

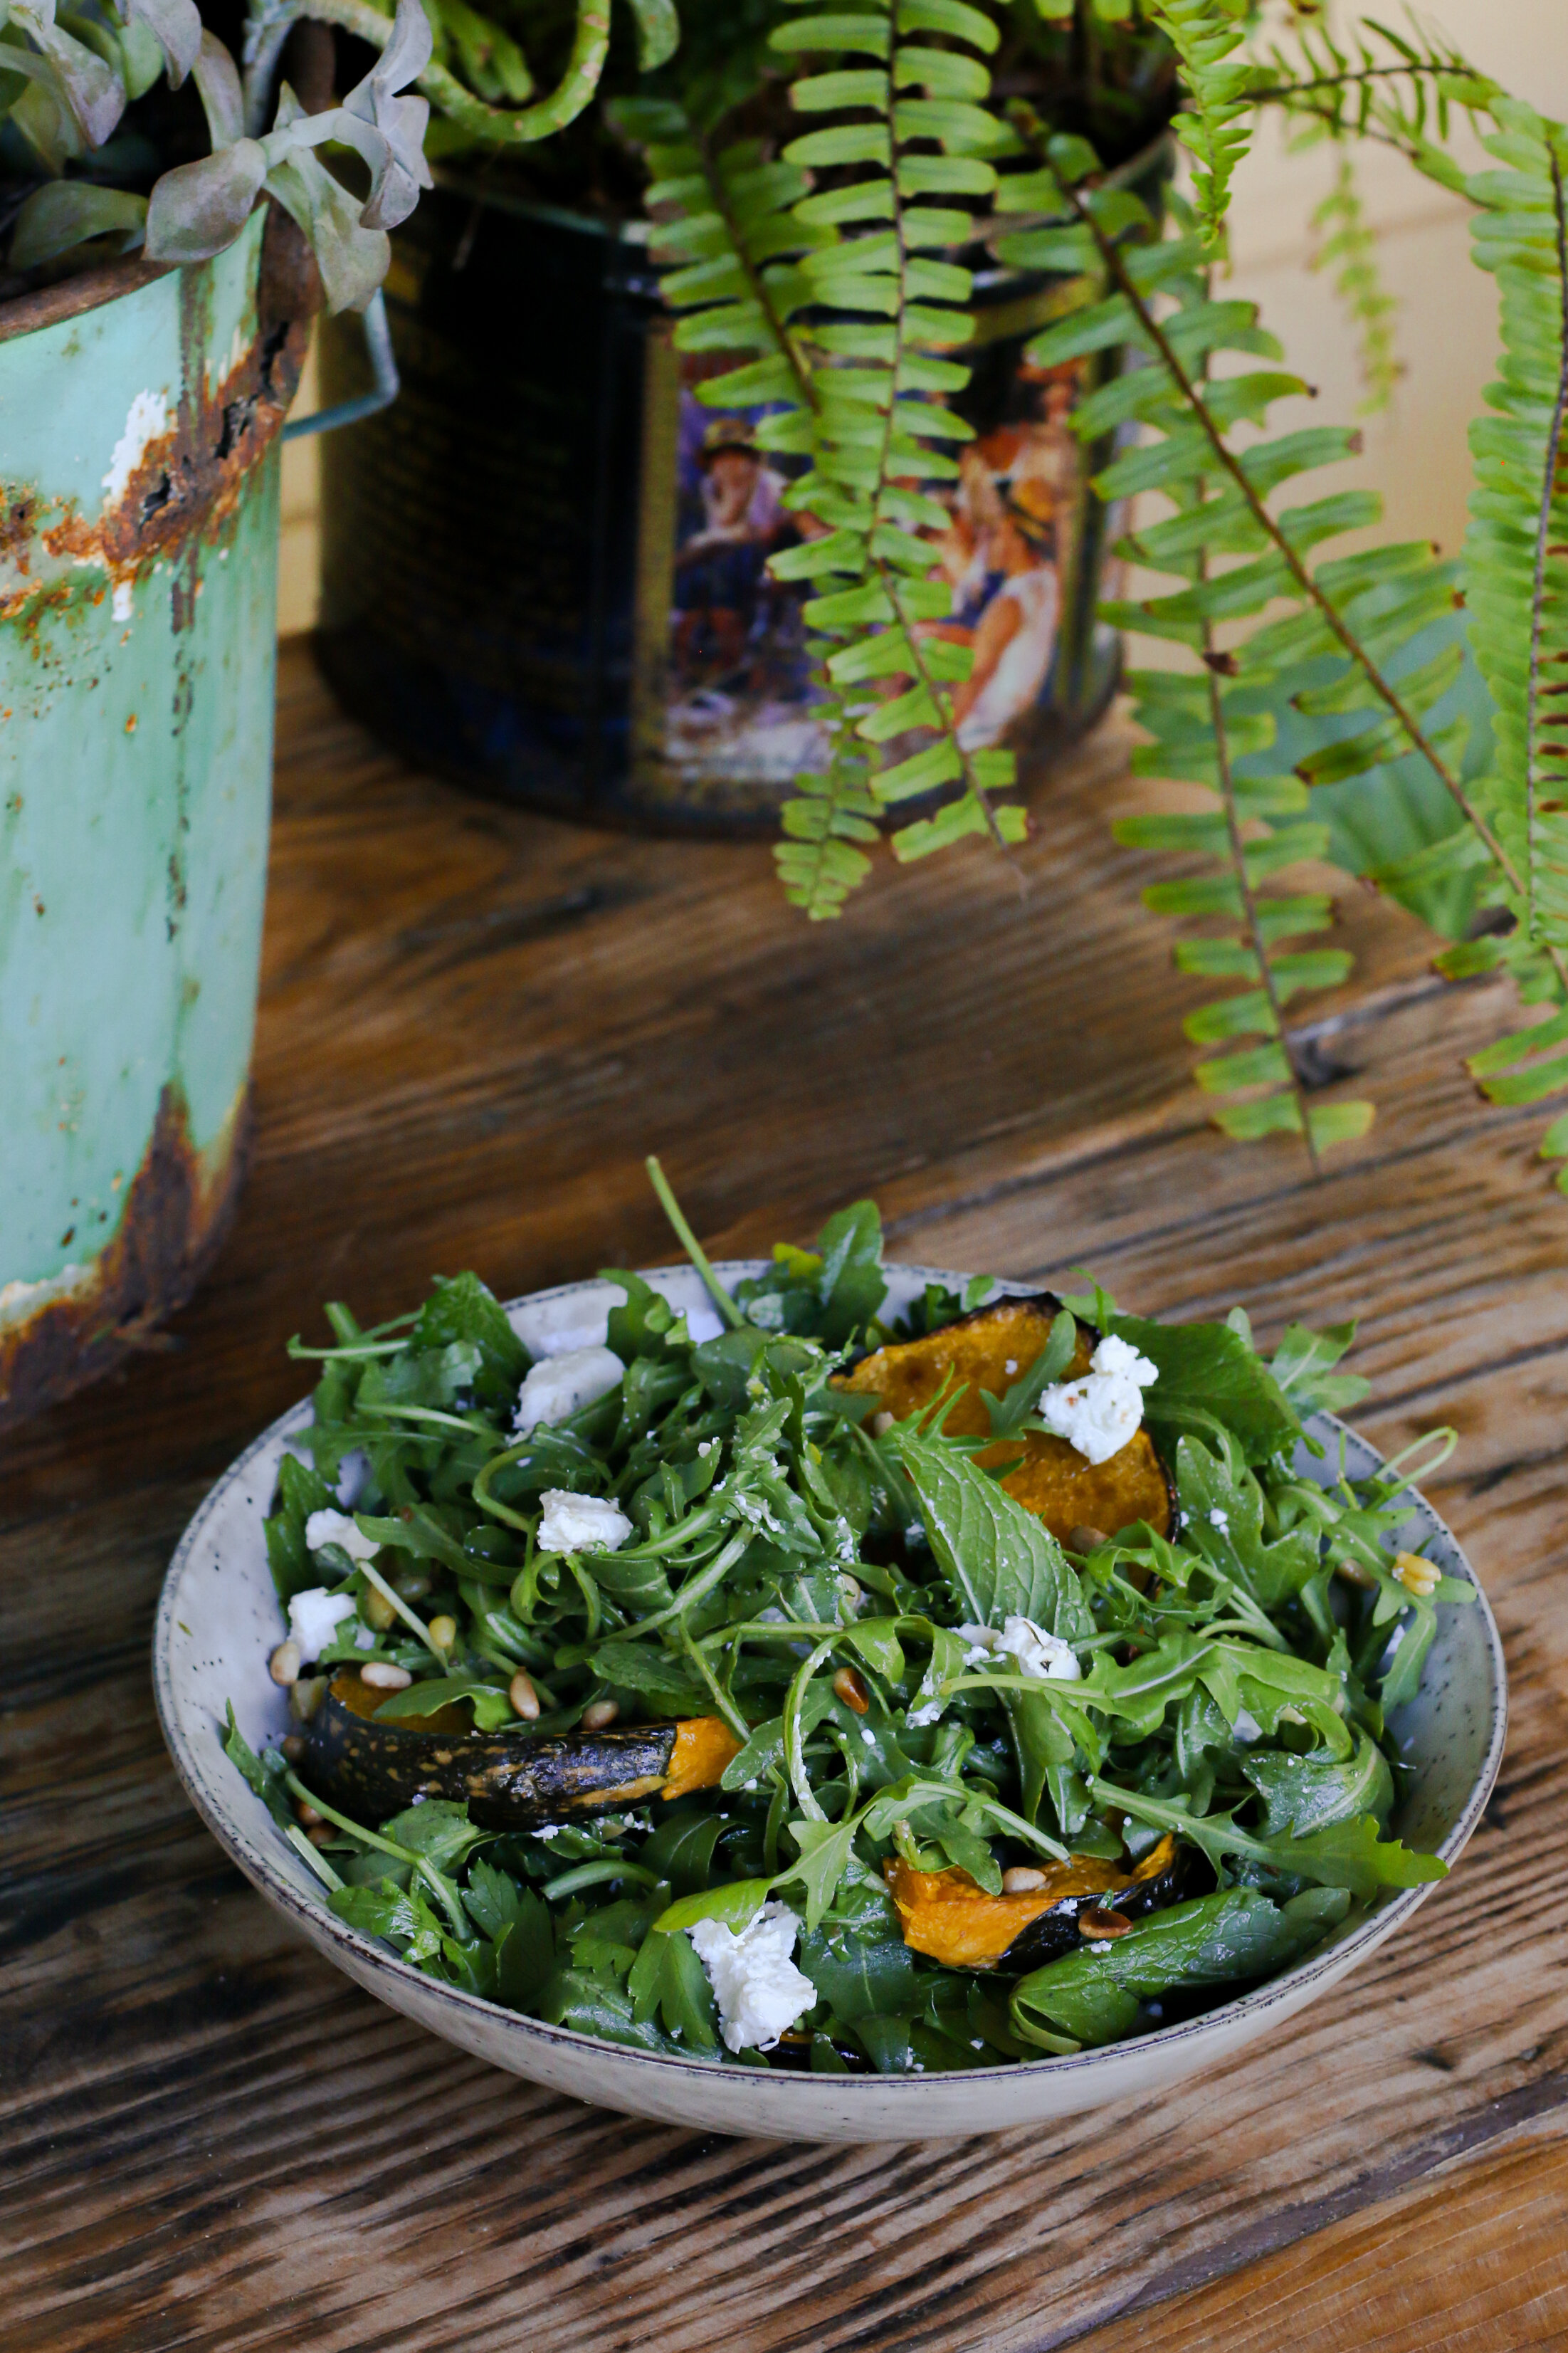
ROASTED PUMPKIN & FARRO SALAD WITH CARAMELIZED SHALLOT DRESSING
There is nothing I enjoy more in a salad than roasted pumpkin. It adds heartiness sans meat, sweetness without going overboard, and a caramelized quality that makes me feel at home. Whether you are craving a heartier, more comforting salad for fall or dreaming of the crisp brightness of spring, this salad meets you exactly where you are at.
DELICIOUS & EARTHY SALAD FULL OF FLAVOR, ALL YEAR ROUND
There is nothing I enjoy more in a salad than roasted pumpkin. It adds heartiness sans meat, sweetness without going overboard, and a caramelized quality that makes me feel at home. This particular salad balances the nuttiness of farro and toasted pine nuts with the crispness of fresh arugula and herbs. Covered in a rich and savory caramelized shallot dressing and topped with everyone’s favorite salty friend, feta, this salad delivers on both flavor and texture. Whether you are craving a heartier, more comforting salad for fall or dreaming of the crisp brightness of spring, this salad meets you exactly where you are at.

Serves 2
Ingredients
for dressing
1 tbsp + 1/2 cup olive oil
3 shallots, very thinly sliced
2 garlic cloves, thinly sliced
juice from 1 lemon
1.5 tbsp red wine vinegar
1 tbsp maple syrup
1 tsp salt
pinch of pepper
for salad
4 cups arugula
2 cups farro, cooked
1/4 japanese pumpkin
1/2 cup pine nuts
1/2 cup feta cheese, crumbled
1/4 cup fresh parsley leaves
1/4 cup fresh mint leaves
flaky sea salt
Recipe
1. Preheat the oven to 200C (400F). Scoop out the seeds and pulp from the pumpkin with a metal soon. Laying the pumpkin flat on one side, cut into 1” wide slices. Place pumpkin slices in a bowl and coat lightly with olive oil and salt. When ready to bake, place pumpkin slices well spaced from one another on a foil-lined baking tray and bake for 30 to 35 minutes or until golden brown and easily pierced with a fork.
2. While the pumpkin is cooking, begin making the dressing. Heat 1 tbsp of olive oil in a medium non-stick pan over medium high heat. Add shallots and thinly sliced garlic, and season with salt and pepper. Cook, stirring occasionally, until the shallots have become totally softened and caramelized with golden-brown fried edges, 15 to 20 minutes.
3. While the shallots are cooking, toast the pine nuts. Heat a small pan on low heat, add the pine nuts, and, shaking occasionally, toast until the pine nuts are lightly golden brown. Remove from heat and set aside to cool.
4. When the shallots are done cooking, add them to the blender along with the lemon juice, red wine vinegar, maple syrup, salt and pepper. Blend until combined, then continue to blend on low while slowly pouring in the olive oil until well emulsified. Season with additional salt and pepper to taste. Set aside.
5. Assemble the salad. In a large bowl, combine arugula, parsley and mint leaves, farro, half of the pine nuts, and half of the feta. Drizzle lightly with the salad dressing and toss until evenly coated with dressing. Taste a few leaves as you go, adding more salad dressing as needed (less is more)!
6. To serve, divide dressed salad into two bowls. Arrange half of the pumpkin on each bowl, and top with remaining feta, pine nuts, and flaky sea salt. Enjoy!


PIN THIS STORY TO READ LATER


WANT TO SHARE SOMETHING OR SOMEONE? HEAD TO OUR SUBMISSIONS PAGE TO SHOW US.


A JUICE A DAY...
We love fresh juices. Whether we are making our own or grabbing one to go at our local Whole Foods, it’s been proven that juicing can really help makes us feel our best. From fighting off a cold to looking for a mental boost to get through the day, we compiled our favorite juice combinations so you can try one every day this week.

FIVE JUICES FOR IMMUNITY BOOSTING, WEIGHT LOSS OR CURING MENTAL FATIGUE
Contributed by estCA staff, Lindsay Vacek
We love fresh juices. Whether we are making our own or grabbing one to go at our local Whole Foods, it’s been proven that juicing can really help makes us feel our best. From fighting off a cold to looking for a mental boost to get through the day, we compiled our favorite juice combinations so you can try one every day this week.


MONDAY: IMMUNE BOOSTER
4 large carrots, scrubbed clean
1-2 cloves of garlic, potency level entirely up to you
1/2 cored and peeled pineapple
1 inch of fresh ginger
TUESDAY: FATIGUE FIGHTER
1 large carrot, scrubbed clean
2 slices of lemon, peel removed
1/2 beet
1 apple (any kind - we like Fuji)
handful of spinach


WEDNESDAY: DE-STRESSER
We recommend you make this one in your blender.. we’ve never tried to juice a banana but imagine it could get a bit messy
1 frozen Banana
5 whole strawberries (tops removed)
1 pear (cored)
THURSDAY: BEAT THE BLOAT
Carrot, Apple, Cabbage


FRIDAY: HANGOVER CURE
Apple, Carrot, Beet, Lemon
PRO TIPS:
Don’t have a juice, don’t worry! You can easily throw these ingredients into a blender and then pour it through a strainer into your glass.
Juices lose their nutrients after a few hours so it’s best to consume your juice right away

DO YOU HAVE A FAVORITE JUICE? TELL US ABOUT IT BELOW!


TEN OF THE TOP COCKTAILS FOR SUMMER
It's June! Which means BBQs, hot summer nights and lots of laughs with friends. And what pairs well with hot summer nights with friends? Nice, lovely, refreshing cocktails! That's why we pulled together ten of the top cocktails for summertime!

It's June! Which means BBQs, hot summer nights and lots of laughs with friends. And what pairs well with hot summer nights with friends? Nice, lovely, refreshing cocktails! That's why we pulled together ten of the top cocktails for summertime!

Grapefruit, Ginger & Lemongrass Sake from The Bojon Gourmet

Whiskey Sprite & Lime from Cooking LSL

Peach, Mango & Pineapple White Sangria from Averie Cooks

The Simple Pineapple Mule from Something Turquoise

Lavender Mint Julep from Pizzazzerie
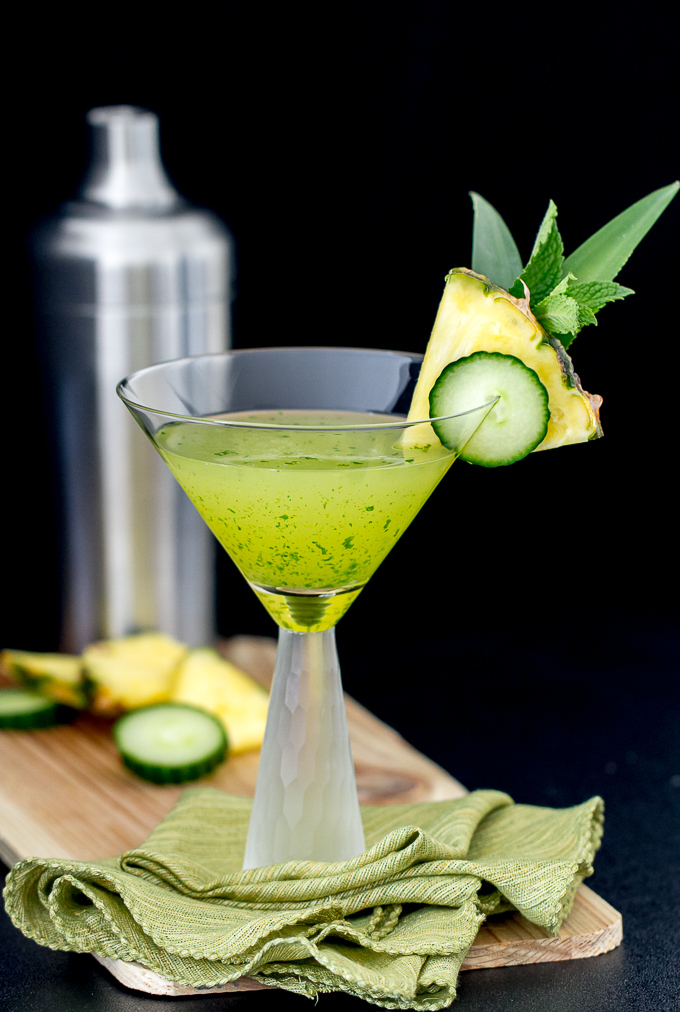
Cucumber Pineapple Mint Martini from I'm Bored, Let's Go

Chili Mango Margarita from Minimalist Baker

Spicy Old Bay Bloody Mary with Rosemary Infused Vodka from With Food and Love

Dragoons Punch from Barbells and Bellinis

Ginger Mojitos from Chow
What's your favorite summer cocktail? Let us know in the comments or share with us using #estcalifornia on your social channels!
Contributed by estCA staff, Lindsay Vacek

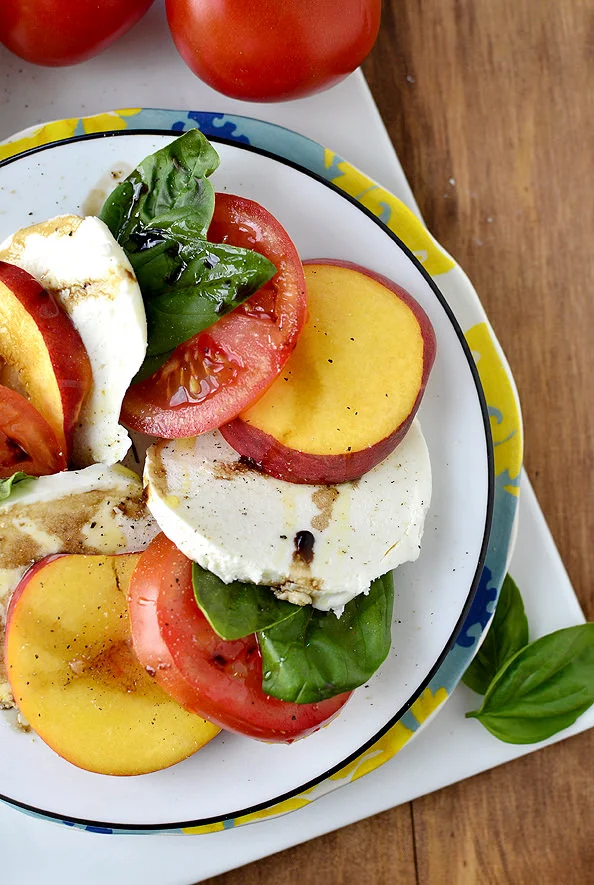
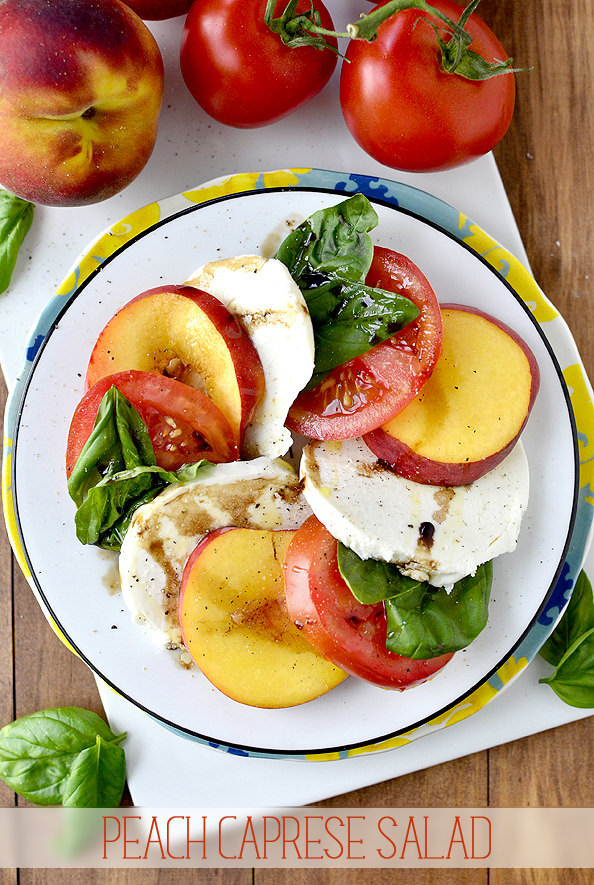
Peach Caprese Salad
I’ve got a good-as-it-is-easy “non-recipe” type recipe for you (whew – got that?!) on this hot and sizzling summer day: Peach Caprese Salad. This salad is next-level, people!
I’ve got a good-as-it-is-easy “non-recipe” type recipe for you (whew – got that?!) on this hot and sizzling summer day: Peach Caprese Salad. This salad is next-level, people!
Everyone keeps asking me if I’m hot being this pregnant in the summertime, to which I answer, a.) Yes. Fan me. and b.) but at least the weather isn’t like it was last year when we hit a record number of consecutive days over 100 degrees. Now those ladies were the real warriors!
Regardless, I think we’ve officially hit the dog days of summer, and while it’s extra sweaty with this bowling ball strapped to my torso, I still love it. I’ll take hot over cold any day of the year. I’m still no fan of heating up the kitchen when I don’t have to though, which is just one of the many reasons why I”m head over heels in love with this no-cook recipe that’s ready in 15 minutes. Peach Caprese Salad is so, so, so good!

Fresh mozzarella cheese is layered with juicy yellow peach slices, thick-cut tomatoes, and lots of fresh basil leaves then drizzled with good extra virgin olive oil and balsamic vinegar, and sprinkled with salt and pepper. This is the ultimate summer meal. Light and refreshing. And that unexpected hit of sweet from the peach is unbelievable with the salty, savory flavors in the classic caprese salad. Promise me you’ll try this!

Start by raiding your farmers’ market, garden, or grocery store for the best ripe peaches and tomatoes, and fresh-plucked basil leaves you can find, then pick up a fresh mozzarella cheese ball. This salad is best using tomatoes and peaches that are on the verge of use or lose. Super juicy, sweet, and ripe, ripe, ripe.
If your peaches are still a little hard when you buy them place them in a paper bag, roll down the top, then let ’em veg in the dark for a day or so.

Slice said ripe tomatoes and peaches into thick slices, then do the same with the mozzarella cheese. I like to pop my mozzarella into the freezer for 10-15 minutes to make it easier to slice.

Layer the tomato, peach, and cheese slices with a couple slices of basil, then drizzle with the best extra virgin olive oil and balsamic vinegar you have. I used the strawberry balsamic vinegar I got in Chicago a few months ago, which was incredible. Reduced balsamic vinegar would be fantastic too – I hear Trader Joe’s makes a pretty good version if you don’t want to make your own. Finish with a heavy dash of both salt and pepper, then enjoy!

Peach Caprese Salad
serves 2
Ingredients
6oz fresh mozzarella cheese, sliced
1 ripe yellow peach, sliced thick
1 vine-ripened tomato, sliced thick
12 leaves fresh basil
good extra virgin olive oil
good balsamic vinegar (or reduced balsamic vinegar)
salt & pepper
Directions
Layer mozzarella cheese slices with peaches, tomatoes, and basil. Drizzle with extra virgin olive oil and balsamic vinegar then sprinkle with salt and pepper.

Sweet, creamy, tangy, and fresh. This plate is ALL the best things about summer. Make and enjoy this sweet & savory salad often!

This post originally appeared on Iowa Girl Eats. You can see the original post here.
HAVE A RECIPE YOU WANT TO SHARE? SUBMIT YOUR BLOG POST HERE. DID YOU MAKE THIS RECIPE? LET US KNOW HOW IT TASTED IN THE COMMENTS BELOW!

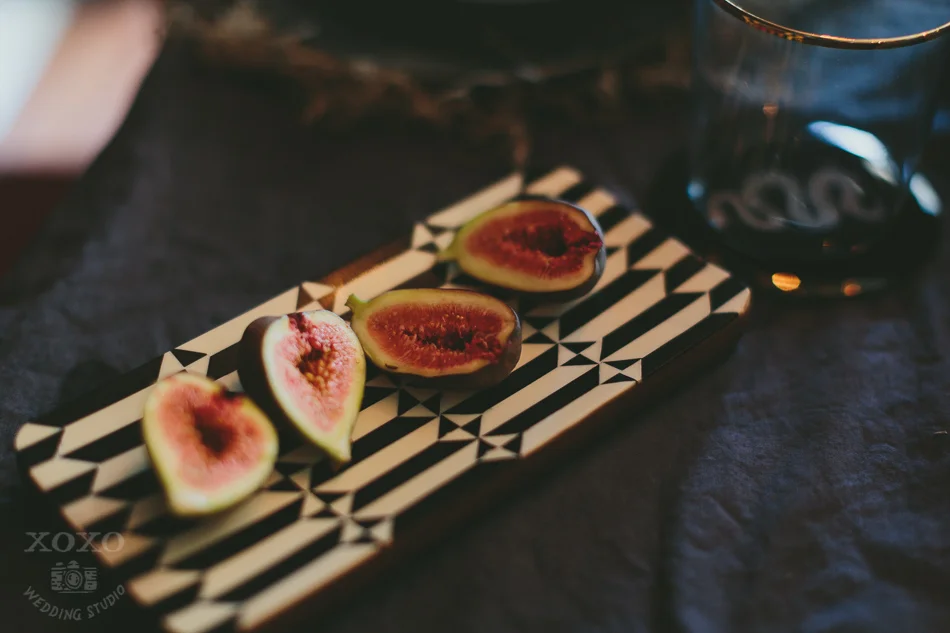
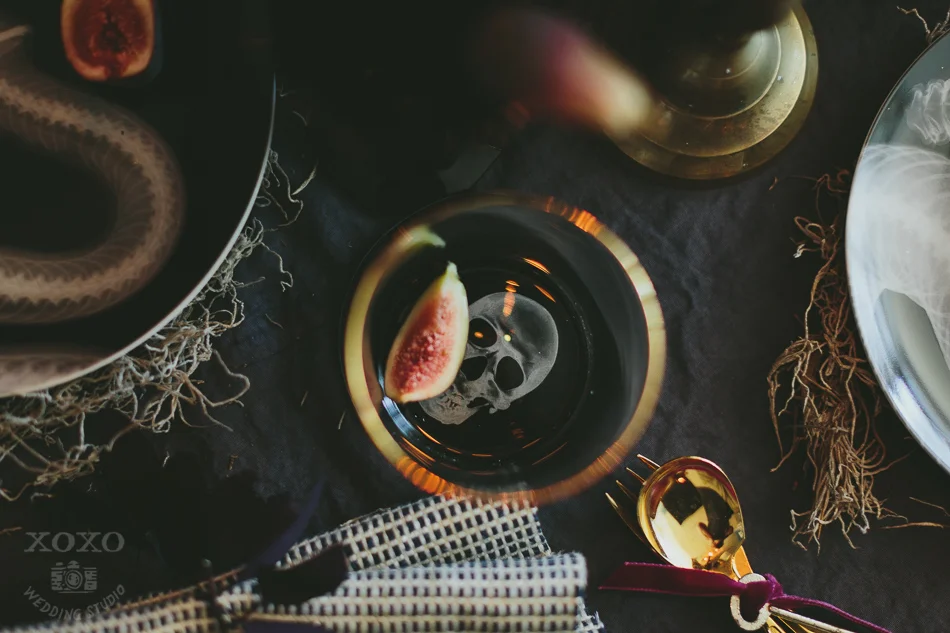
FIG-Ment of the Imagination
A FIG-Ment of the Imagination - A dish to tantalize your tastebuds full of mascarpone, honey, fig and sugar, This food recipes from Cara at @cara_melized is perfect for any Halloween Party.

It’s that perfect time of year, when the last few months of 2015 are underway, fall is in full swing and the line-up of monthly events brings friends & family to your door. Which brings us a fabulous excuse to throw a fabulous Halloween Dinner Party! Here is the perfect side dish when you host a most sumptuous meal for a warm & spooky night with close friends.
FIG-Ment of the Imagination - Makes 4 servings
1 cup mascarpone
1 tablespoon honey, plus extra to drizzle
8 figs, butterflied
1 teaspoon granulated sugar
1. Preheat oven to 350 degrees. Line a baking sheet with parchment paper for easy clean-up. Place butterflied figs on baking sheet and sprinkle with sugar. Bake for 8-10 minutes until sugar crystallizes.
2. Meanwhile, in a small glass bowl, whisk mascarpone with honey until consistently is light and whipped. Spoon approximately 1/4 cup onto a plate, smoothing the top of the mascarpone with the back of your spoon to create a small nest for figs. Repeat for remaining dessert plates.
3. Top each mound of mascarpone with figs. Drizzle with extra honey, if desired.
Styling Conni @artinthefind
Food Recipes Cara @cara_melized
Photography Kevin @xoxoweddingstudio
Floral arrangements Jill @layeredvintage

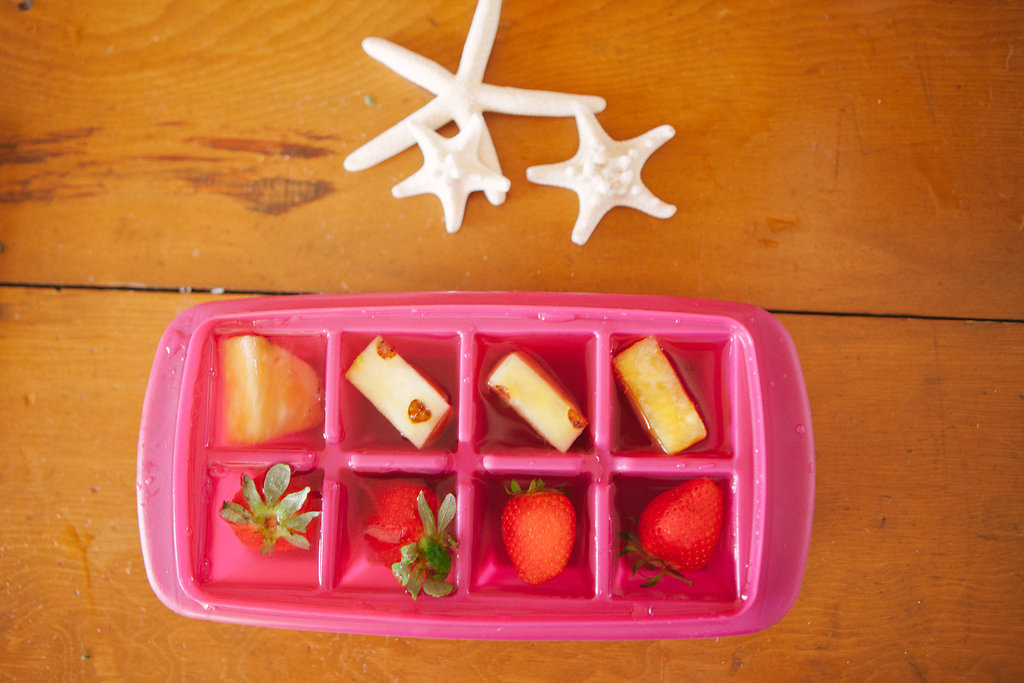
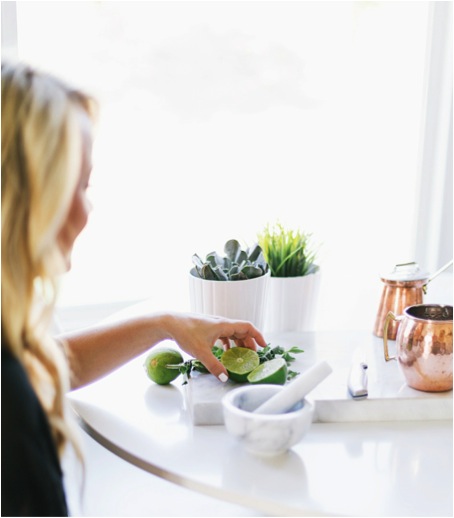
Fruit Infused Ice Cubes for the Summer
I'm always trying to think of ways to dress up drinks, especially when you’re having summer parties! These summer fruit infused ice cubes are the perfect addition to any cocktail, mocktail, or just plain old water.
Photography by Ashley Williams
Happy Summer!!
My favorite time of year! During summer, I am definitely in the mood for entertaining, long beach days, bright fun colors, and refreshing beverages (wellI'll take one of those all year round, just saying..)
I'm always trying to think of ways to dress up drinks, especially when you’re having summer parties! These summer fruit infused ice cubes are the perfect addition to any cocktail, mocktail, or just plain old water. I made a huge batch of these and have been popping them in my La Croix sparkling grapefruit water. Best summer drink ever! If you're having a party or happy hour, pour a shot or 2 of vodka and you got your self the most refreshing, summery cocktail! Love it!

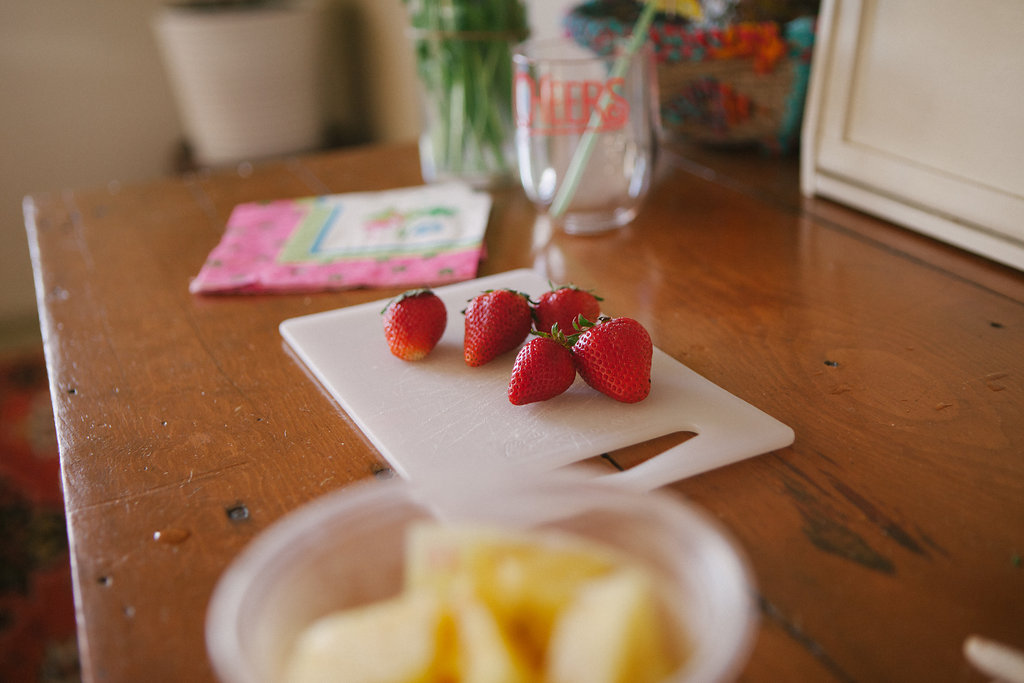
These adorable ice cubes are so simple to make. Hardly no prep time, you just have to wait for the water to freeze and there ya have it! Pick a couple of your favorite summer fruits. I am a huge fan of pineapple and strawberries, so that's what I chose, but any fruit would be great! (watermelon, berries, kiwi, etc)

♥ Fill an ice cube tray with a piece or 2 of fruit. (I love this chunky ice cube tray because it makes large square ice, and I really only pop 1 or 2 into a drink and you're good to go)

♥ Fill with water
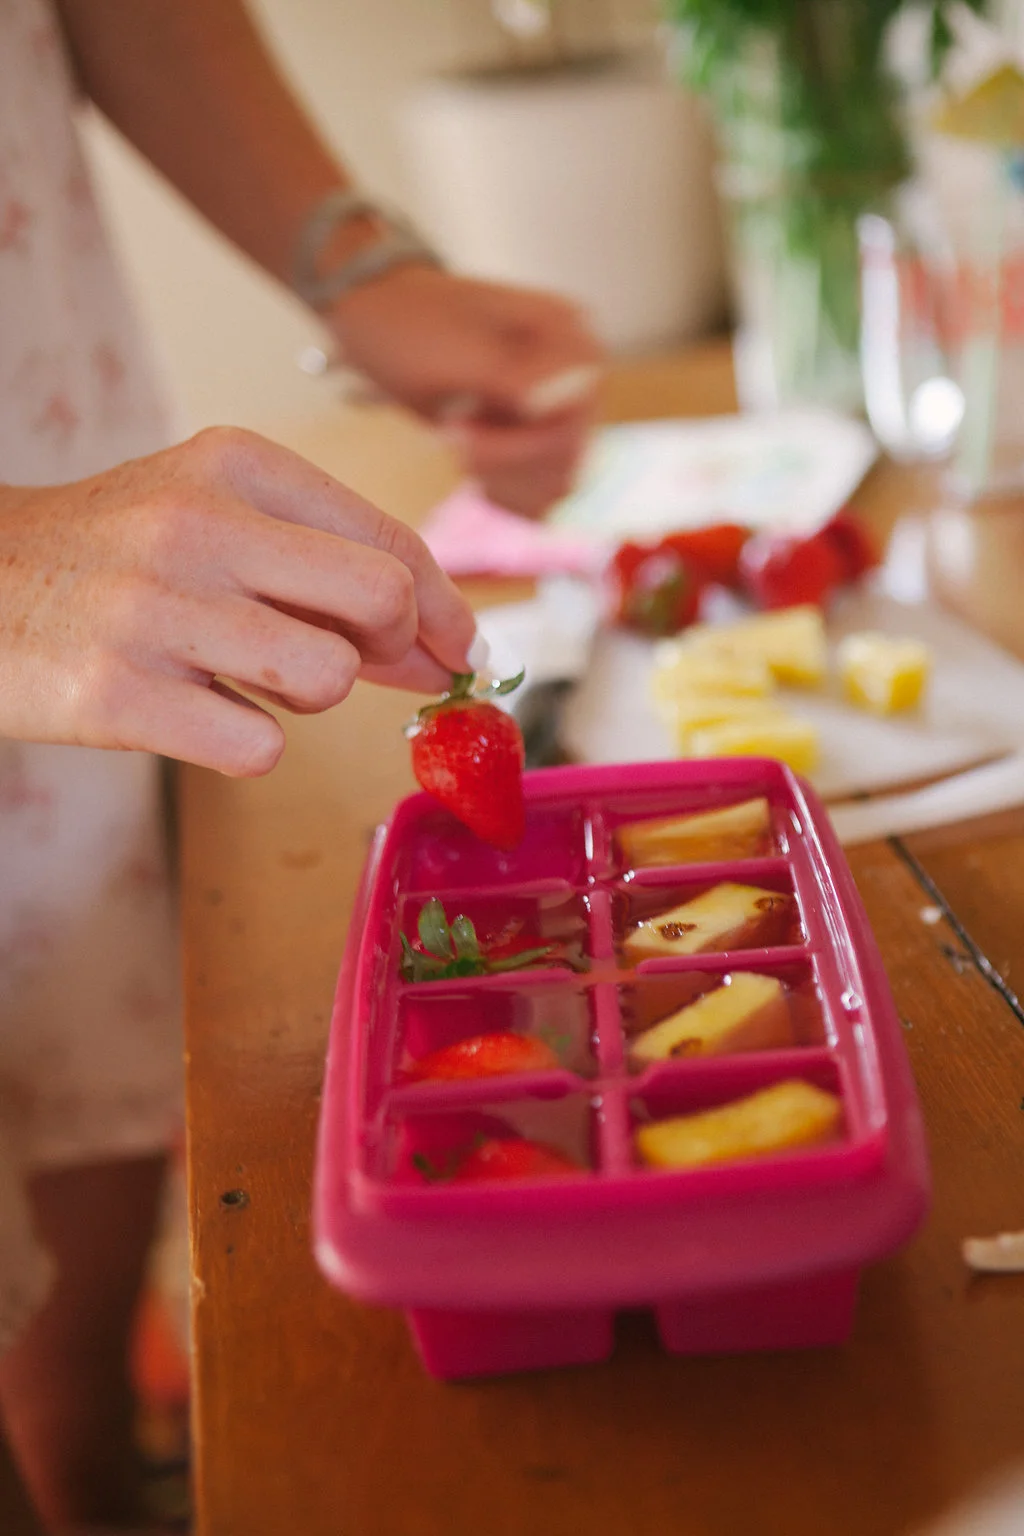
♥ Pop into the freezer over night

♥ Serve in your fav summer drink!


What are some of your favorite things to do/make in the summer??
XO Melissa ♥

ABOUT THE AUTHOR

Melissa Heyde is the creator behind the beach inspired lifestyle blog, Mermaid Memos! She's a total beach girl, with a love and passion for health, travel, beauty and overall wellness. She grew up in beautiful San Diego, lived in Hawaii for a couple years and have always been drawn to the beach lifestyle. She believes that life is a balancing act so staying positive and grateful are her key motives for being the best version of herself, each and every day!

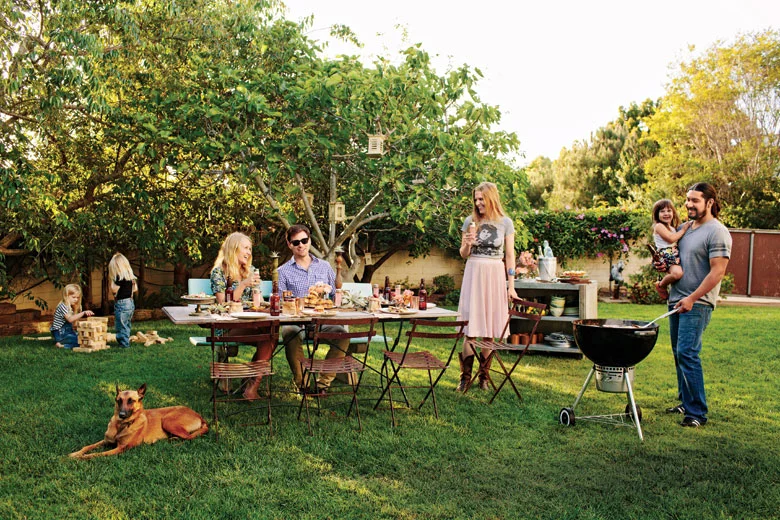
Ten Great Side Dishes For Any BBQ!
Summer is here and with that comes backyard BBQs with family and friends! BBQ's are definitely one of my favorite summer activities and whether you are hosting or attending, it's always great to have a handful of side dishes to satisfy guests. That's why we've pulled together 10 of our favorite BBQ side dishes from one of our favorite sites and magazine: Real Simple.

Summer is here and with that comes backyard BBQs with family and friends! BBQ's are definitely one of my favorite summer activities and whether you are hosting or attending, it's always great to have a handful of side dishes to satisfy guests. That's why we've pulled together 10 of our favorite BBQ side dishes from one of our favorite sites and magazine: Real Simple.
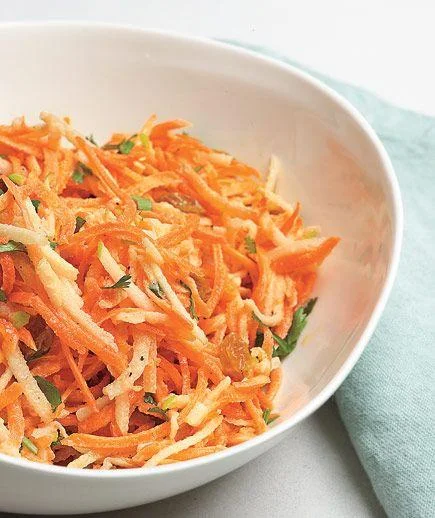
Photo: Jose Picayo
Carrot and Apple Slaw With Raisins
This tangy slaw will help cut through rich, fatty meats and sweet barbecue sauce.
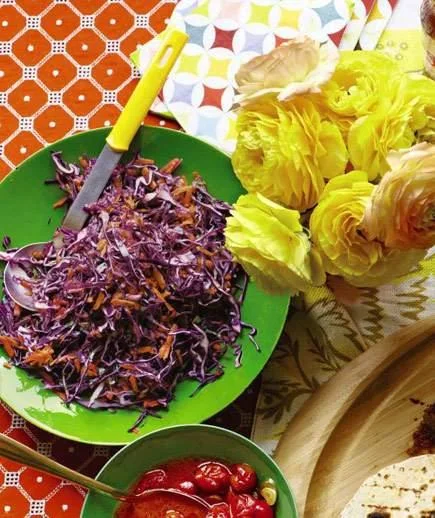
Photo by Con Poulos
Tangy Red Cabbage Slaw
You can prep this slaw (without the cilantro) up to a day in advance.
Get the recipe.

Photo by Con Poulus
Creamy Potato Salad With Bacon
Fresh herbs brighten up the flavor, while white wine vinegar adds a tang that balances out the rich mayonnaise and sour cream.
Get the recipe.
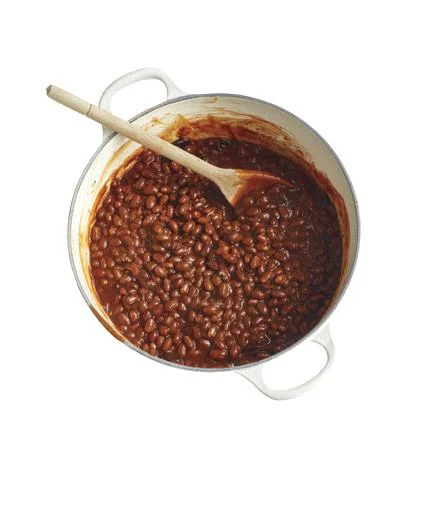
Photo by Christopher Baker
Baked Beans
Traditional baked beans in a ketchup-and-molasses sauce are a classic barbecue accompaniment.
Get the recipe.
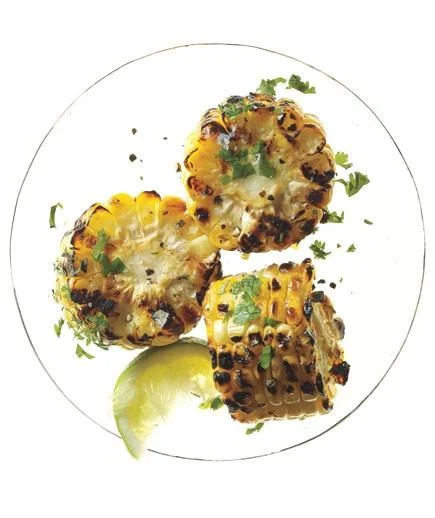
Photo by Sang An
Mexican Grilled Corn With Cilantro
Spruce up grilled corn-on-the-cob with fresh lime juice and cilantro.
Get the recipe.
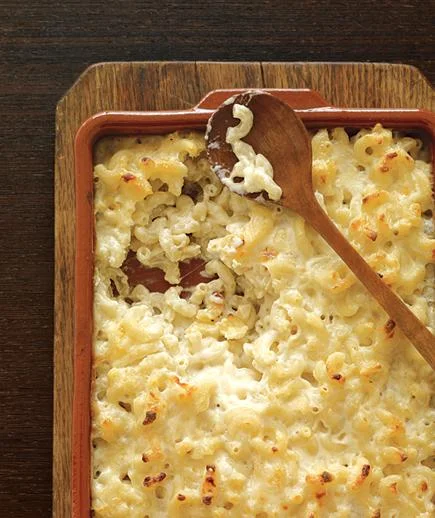
Photo by Sang An
Macaroni and Cheese
Use a mixture of Gruyère and Cheddar cheeses for more complex flavors.
Get the recipe.
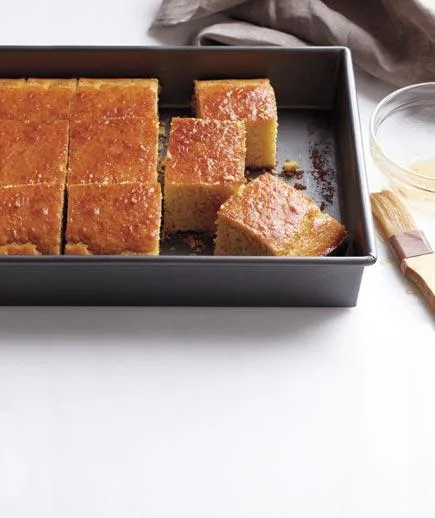
Photo by Con Poulos
Maple Corn Bread
Moist, fluffy corn bread gets its sweetness from pure maple syrup.
Get the recipe.
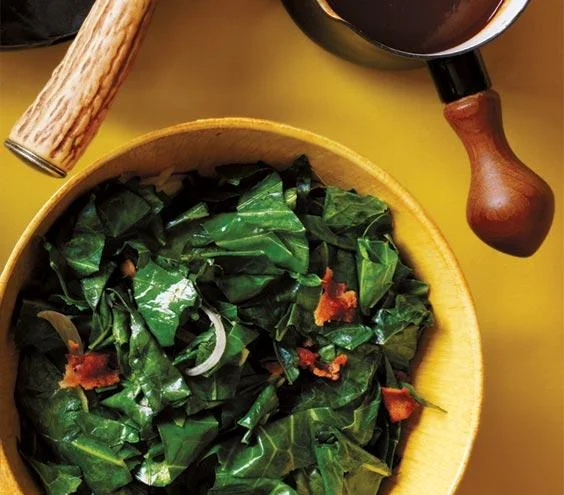
Photo by Jonny Valiant
Collard Greens With Bacon
Cook the sliced shallots and greens in the bacon drippings to infuse the dish with savory richness.
Get the recipe.
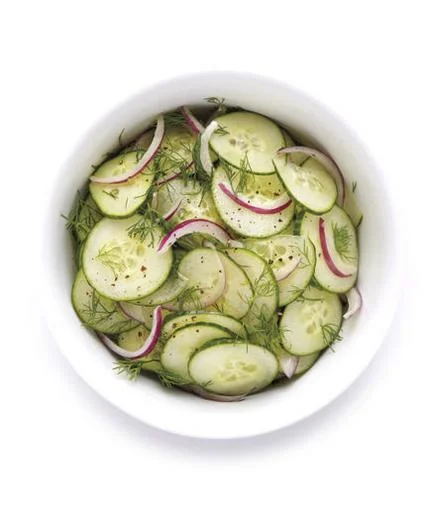
Photo by Raymond Hon
Tangy Cucumber-Dill Salad
This simple no-cook salad—with tangy red wine vinegar and red onions—make a great partner for rich, smoked meats.
Get the recipe.
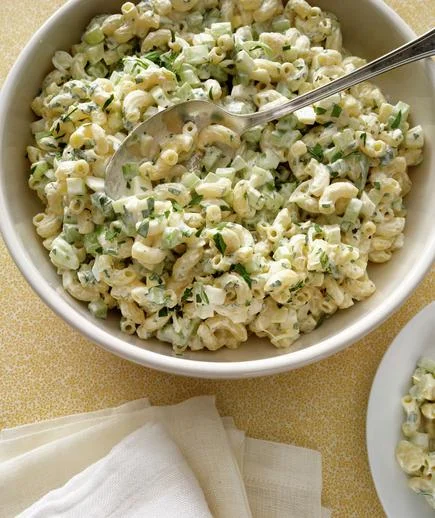
Photo by Charles Masters
Macaroni Salad
Chopped celery gives this salad a refreshing crunch.
Get the recipe.
WHAT'S ONE OF YOUR FAVORITE BBQ SIDE DISHES? SHARE WITH US BELOW OR BY USING #ESTCALIFORNIA ON YOUR SOCIAL CHANNELS!


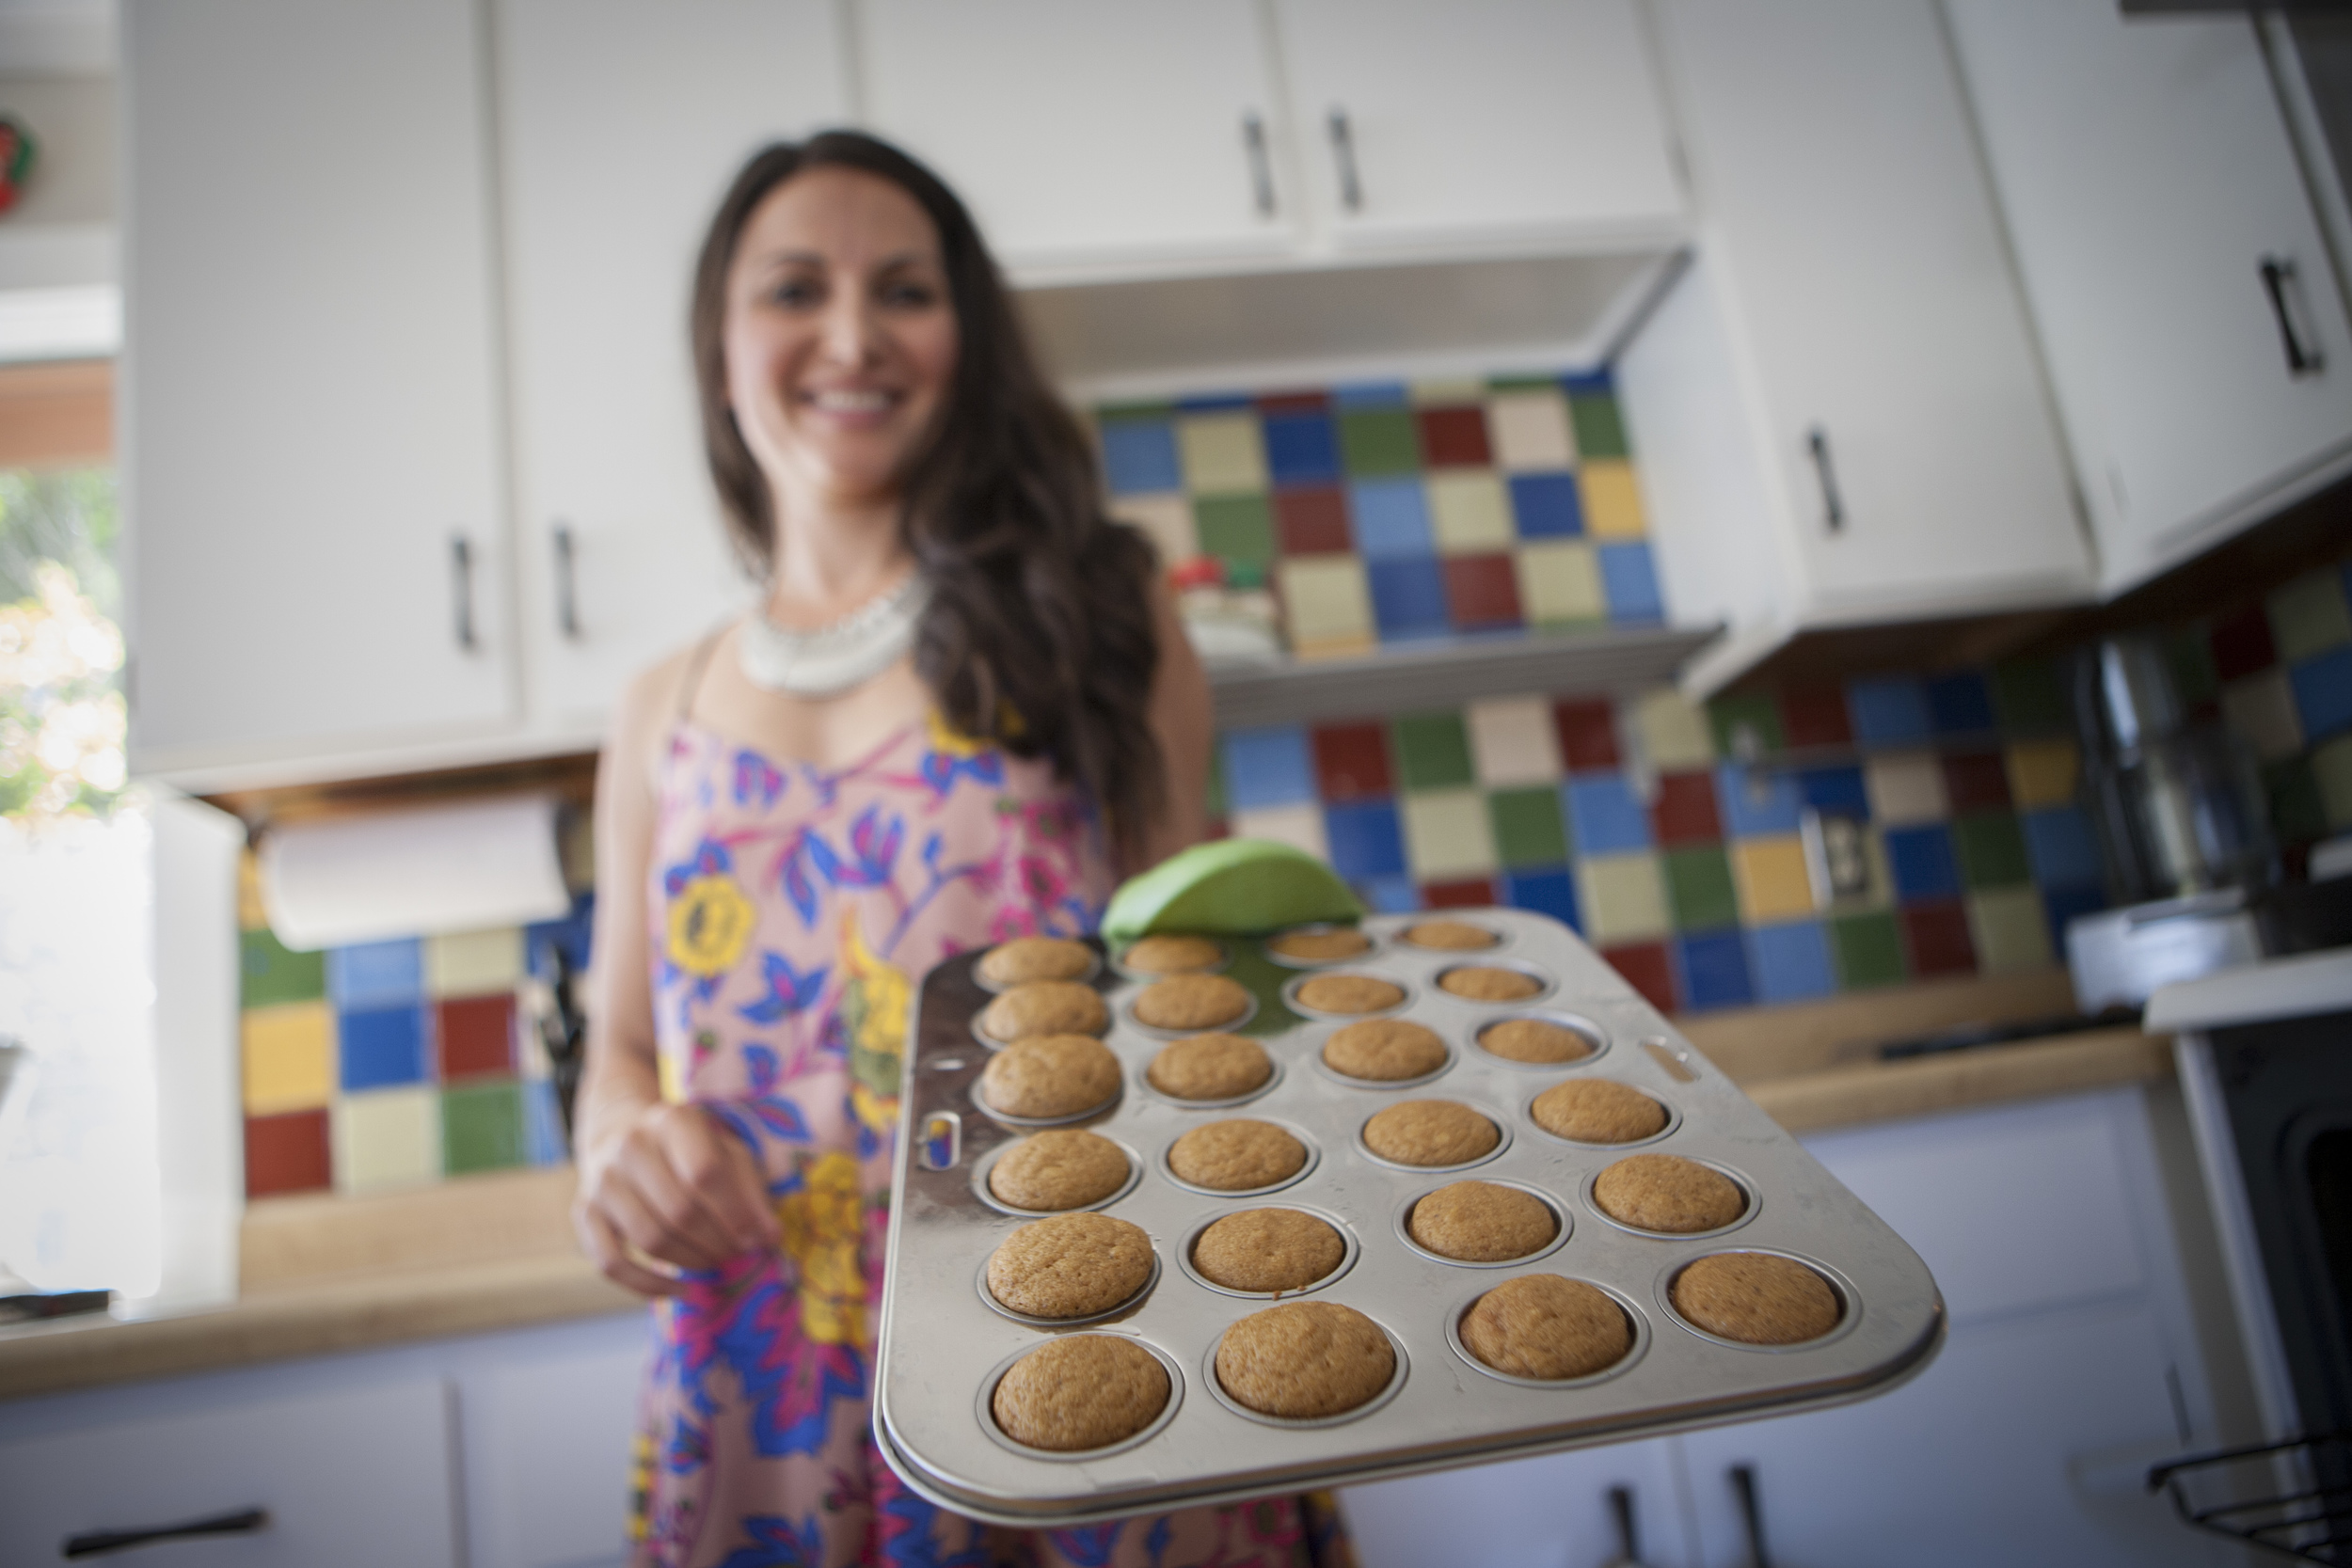
Easter Baking: Coconut Flour Carrot Cupcakes
I love Easter! It’s such a colorful, happy holiday usually filled with brunch on the beach, family, and too many grapefruit mimosas! I tested these out a few weeks ago and Oh Ma Gah, they were so good!! Not too sweet, the perfect amount of carrot(ness) and were the ultimate Easter desert!

I cannot believe that this Sunday is Easter!! Where does the time go??
I love Easter! It’s such a colorful, happy holiday usually filled with brunch on the beach, family, and too many grapefruit mimosas!
I try to bake a special treat every year and this year I had my heart set on Carrot Cupcakes! I used coconut flour instead of regular flour, so they are gluten free (plus I have an obsession with coconut). Usually if a recipe has any more than 5 ingredients, I’M OUT, but since it’s a festive holiday I splurged a little bit.
I tested these out a few weeks ago and Oh Ma Gah, they were so good!! Not too sweet, the perfect amount of carrot(ness) and were the ultimate Easter desert!
I swapped out sugar and used apple sauce and raw honey instead. Every item I used was a whole food, meaning nothing was fat free, low fat, zero sugar, or have any crazy ingredients that I can’t pronounce. I always try and use real foods that my body can recognize and break down, instead storing as fat.
In fact, these cupcakes are pretty healthy, I mean there are carrots in them right?
Don’t let this ingredient list scare you off → you will probably have 80% of the items already in your cupboard
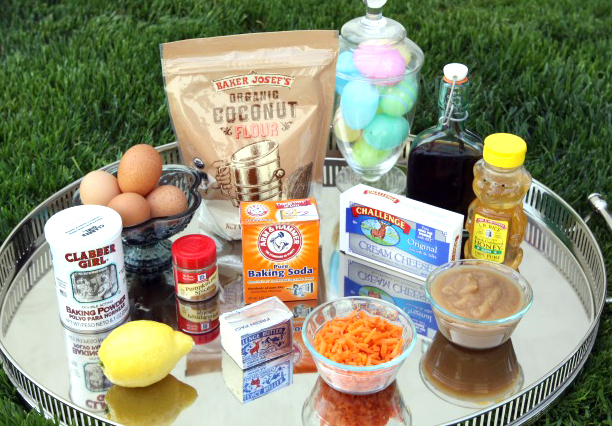
♥ 1/2 cup Coconut Flour
♥ 5 eggs
♥ 1/3 cup grass-fed butter or coconut oil (I like to use butter when I’m baking - just make sure it’s room temp)
♥ 1 teaspoon vanilla
♥ 1 tablespoon pumpkin pie spice
♥ 1 cup apple sauce (buy the real organic stuff)
♥ 1 teaspoon baking powder
♥ 1 teaspoon baking soda
♥ about a cup of shredded carrot (they sell it already shredded at the store, so to make your life easier buy it like this)
♥ optional: add raisins, walnuts, or whatever else your little heart desires
Frosting:
- 1 8oz package full fat cream cheese (You are having one cupcake, it’s not going to kill you, full fat is MUCH better for you than reduced fat, remember WHOLE foods)
- 3 tablespoons honey or agave nectar-
- half of a squeezed lemon
- 1/4 cup powdered sugar (ok there is a little sugar but it’s honestly the smallest amount just to fluff the frosting up, you could even use less)
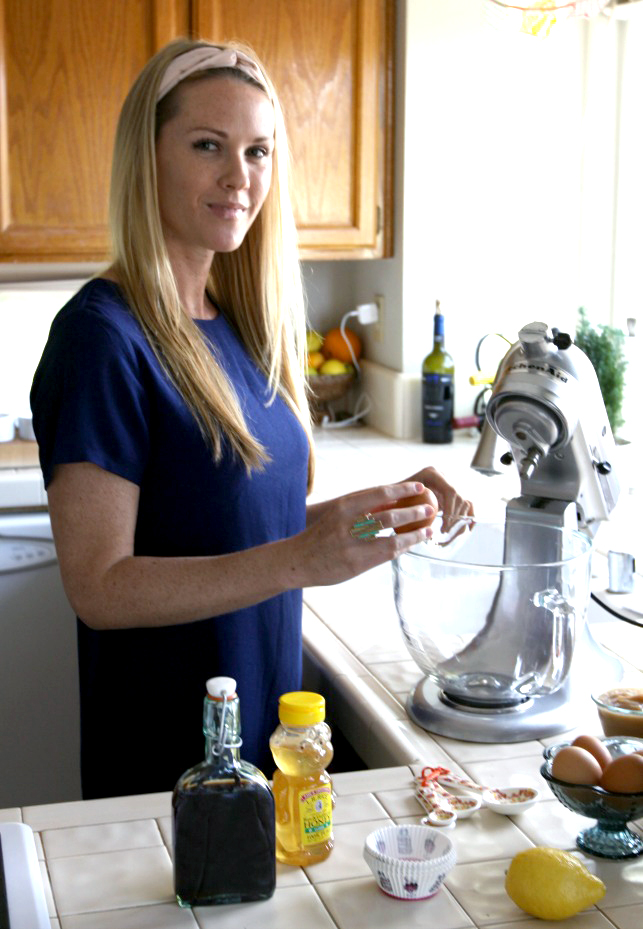
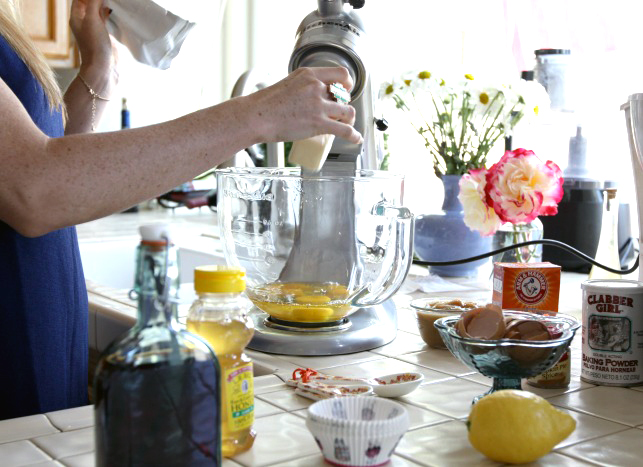
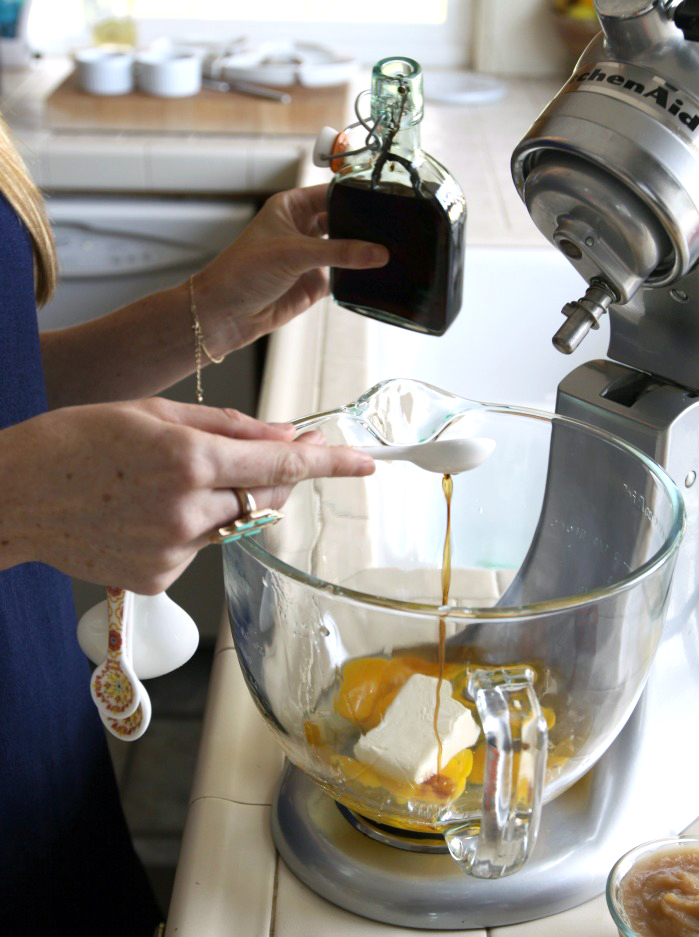
Now…
Pour yourself a glass of champagne, have a friend over and the process of making these will be so much more fun. Trust me, if I can do it, you can probably do it 100 times better. (One time I made brownies that turned out looking like a slab of steak, the whole measurement thing scares me!!!)
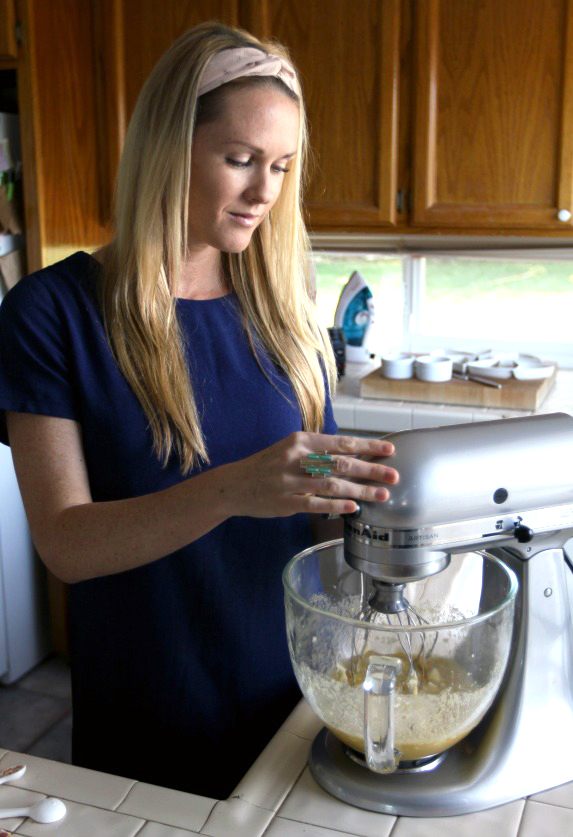
- In a large bowl or Kitchen Aid mix eggs, butter, vanilla, honey and applesauce till completely combined
- Next add baking soda, baking powder, pumpkin pie spice, and coconut flour into the wet ingredients. Mix until blended
- Add the grated carrots or nuts or whatever else
- Pour your delicious batter into 12 cupcake tins and bake at 350 for 20 minutes or until a toothpick inserted into the cupcake comes out clean
For the Frosting:
With a hand mixer or Kitchen Aid, add cream cheese, honey, lemon, and powdered sugar and blend until smooth and fluffy
Apply to cooled carrot cupcakes
I have made these twice and literally eat half the batter and frosting before they are even ready. (what is my problem?)
Since my favorite flowers are daisies and it’s Spring time, I cut the stems off a few daisies and put them right in the center of the cupcake. You can add decorative sprinkles, jelly beans, Peeps, anything to add a little extra love!

Happy baking bunnies!
XO Melissa ♥

ABOUT THE AUTHOR

Melissa Heyde is the creator behind the beach inspired lifestyle blog, Mermaid Memos! She's a total beach girl, with a love and passion for health, travel, beauty and overall wellness. She grew up in beautiful San Diego, lived in Hawaii for a couple years and have always been drawn to the beach lifestyle. She believes that life is a balancing act so staying positive and grateful are her key motives for being the best version of herself, each and every day!


SIMPLE NO-BAKE 3 INGREDIENT PEANUT BUTTER CUPS
The snack monster strikes again! It always happens right after I eat dinner. I'm at home, indulging in some trashy TV (a la T.G.I.T) and the sweet tooth gremlin starts knocking at my door. But with treats like these ones... maybe I don't mind so much....

The Snack Monster strikes again! It always happens right after I eat dinner. I'm at home, indulging in some trashy TV (a la T.G.I.T) and the sweet tooth gremlin starts knocking at my door.
"What do you what?" I say, annoyed as I open the door.
"I'm hungry." the pesky Snack Monster replies. I raise an eyebrow to him. What makes him think that I want to be interrupted from my Thursday night TV line-up? "I know you don't like me, but I have the perfect and EASY snack you can make me!" I'm intrigued.
I slowly peel myself off the couch and head to the kitchen. The snack monster following behind me, whispering in my ear to open the cabinet and grab just 3 items from the cupboard. "Only three items?" I think.
He was right. I had to share with you all. Maybe I won't be so bitter the next time the Snack Monster knocks on my door.. especially if he brings me ideas like these.

Makes 12 mini peanut butter cups, 80 calories each.
What you'll need:
4 tbsp PB2 Powdered Peanut Butter
4 tbsp Shredded Coconut
For a protein boost, add 2-3 tbsp of Vanilla Whey Protein Isolate (optional)
Instructions:
Place PB2 into a bowl and mix with 8 tbsp water to make a nice, creamy peanut butter.
Mix in coconut shreds and put aside.
Create a double boiler on your stove top and melt down the chocolate chips (be sure not to allow any water to mix with the chocolate or your chocolate will curdle)
In a 12-Cup Mini Muffin Pan, spoon some of the peanut butter mixture into the bottom of the tins. Top with the chocolate.
Place into freezer for 1-2 hour. Use a knife to pop out of the muffin tin once frozen. Freeze to store and will best if eaten within 1 week (I find that if you let them defrost for 5 minutes, before eating, they are perfect!)


ABOUT THE AUTHOR

Lindsay Vacek has a passion for style, details and design. As a Fashion Editorial Photographer, she's worked in the Entertainment Industry for over 10 years and has a love for adventure and travel. She spends her spare time globe-trotting her way through foreign countries and loves new cultures, food, music and the arts.

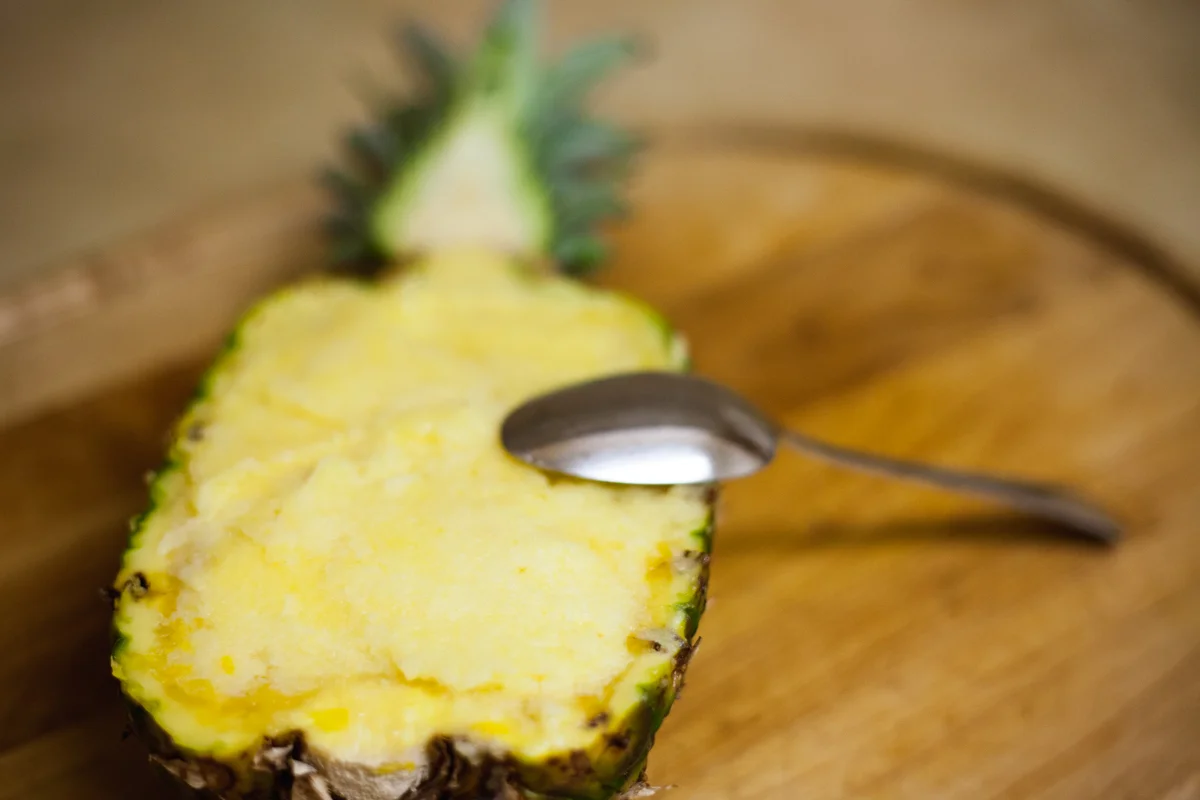
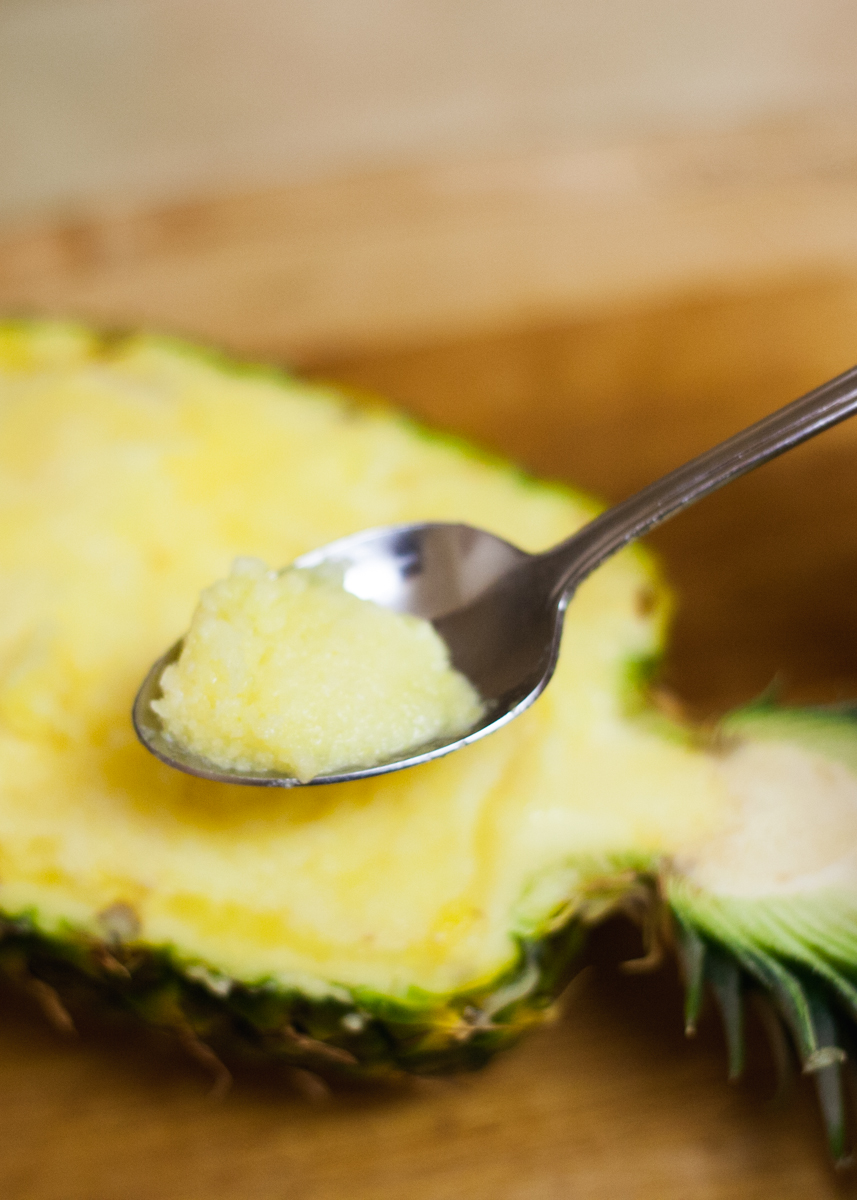
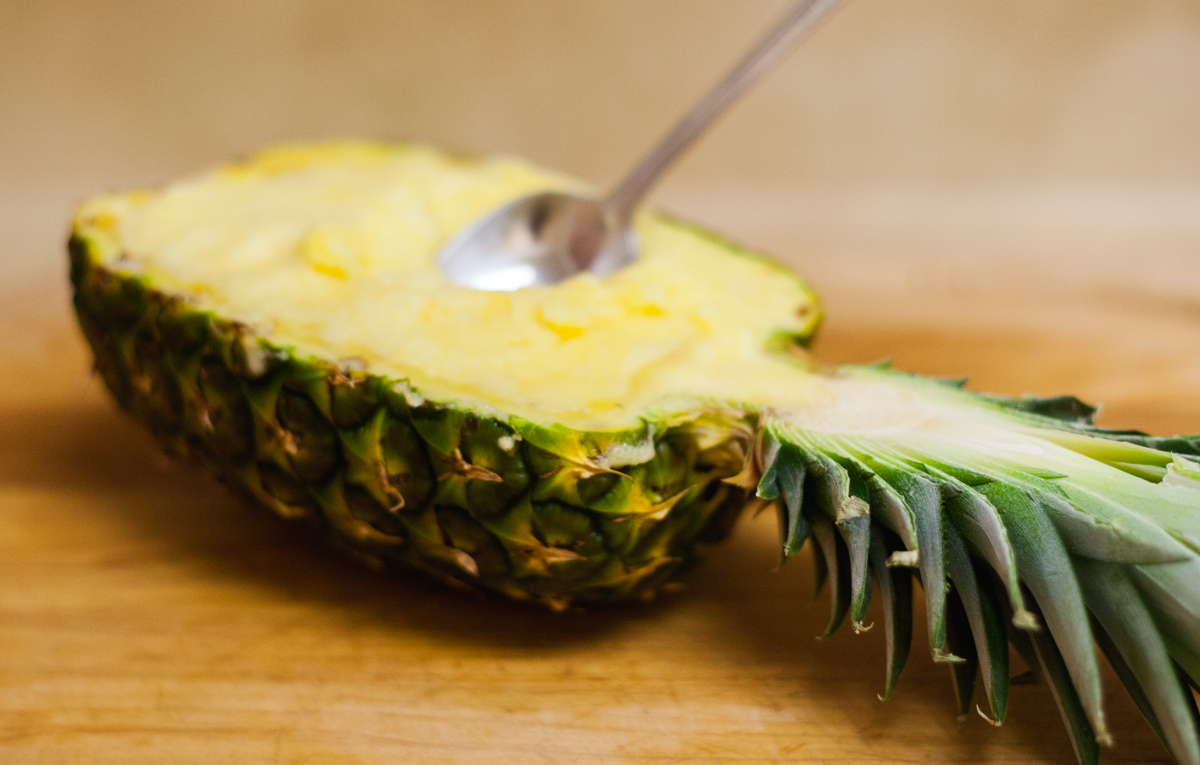
PINEAPPLE SORBET
I know i shouldn't complain but it's been really hot in Los Angeles the last few days! It makes me so ready for the Summer. The sun stays out much longer, it's perfectly acceptable to wear flip-flops all day and people don't judge you if you eat FroYo for dinner.

I know i shouldn't complain but it's been really hot in Los Angeles the last few days! It makes me so ready for the Summer. The sun stays out much longer, it's perfectly acceptable to wear flip-flops all day and people don't judge you if you eat FroYo for dinner.
I get a mean sweet tooth at times (as I mentioned here and here haha) and frequent trips to the FroYo shop can add up quickly (both in calories and the bank account). So I decided to take a shot at creating a frosty treat using one of my favorite flavors: PINEAPPLE. It's not Summer yet, but it sure feels like it!
Makes about 2 pints
- 1 ripe Pineapple (about 4 cups diced)
- 1-4 tbsp sugar (if your pineapple is really ripe, you can omit)
- 1/2 cup coconut water
- 1/2 vanilla coconut milk (optional - replace with more coconut water if you omit)
- Juice from 1 lemon
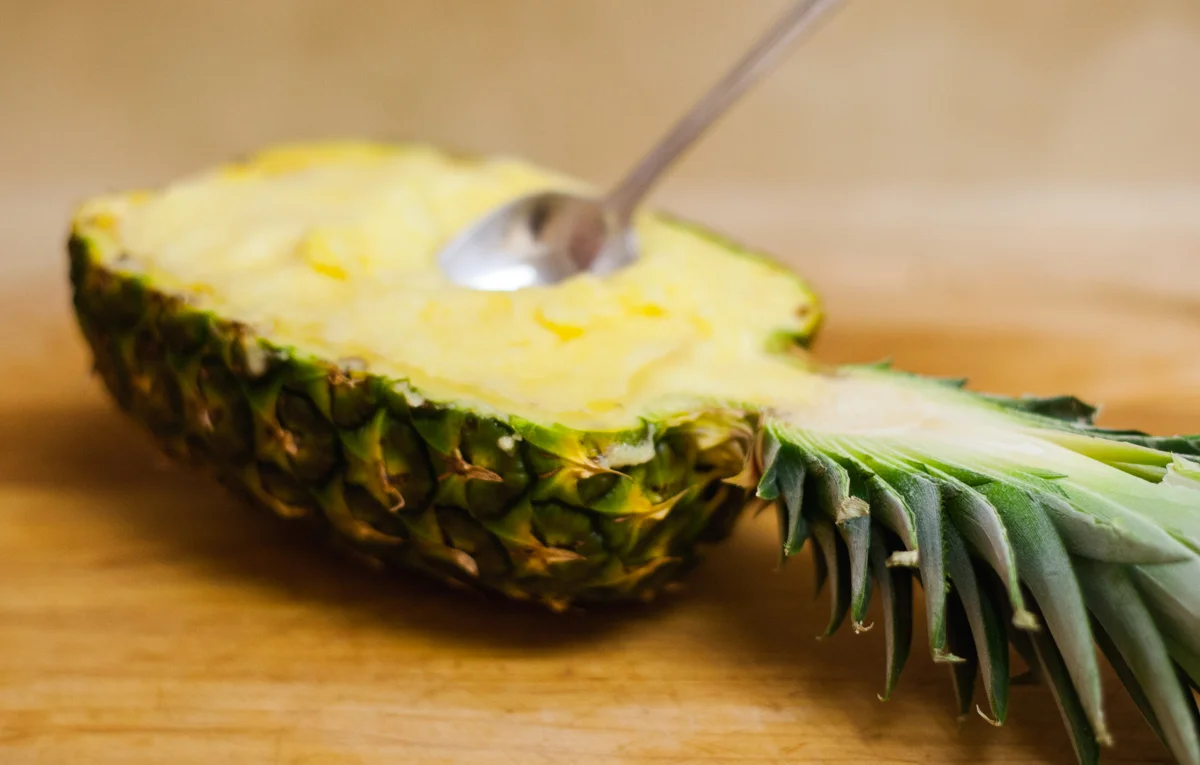
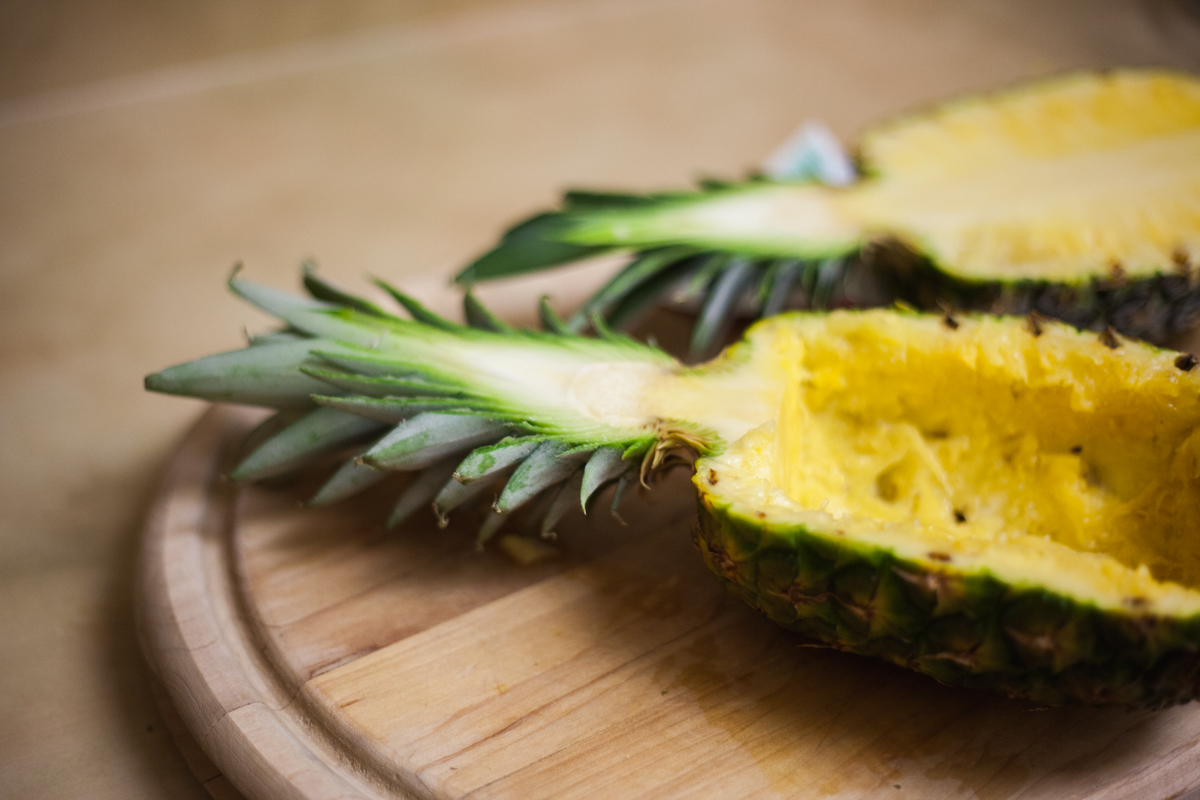
- Cut and cube your pineapple (save the outside of the pineapple for a fun serving idea!)
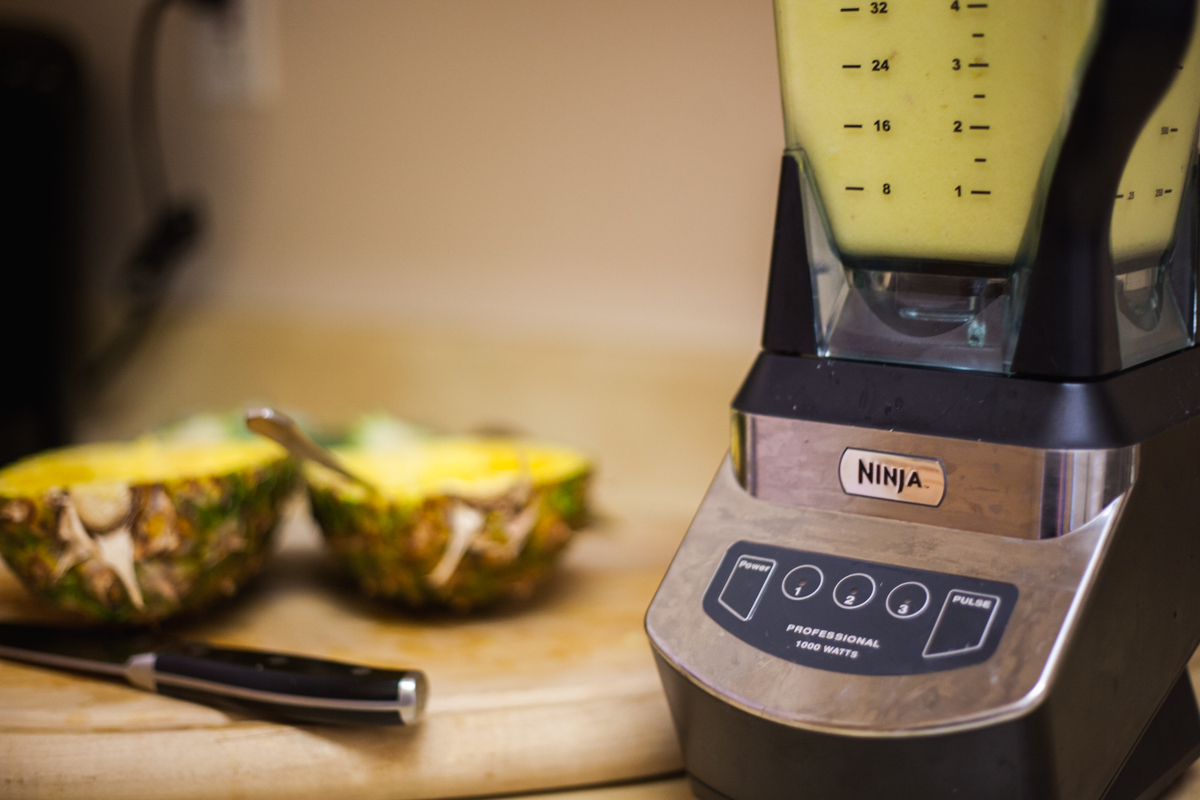
- Add all ingredients into blender and blend until creamy (about 3 minutes should do it)
- Pour into a glass dish and place into the freezer for 1-2 hours. At this point, you can use a ice cream machine to complete the process or add it back into the blender and blend again. Then place into the container you'll be storing it in and freeze an additional 5 hours.
DID YOU MAKE THIS RECIPE? COMMENT BELOW AND LET US KNOW HOW IT WAS! YOU CAN ALSO SHOW US BY USING #ESTCALIFORNIA ON YOUR SOCIAL CHANNELS! HAVE A RECIPE YOU WANT FEATURED HERE? SEND OUR WAY!
SCROLL TO SHOP THE POST

ABOUT THE AUTHOR

Lindsay Vacek has a passion for style, details and design. As a Fashion Editorial Photographer, she's worked in the Entertainment Industry for over 10 years and has a love for adventure and travel. She spends her spare time globe-trotting her way through foreign countries and loves new cultures, food, music and the arts.
Being a California Native, Lindsay loves meeting new people and sharing her version of life with others. With an infinite list of things-to-do, places-to-go and sights-to-see - she believe everyone can have a little more California in their own lives.

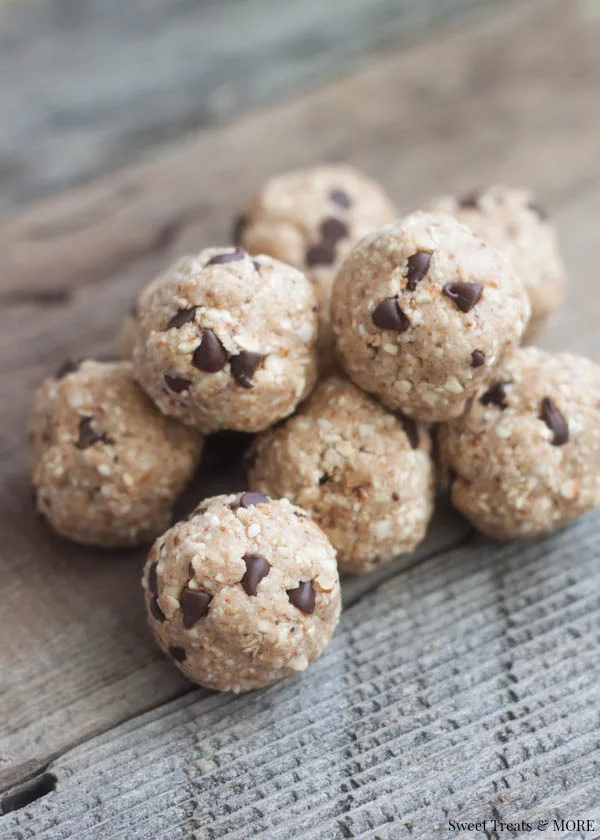
PROTEIN ENERGY BALLS
I have a sweet tooth. A mighty one at that. I usually can keep it in check, but it tends to rear it's ugly head at night, right after I've had my dinner.. or in the afternoon.. around 3pm... or first thing when I wake up.. okay, okay.. fine! It's an all-day thing. The battle is real, ya'll.

I have a sweet tooth. A mighty one at that. I usually can keep it in check, but it tends to rear it's ugly head at night, right after I've had my dinner.. or in the afternoon.. around 3pm... or first thing when I wake up.. okay, okay.. fine! It's an all-day thing. The battle is real, ya'll.
Well, would you believe me that those delicious looking cookie dough and chocolate bites you see above are vegan, paleo and packed with protein and fiber?! Well, they are! And, the best part yet, they are so simple to make (no baking required!).
My favorite thing about these delicious balls of yum is that the flavor possibilities are endless! Lemon, Nut Butters, Pumpkin Spice, Coconut... and trust, there are plenty of recipes out there to give you inspiration! I made three different versions of these balls tonight and I found myself wondering if anyone else makes these as often as I do? What are your favorite flavors? I'd love to hear about them. Use #estcalifornia on your social devices or comment below!


Cookie Dough Bites from Sweet Treats More

Cake Batter Protein Bites from Purely Twins

Sunflower Seed Protein Balls from Healthy Seasonal Recipes

Crunchy Raw Protein Balls from Healthy Family and Home

Almond Joy Protein Balls from iFoodReal

ABOUT THE AUTHOR

Lindsay Vacek has a passion for style, details and design. As a Fashion Editorial Photographer, she's worked in the Entertainment Industry for over 10 years and has a love for adventure and travel. She spends her spare time globe-trotting her way through foreign countries and loves new cultures, food, music and the arts.
Being a California Native, Lindsay loves meeting new people and sharing her version of life with others. With an infinite list of things-to-do, places-to-go and sights-to-see - she believe everyone can have a little more California in their own lives.

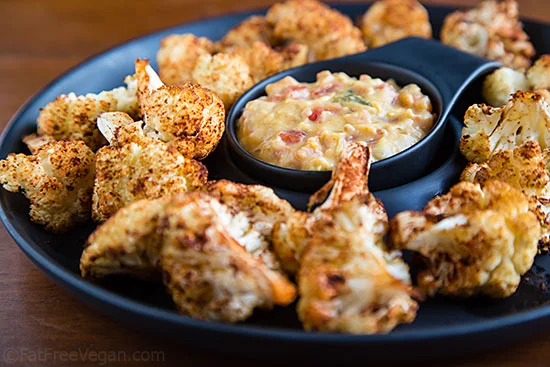
ROASTED CAULIFLOWER BITES
Super Bowl Sunday is just around the corner and we've had our eyes out for a delicious snack that we can eat without feeling all the guilt. That's when we stumbled across Susan Voisin's Roasted Cauliflower Bites recipe on FatFreeVegan and man, oh man! We feel like we hit the snack food jackpot! We knew we wanted to feature it so that all of you can add it to your Super Bowl parties!

Super Bowl Sunday is just around the corner and we've had our eyes out for a delicious snack that we can eat without feeling all the guilt. That's when we stumbled across Susan Voisin's Roasted Cauliflower Bites recipe on FatFreeVegan and man, oh man! We feel like we hit the snack food jackpot! We knew we wanted to feature it so that all of you can add it to your Super Bowl parties!
These recipes originally appeared on FatFreeVegan. Make sure to head over to her site to get more of her delicious recipes!
Roasted Cauliflower Bites
You can turn these into Buffalo Bites by tossing them with your favorite hot sauce after they’ve baked for 15 minutes; then continue baking until done.
Preparation time: 10 minute(s) | Cooking time: 30 minute(s)
Number of servings (yield): 6
Nutrition (per serving): 65 calories, 3 calories from fat, <1g total fat, 0mg cholesterol, 273.4mg sodium, 764.6mg potassium, 13.7g carbohydrates, 6.4g fiber, 6g sugar, 5g protein.
Ingredients
- 1 head cauliflower
- 1 teaspoon mild chili powder
- 1/2 teaspoon salt (optional or to taste)
- 1/2 teaspoon ground cumin
- 1/2 teaspoon smoked paprika
- 1/2 teaspoon garlic powder
- 1/4 teaspoon chipotle chile powder (optional)
Instructions
- Preheat oven to 400F. Line a baking sheet with parchment paper or silicone baking mat.
- Cut the cauliflower into individual bite-sized florets. Try to keep them about the same size. Rinse them in a colander under running water. Shake off excess water but don’t dry. Spread them out on the baking sheet.
- Combine all seasonings in a small bowl. Sprinkle over the cauliflower, turning the florets so that all sides are seasoned. Bake in preheated oven for 15 minutes; turn florets and bake another 15 minutes or until they are beginning to brown in spots. Remove and serve warm with nacho cheese or other dipping sauce.
Vegan Nacho Cheese Sauce
Use this luscious sauce as a dip or as an ingredient in burritos, tacos, or jalapeno poppers.
Ingredients
- 1 cup plain, sugar-free non-dairy milk
- 1/4 cup nutritional yeast
- 1/4 cup mashed sweet potato
- 2 tablespoons potato starch or cornstarch
- 1 tablespoon lemon juice
- 1/2 -3/4 teaspoon salt (optional or to taste)
- 1/2 teaspoon dry mustard
- 1/8 teaspoon garlic powder
- 1/8 teaspoon onion powder
- 1/8 teaspoon ground cumin
- 1 10-ounce can Rotel Diced Tomatoes and Chilies, drained and liquid reserved
- chipotle powder, to taste
Instructions
- Put all ingredients except Rotel tomatoes and chipotle into the blender. Blend at high speed until smooth. Pour into a saucepan and cook, stirring constantly, over medium-high heat until boiling. Reduce heat to low and continue cooking and stirring until mixture becomes very thick. Stir in the drained tomatoes. If sauce is too thick, add a tablespoon or so of the reserved tomato liquid. Check seasoning, and add chipotle powder to taste if you’d like it spicier.
- Serve warm with Roasted Cauliflower Bites, tortilla chips, or crackers or atop burritos and tacos.
Preparation time: 10 minute(s) | Cooking time: 10 minute(s)
Number of servings (yield): 8
Makes about 2 cups. Nutrition (per serving): 46 calories, 8 calories from fat, less than 1g total fat, 0mg cholesterol, 168mg sodium, 71.9mg potassium, 6.5g carbohydrates, less than 1g fiber, less than 1g sugar, 4g protein. Nutritional data uses 1 cup of plain soymilk.


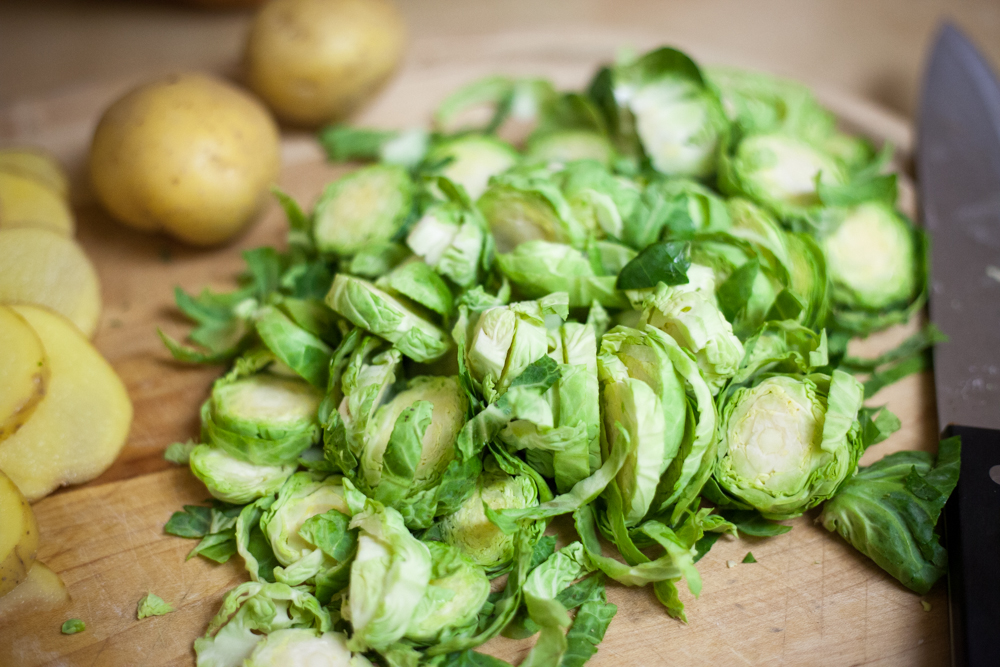
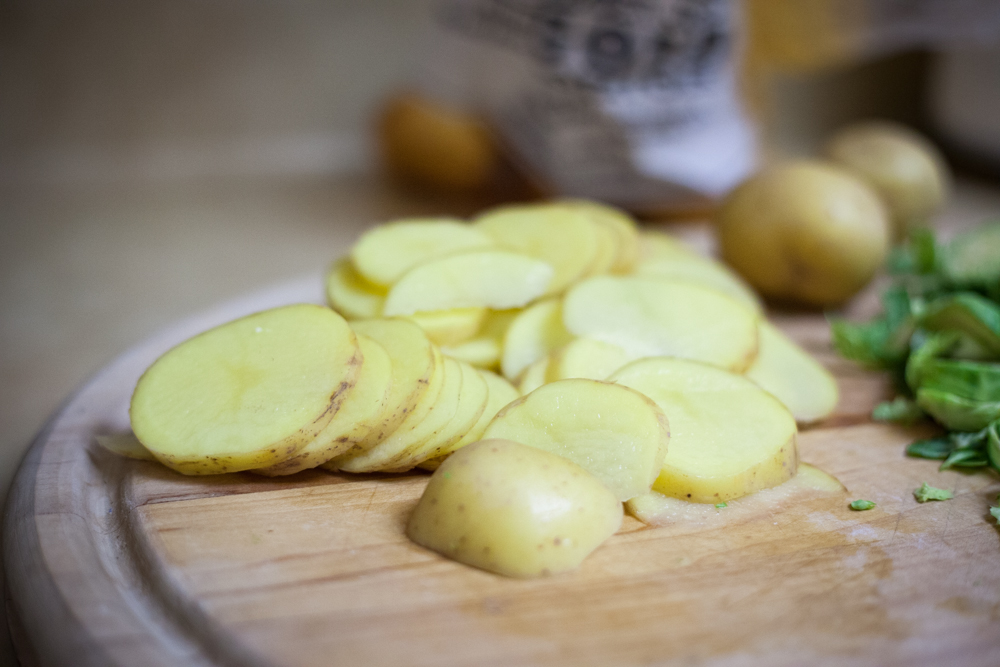
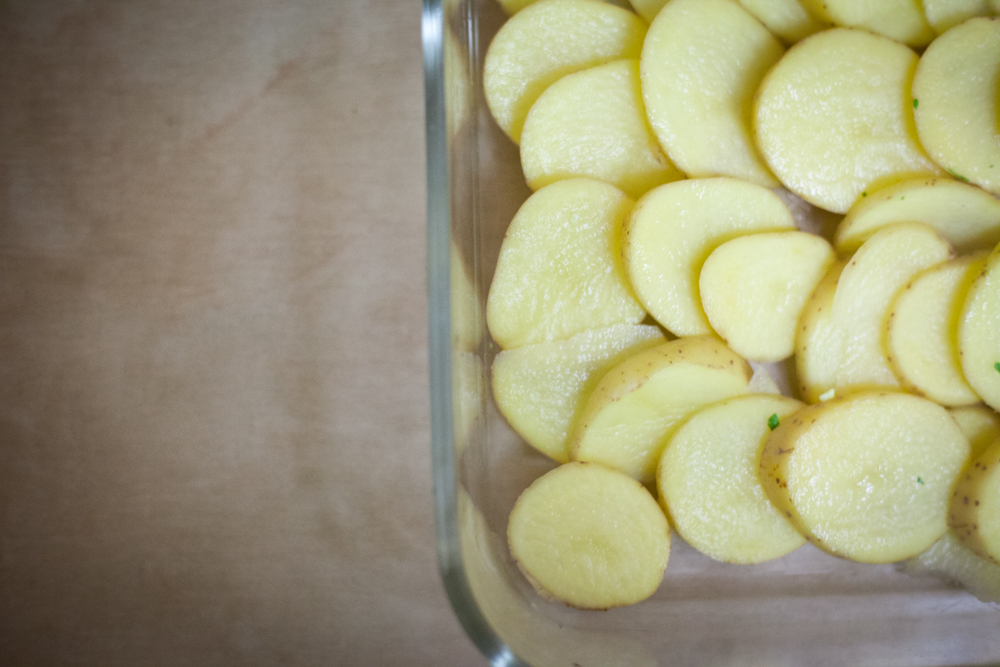
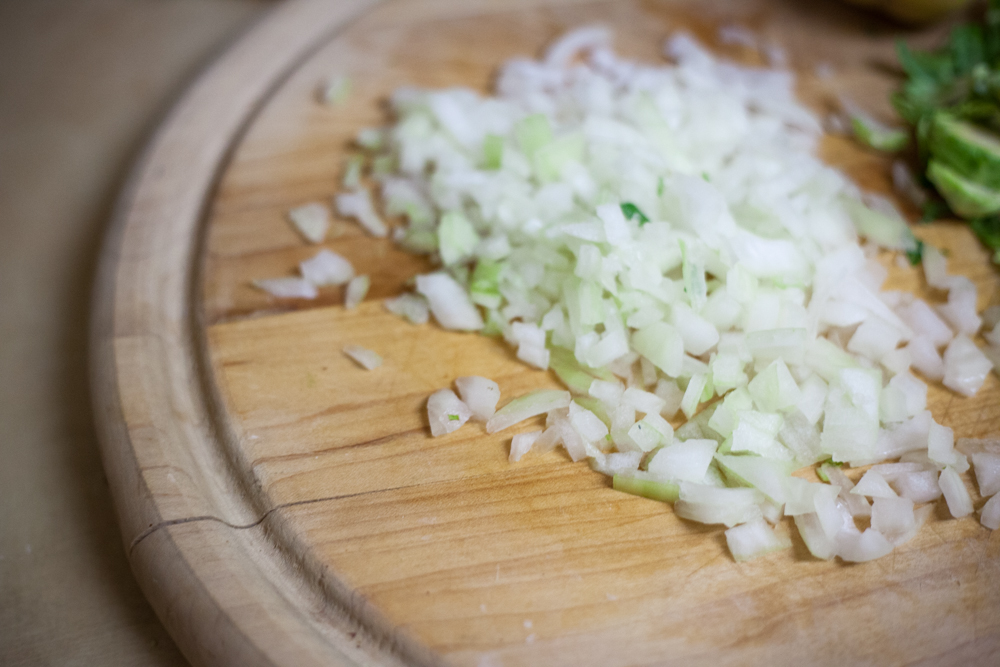
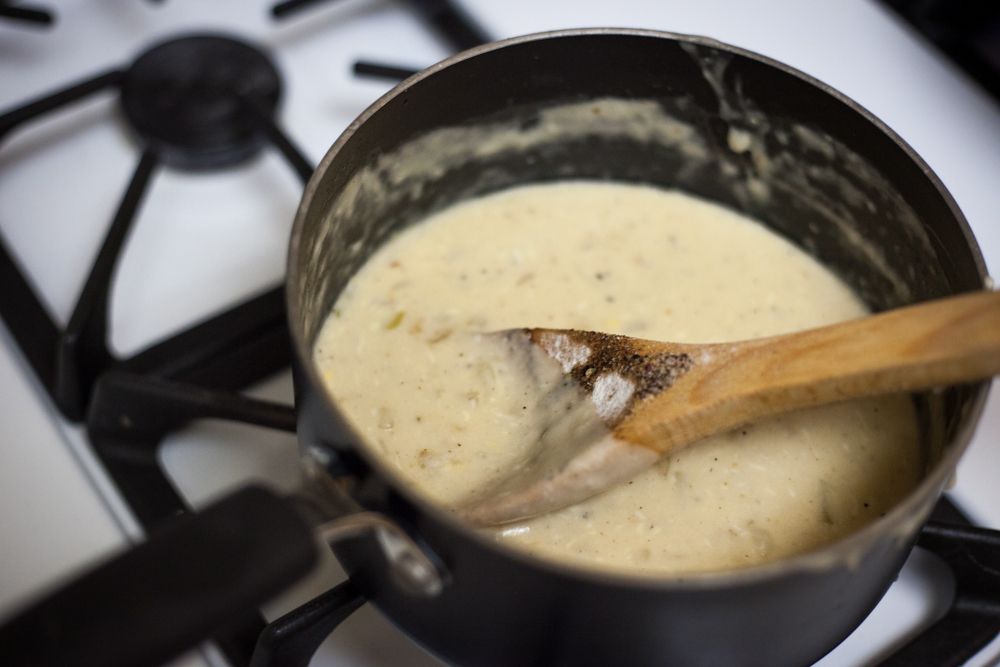
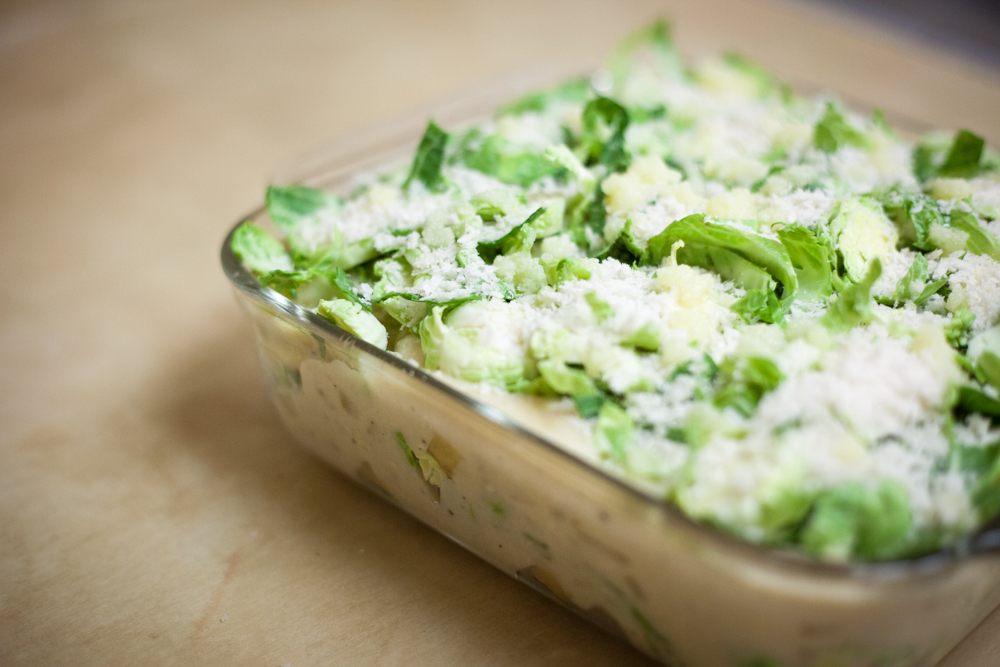
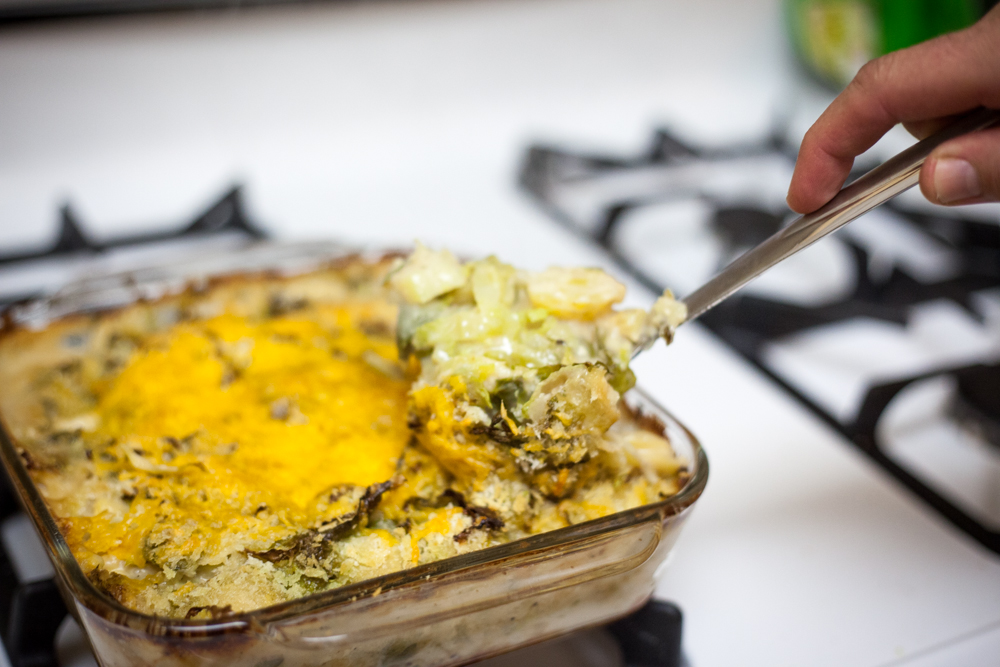
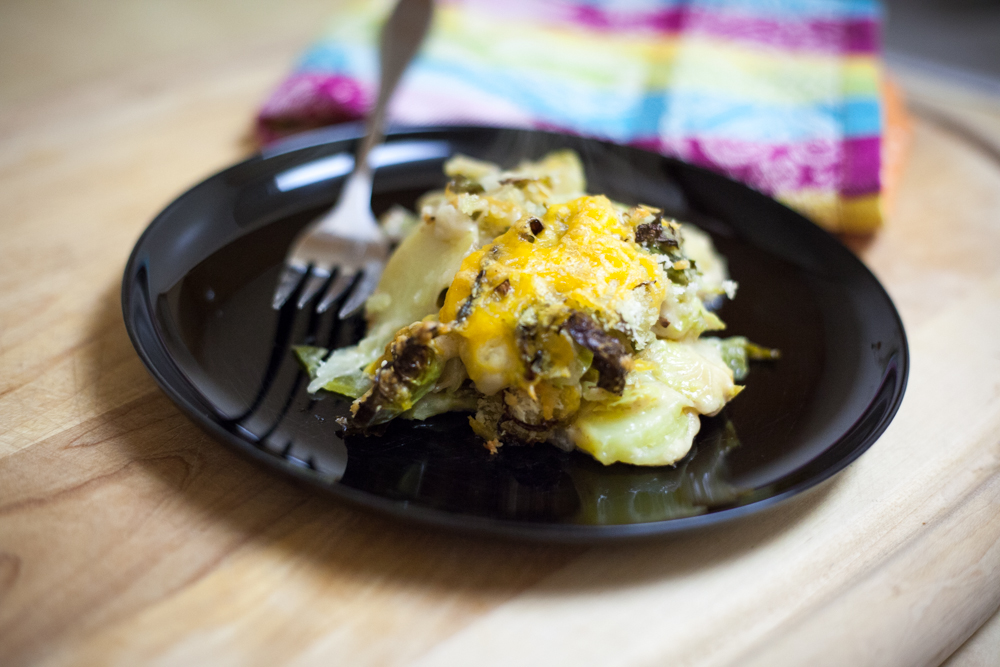
BRUSSELS AU GRATIN
The Holiday Season is in full effect and with that comes parties, dinners and events. It leaves us searching into our recipe catalogs for something tasty.. but healthy.. yet something that will still keep people coming back for seconds (because let's just admit it now, we want to be know as the person who brought the most amazing dish.. am i right?)
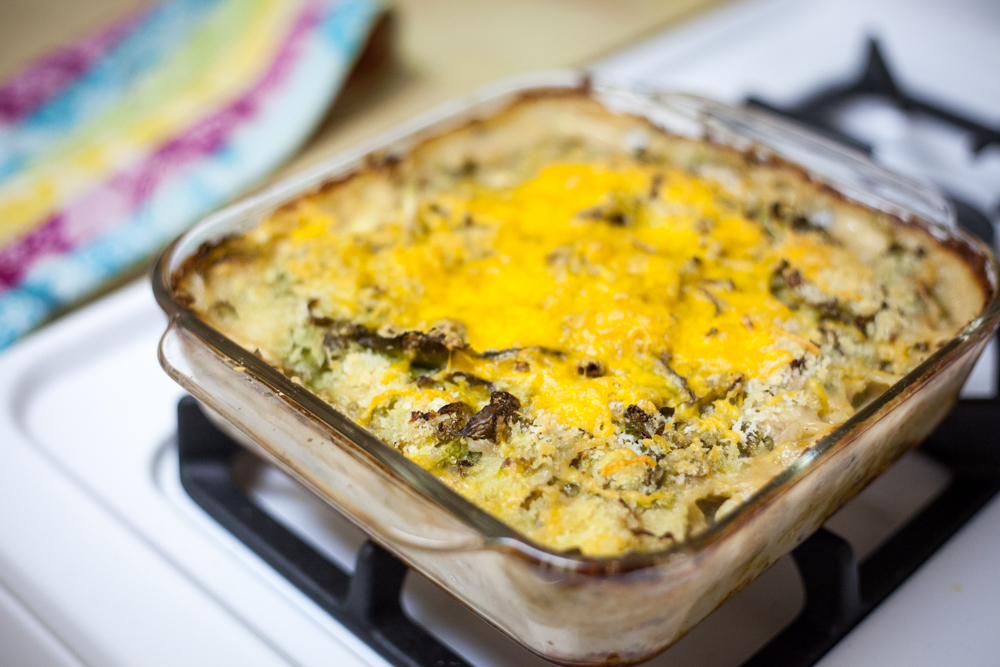
The Holiday Season is in full effect and with that comes parties, dinners and events. It leaves us searching into our recipe databases for something tasty (but healthy).. you know, that special dish that will keep people coming back for seconds (because let's just admit it now, we want to be know as the person who brought the most amazing dish.. am i right?)
If you are anything like me, you are often left with the lingering question... "What should I bring?". I find myself perusing Pinterest for ideas or and inspiration so I wanted to save you the time and energy. I'm sharing one of my newer dishes.. a spin on a traditional dish, but it's packed with additional greens and not so much fat (and we can all be grateful for that).
BRUSSELS AU GRATIN
- 2 cups brussel sprouts, sliced
- 6 small Gold Yellow Potatoes
- 1/2 medium gold sweet onion
- 1 1/4 cup coconut milk
- 3 tbsp ghee (or grass-fed butter)
- 2 tbsp coconut flour
- 1 tbsp minced garlic (2 cloves)
- 1 tsp ground nutmeg
- 1 tsp salt
- 1 tsp pepper
- 1 cup shredded cheese (whichever you prefer - i used Trader Joe's 3-kind shredded cheese)
- Handful of Panco Bread Crumbs.
Instructions:
- Preheat oven to 400 degrees.
- Take brussels sprouts and slice them into sliced pieces. Discard the ends (where the brussels grow).
- Slice potatoes into thin slices.
- In a medium-large saucepan, sweat onions & garlic until they become translucent. Add 2 tbsp ghee & 2 tbsp flour. Once combined (it'll start to look like a paste) add coconut milk. Stir until combined and let sit over a medium heat for 3-5 minutes until thickened.
- Add salt, pepper, nutmeg. Whisk in cheese until melted, then turn off heat.
- In a 9x9" dish, layer 1/2 of the potatoes, followed by 1/2 of the sauce. Top with 1/2 brussels sprouts and then, potatoes, sauce and brussels sprouts. Top with Panco crumbs and last tablespoon of ghee (melted). Sprinkle with cheese (optional).
- Cover with foil and bake for 40 minutes. Then, remove foil and cook another 10 minutes until top is brown and toasty.


ABOUT THE AUTHOR

Lindsay Vacek has a passion for style, details and design. As a Fashion Editorial Photographer, she's worked in the Entertainment Industry for over 10 years and has a love for adventure and travel. She spends her spare time globe-trotting her way through foreign countries and loves new cultures, food, music and the arts.
Being a California Native, Lindsay loves meeting new people and sharing her version of life with others. With an infinite list of things-to-do, places-to-go and sights-to-see - she believe everyone can have a little more California in their own lives.


RUBIES & RADISHES: ARSY'S FAVORITE THINGS
A little more about Arsy; devoted mother, wife, author and successful businesswoman who created the life that she wanted. What a great reminder to us all to keep following your dreams!

We have had such a pleasure working with Arsy all month and learning more from her about the Paleo Lifestyle, great recipes and tips to help keep us inspired. There was an inspiring comment that Arsy shared with us on her Instagram a few weeks ago that I wanted to make sure got a little more attention.
“If I could give you one piece of advice, it would be – Don’t accept the status quo, if it doesn’t feel right for you. Work really really hard to create a life you love and take the risks necessary to make it happen. I did all the “right” things for a long time, went to graduate school (and incurred massive debt) and got a well paying corporate job to pay it off. I always thought I would have a career that gave me the opportunity to improve the lives of other people. Once I became a mom, I also wanted a career that was flexible and allowed me to be home with my daughter. It was scary to make this happen and took (and still takes) a ridiculous amount of work. I am so so grateful for all of it. I wouldn’t have it any other way. There were lots of naysayers, advising me not to change my career in the midst of a recession, but I followed my gut and made it happen. You can make it happen too, if it’s something you want. Just go for it and start working towards it today and you’ll get there! It takes dedication, commitment and time.”
I’m not sure about you, but I want to know more about this cool chick that calls Santa Cruz, California home. So, we wanted to share a little more about Arsy; devoted mother, wife, author and successful businesswoman who created the life that she wanted. What a great reminder to us all to keep following your dreams. Create the life you want to live and it is only up to you to make that happen. Now let’s have a little fun and get to know Arsy a bit more!
Guilty pleasure:
Dried mangos! I am addicted, I don’t leave the grocery store without them.
Treat for yourself:
Massage or a lunch date with a girlfriend. Nothing like some personal time or gabbing with a close friend to refresh.
Outfit:
Maxi dresses and sandals. It’s basically my uniform.
Date night:
Dinner at our favorite farm to table restaurant, La Posta. I basically cook for a living, so not having to cook or do dishes is such a treat. I always love a nice getaway to the city too – that’s always exciting.
Go-to snack:
Epic bars are my favorite. They are a great source of quality protein to tie you over when you are on the go.
Vacation spot:
This is a tough one. I love to travel. My favorite place that I have ever been is Brazil – warm weather, stunning beaches and so much culture.
Restaurant:
Hands down - Naka Sushi. It is a family-operated, authentic, Japanese sushi restaurant in Santa Cruz. It's my two year olds favorite too, we try to have a monthly family date there.
Coffee:
Verve Coffee Roasters. Order the latte with the organic milk. I guarantee, it is the best latte you'll ever have.
Ice Cream:
Coffee ice cream all the way!
I never leave home without…
Essential oils. You never know when they will come in handy. I use them to calm down, to wake up and for minor cuts and scrapes for my toddler.
In my purse:
Phone, wallet, primal life organics chap stick and Stress Away Essential Oil.
A perfect Saturday:
I love this question!! Saturday is my favorite day of the week. On the perfect Saturday I completely unplug from my computer. Have a light breakfast at home with my husband and 2 year old daughter and then grab some coffee at Verve before we head to East Cliff for a walk along the coast. This part of the Santa Cruz coast is rustic and lively. My daughter, Indyanna loves to watch the surfers and pet all the dogs that are taking their morning walks. After that, we’ll come home for a nap. I’ll always try to catch the tail end of the farmers market and while I am out, I round up a few friends to see if they can join us for an early dinner. I try to always cook something unique that isn’t for my blog (meaning I just don’t need to have to write down take photos of it) I love cooking for people. I really can’t think of any better way to ending the perfect Saturday than with great conversation, great food and great wine.


Thank you so much Arsy! It has been a blast, I hope we can have you again!


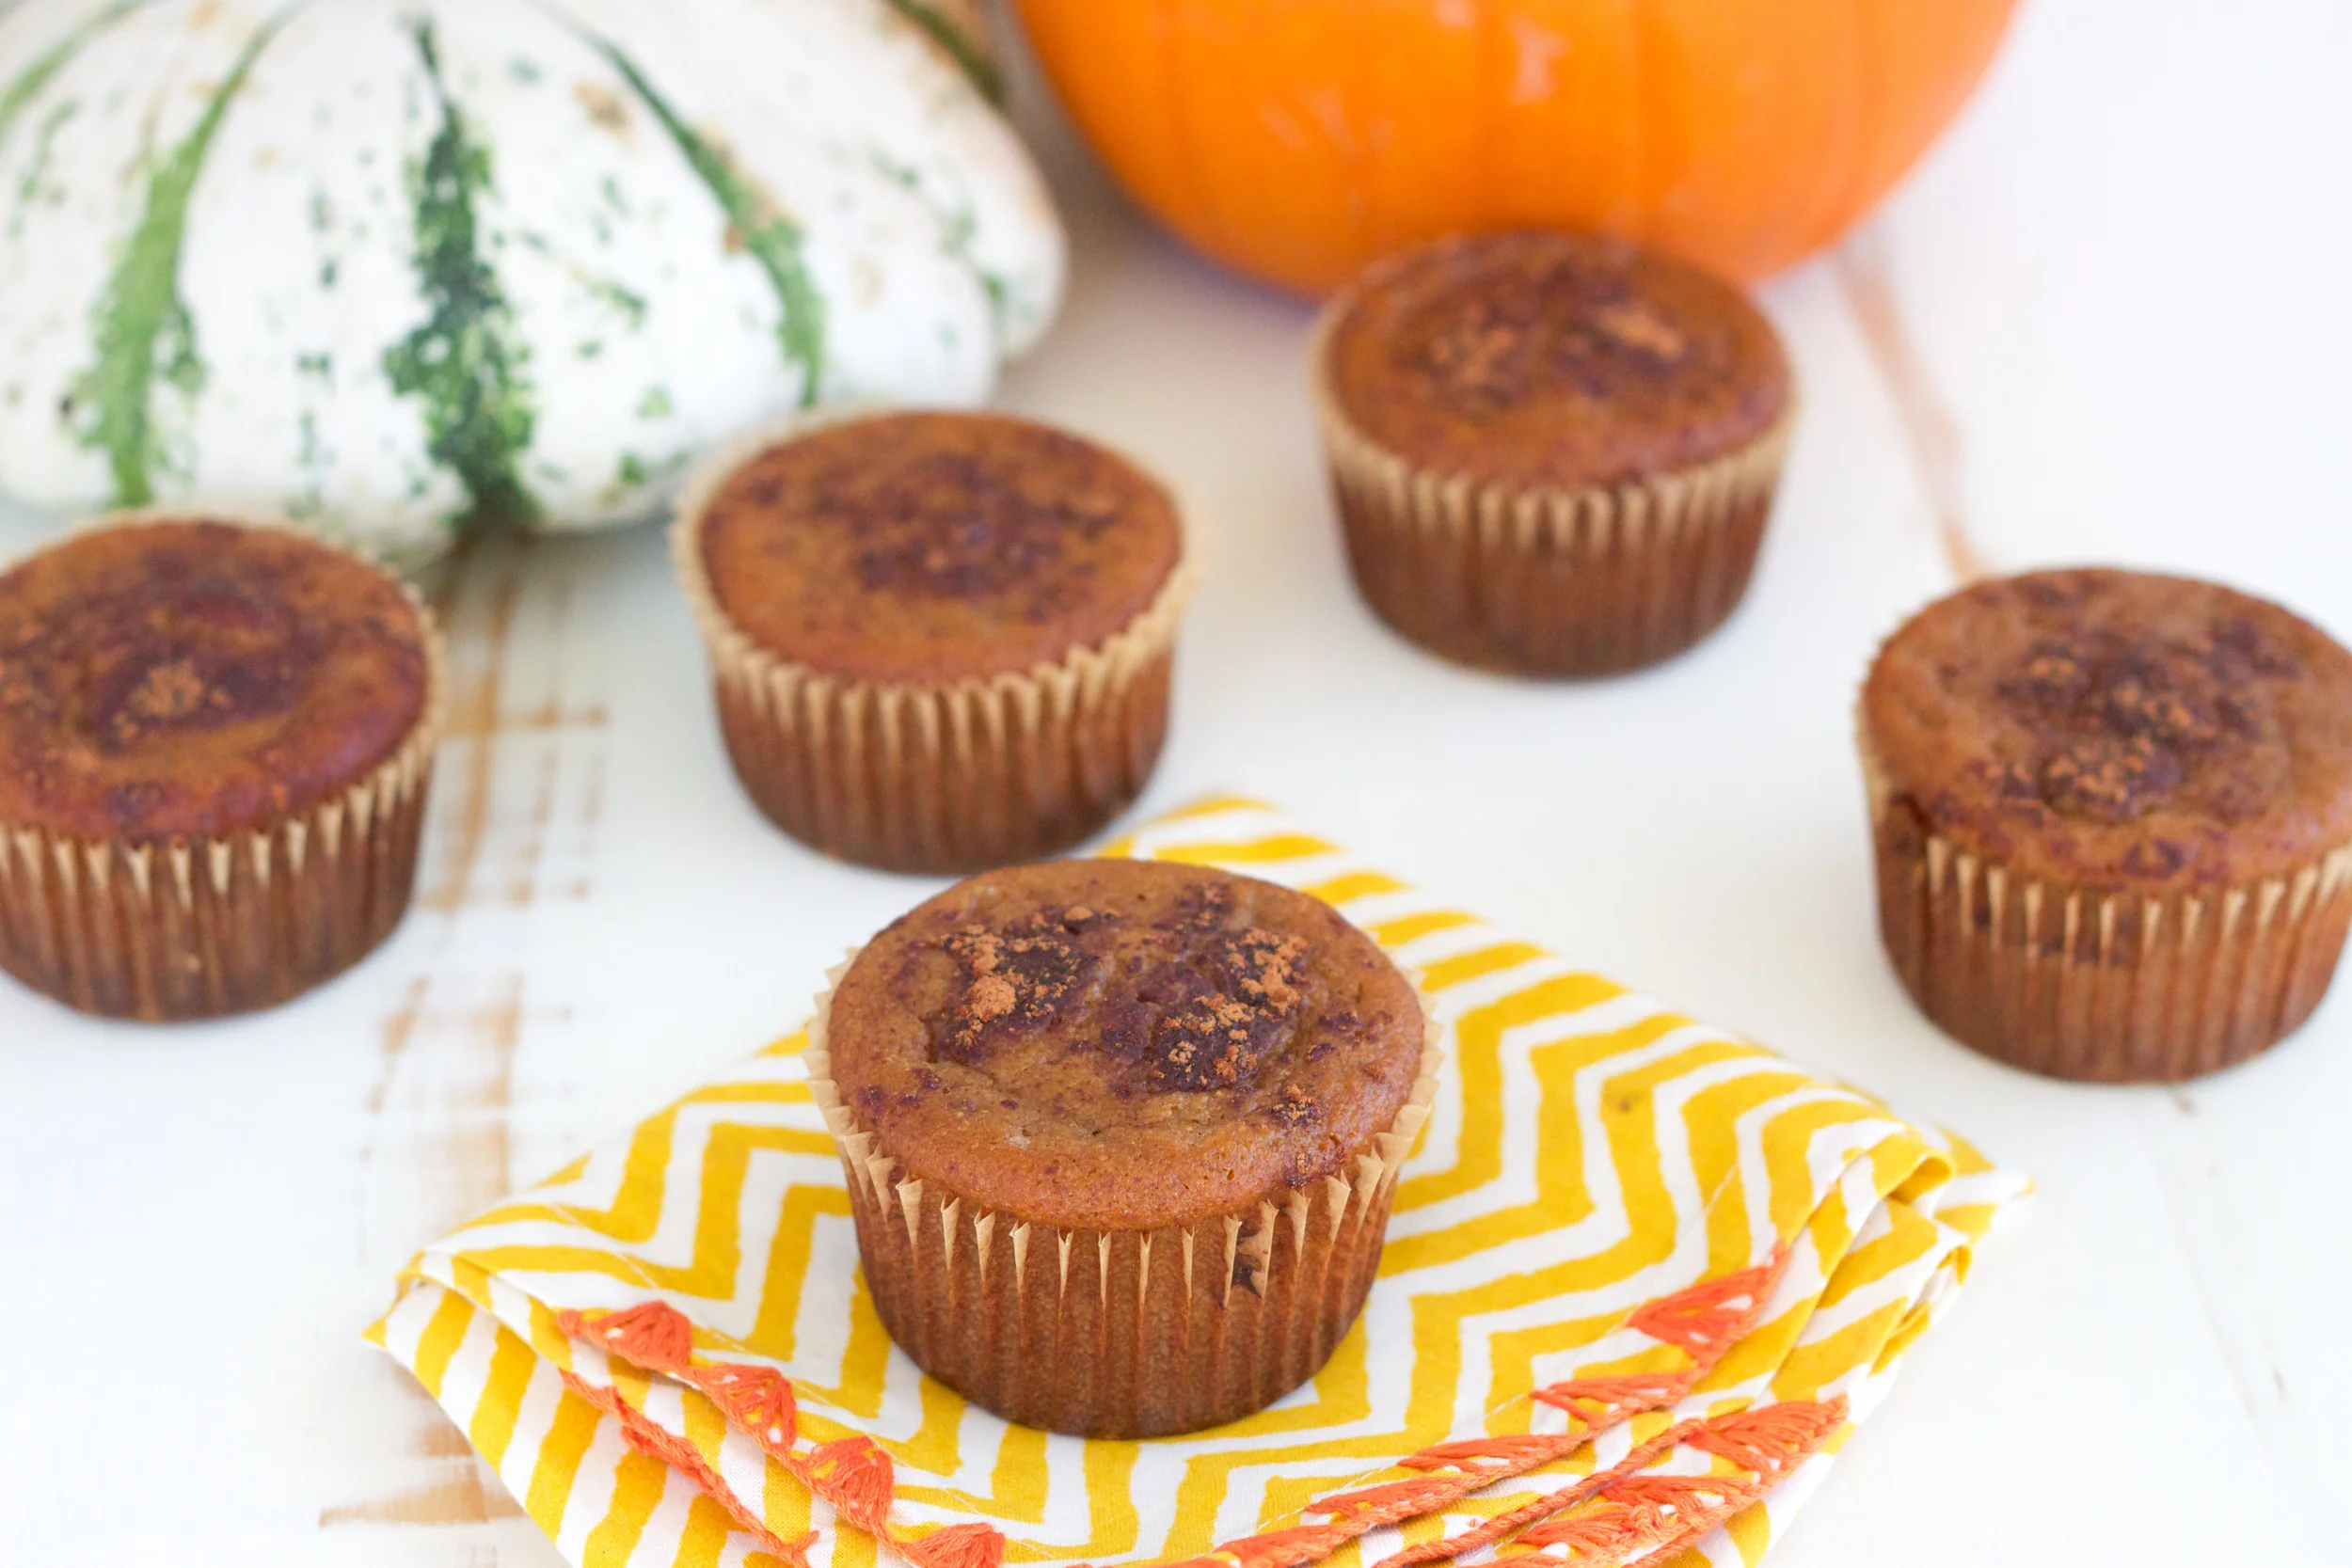
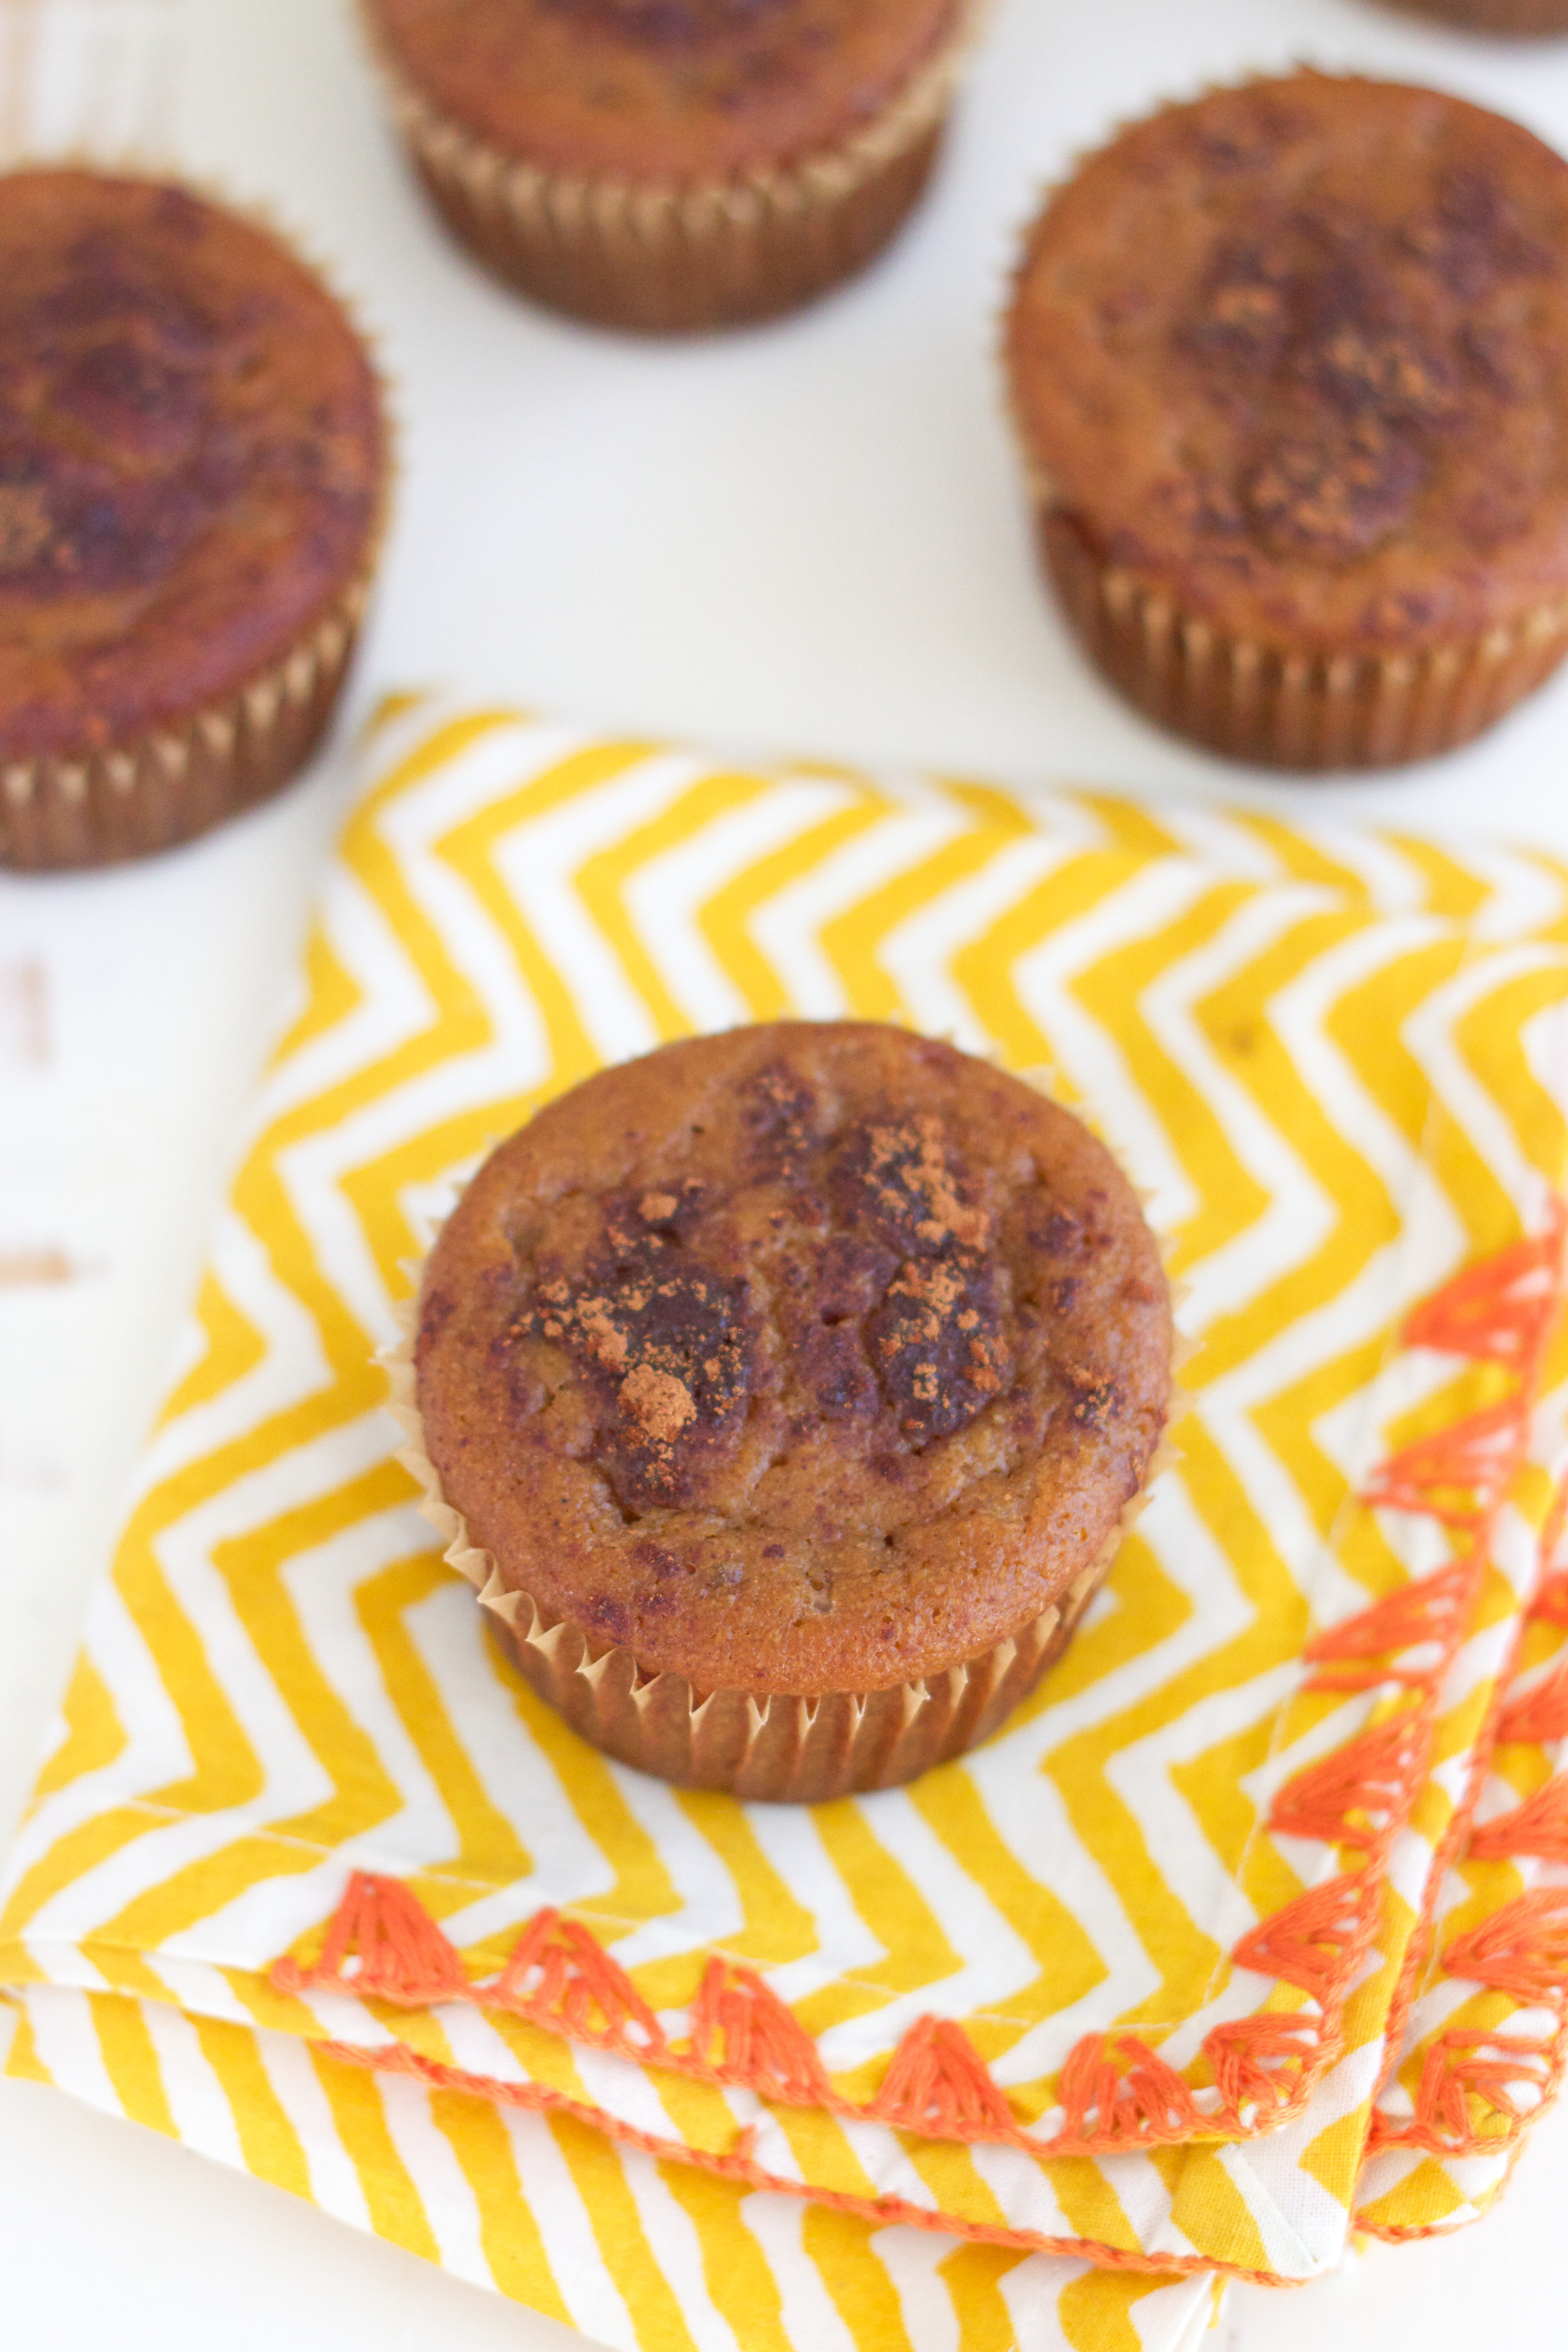
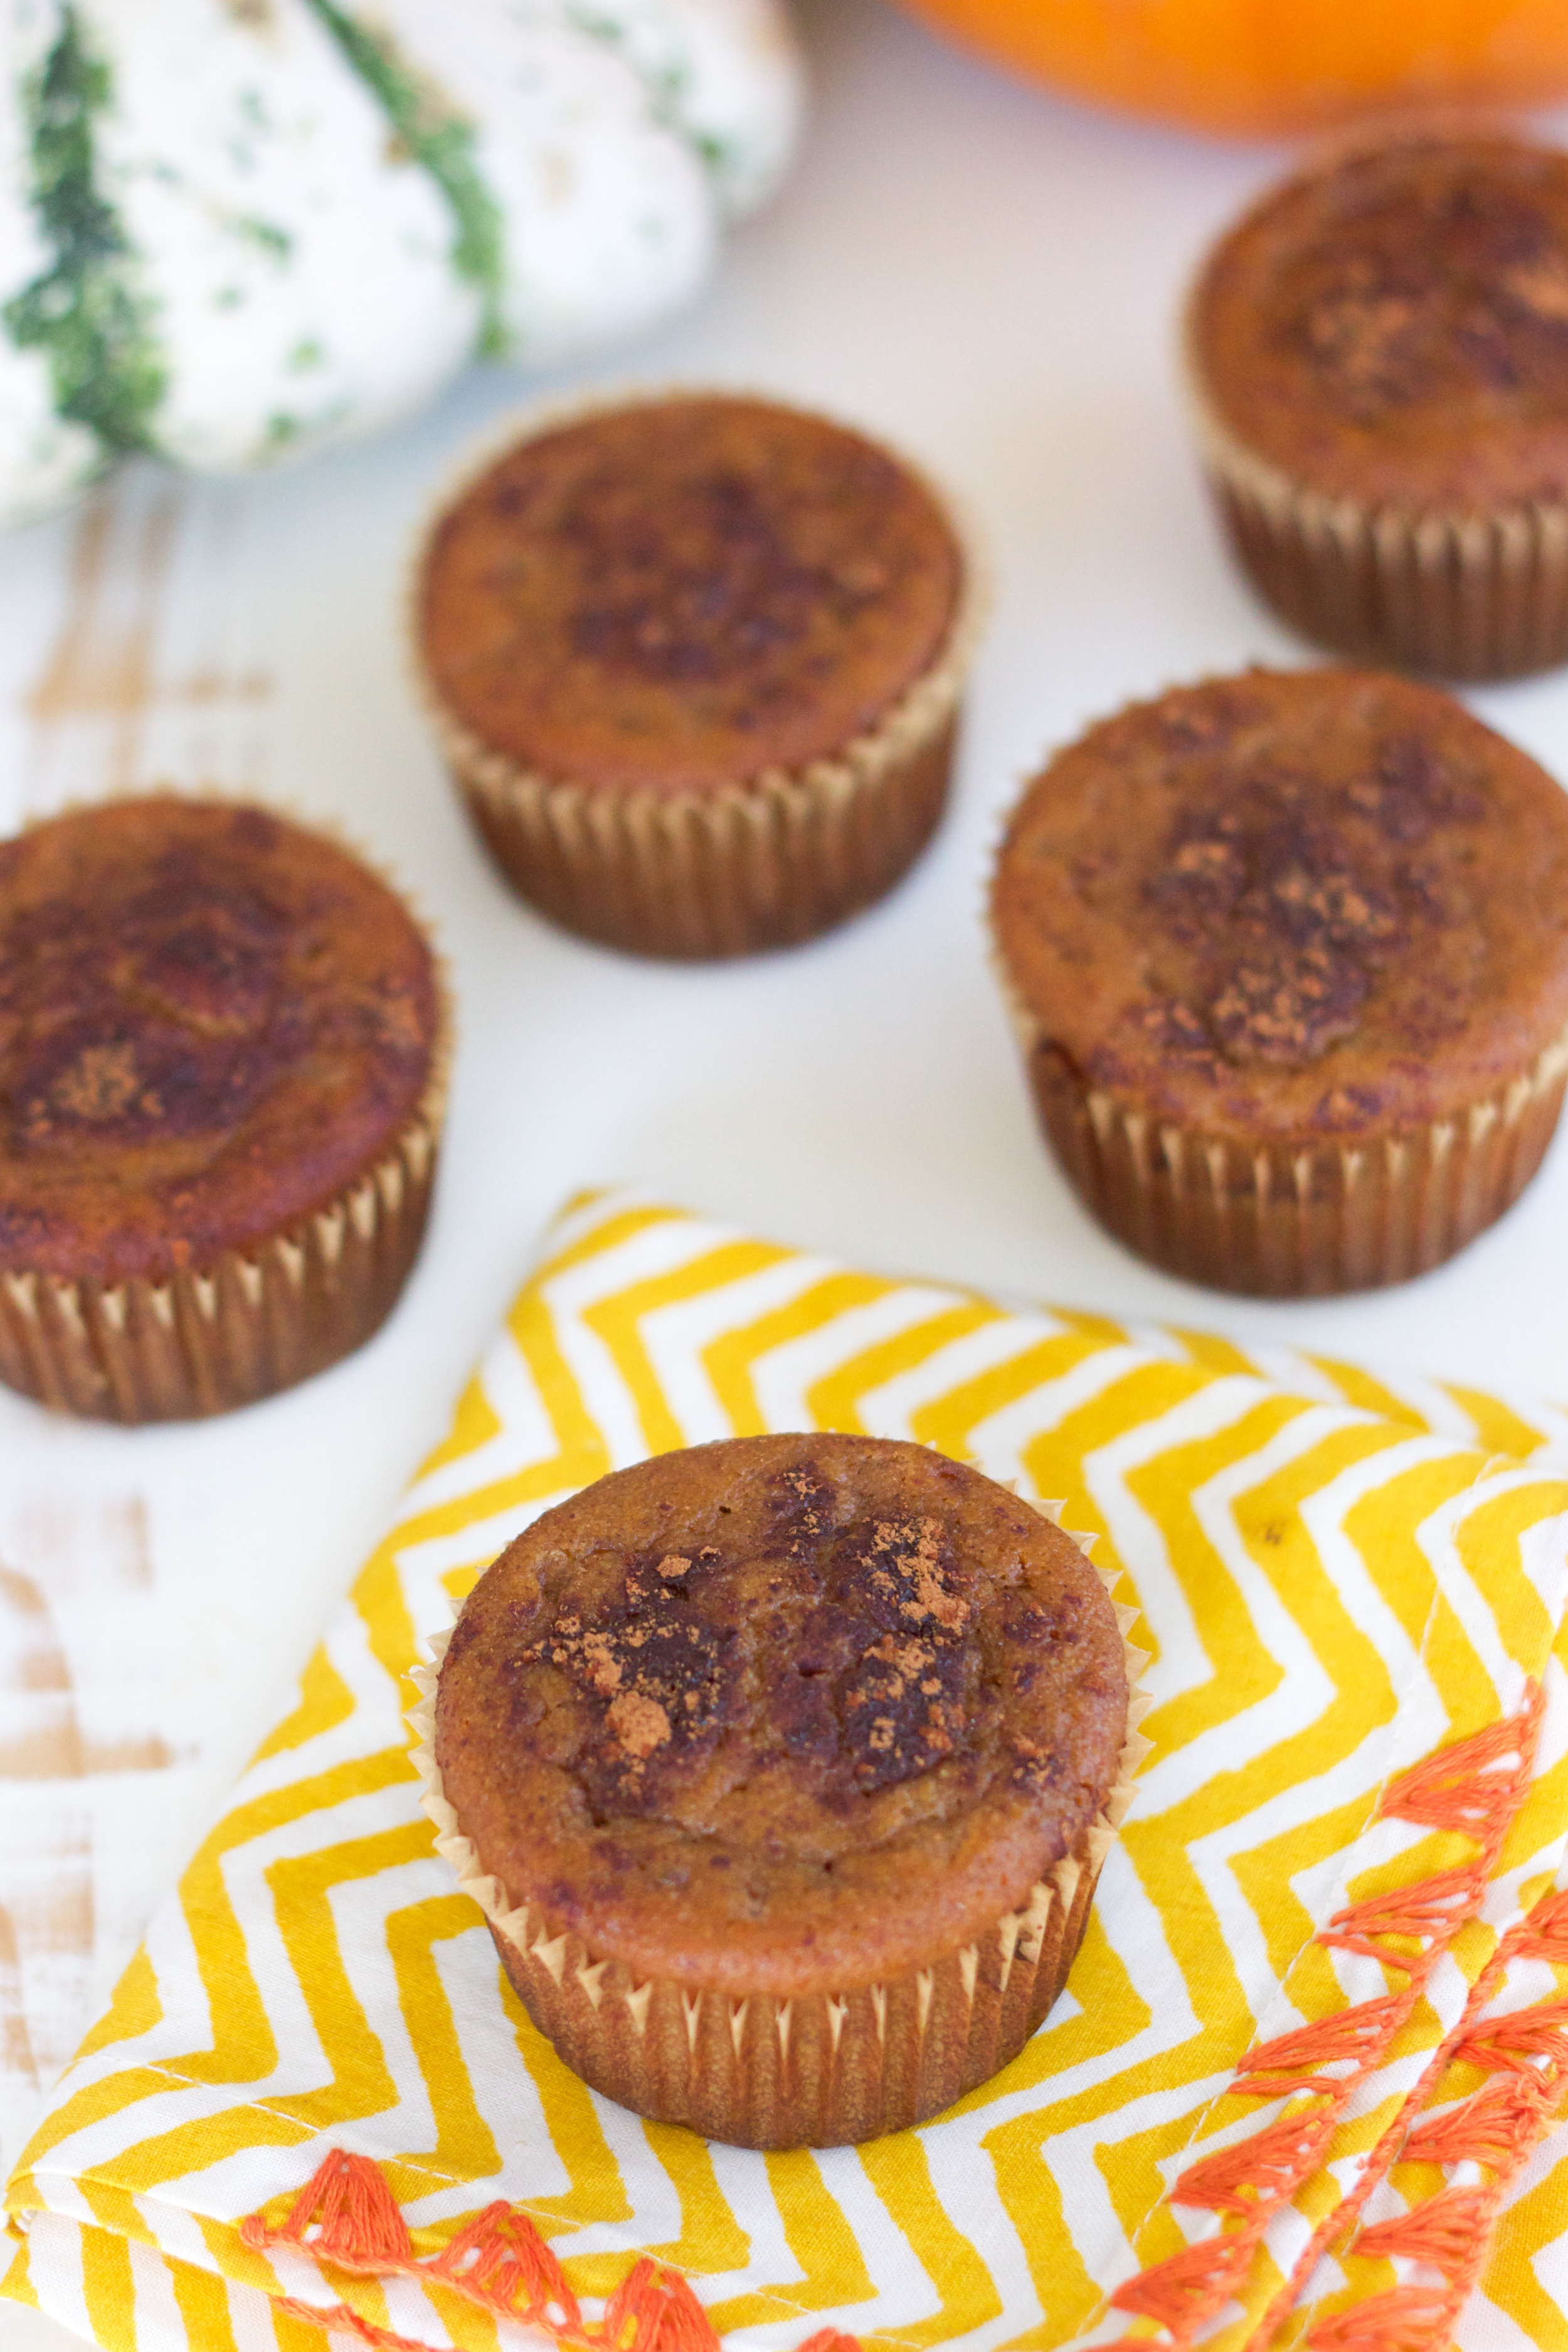
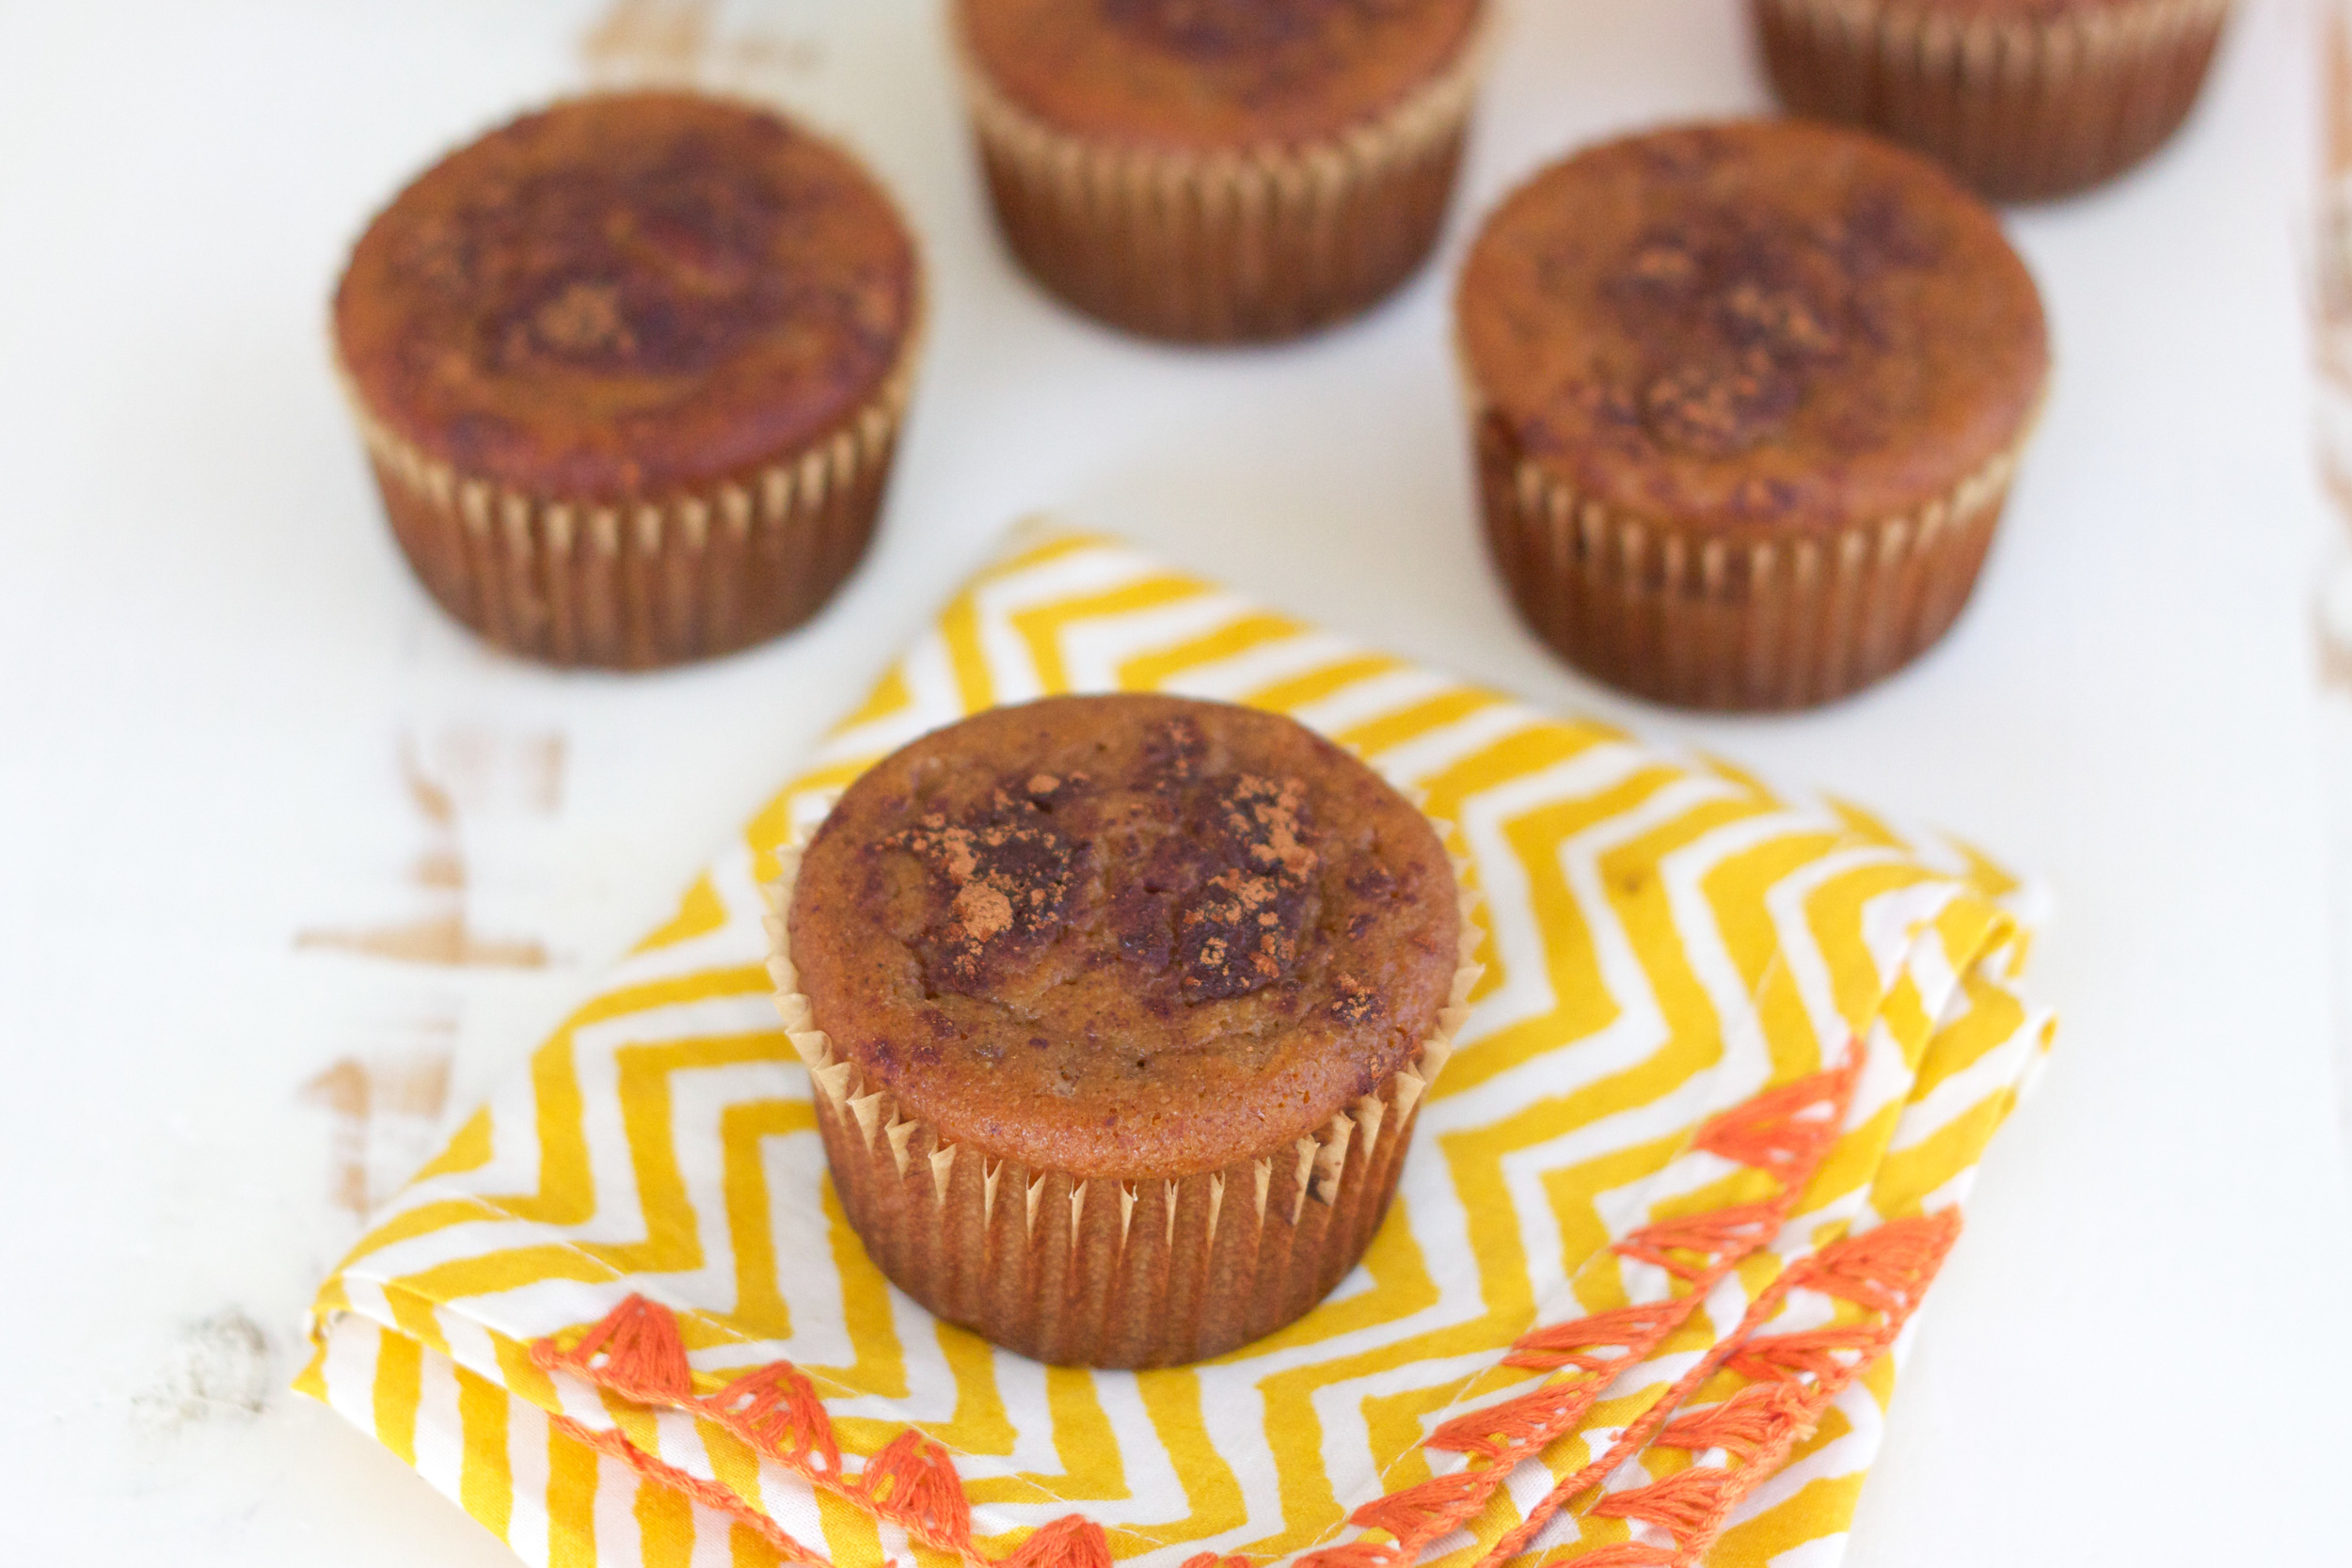
RUBIES & RADISHES: A THANKSGIVING TREAT
To keep you enticed about introducing Paleo into your life, I’ve created these gluten-free, pumpkin muffins that burst with Fall flavors. They are loaded with healthy fats, fiber and protein that will leave you feeling satisfied and energized.

This month we’ve teamed up with chef, author and top ten Paleo food Blogger, Arsy Vartanian, founder of Rubies and Radishes.
I am pleased to announce our cookbook giveaway winner Sunshyne Brightly! Congratulations to you, I hope you have fun with my recipes!
To keep you enticed about introducing Paleo into your life, I’ve created these gluten-free, pumpkin muffins that burst with Fall flavors. They are loaded with healthy fats, fiber and protein that will leave you feeling satisfied and energized.
Grab them for a light breakfast, an afternoon snack or top them with coconut whipped cream for dessert.
Enjoy!
Arsy
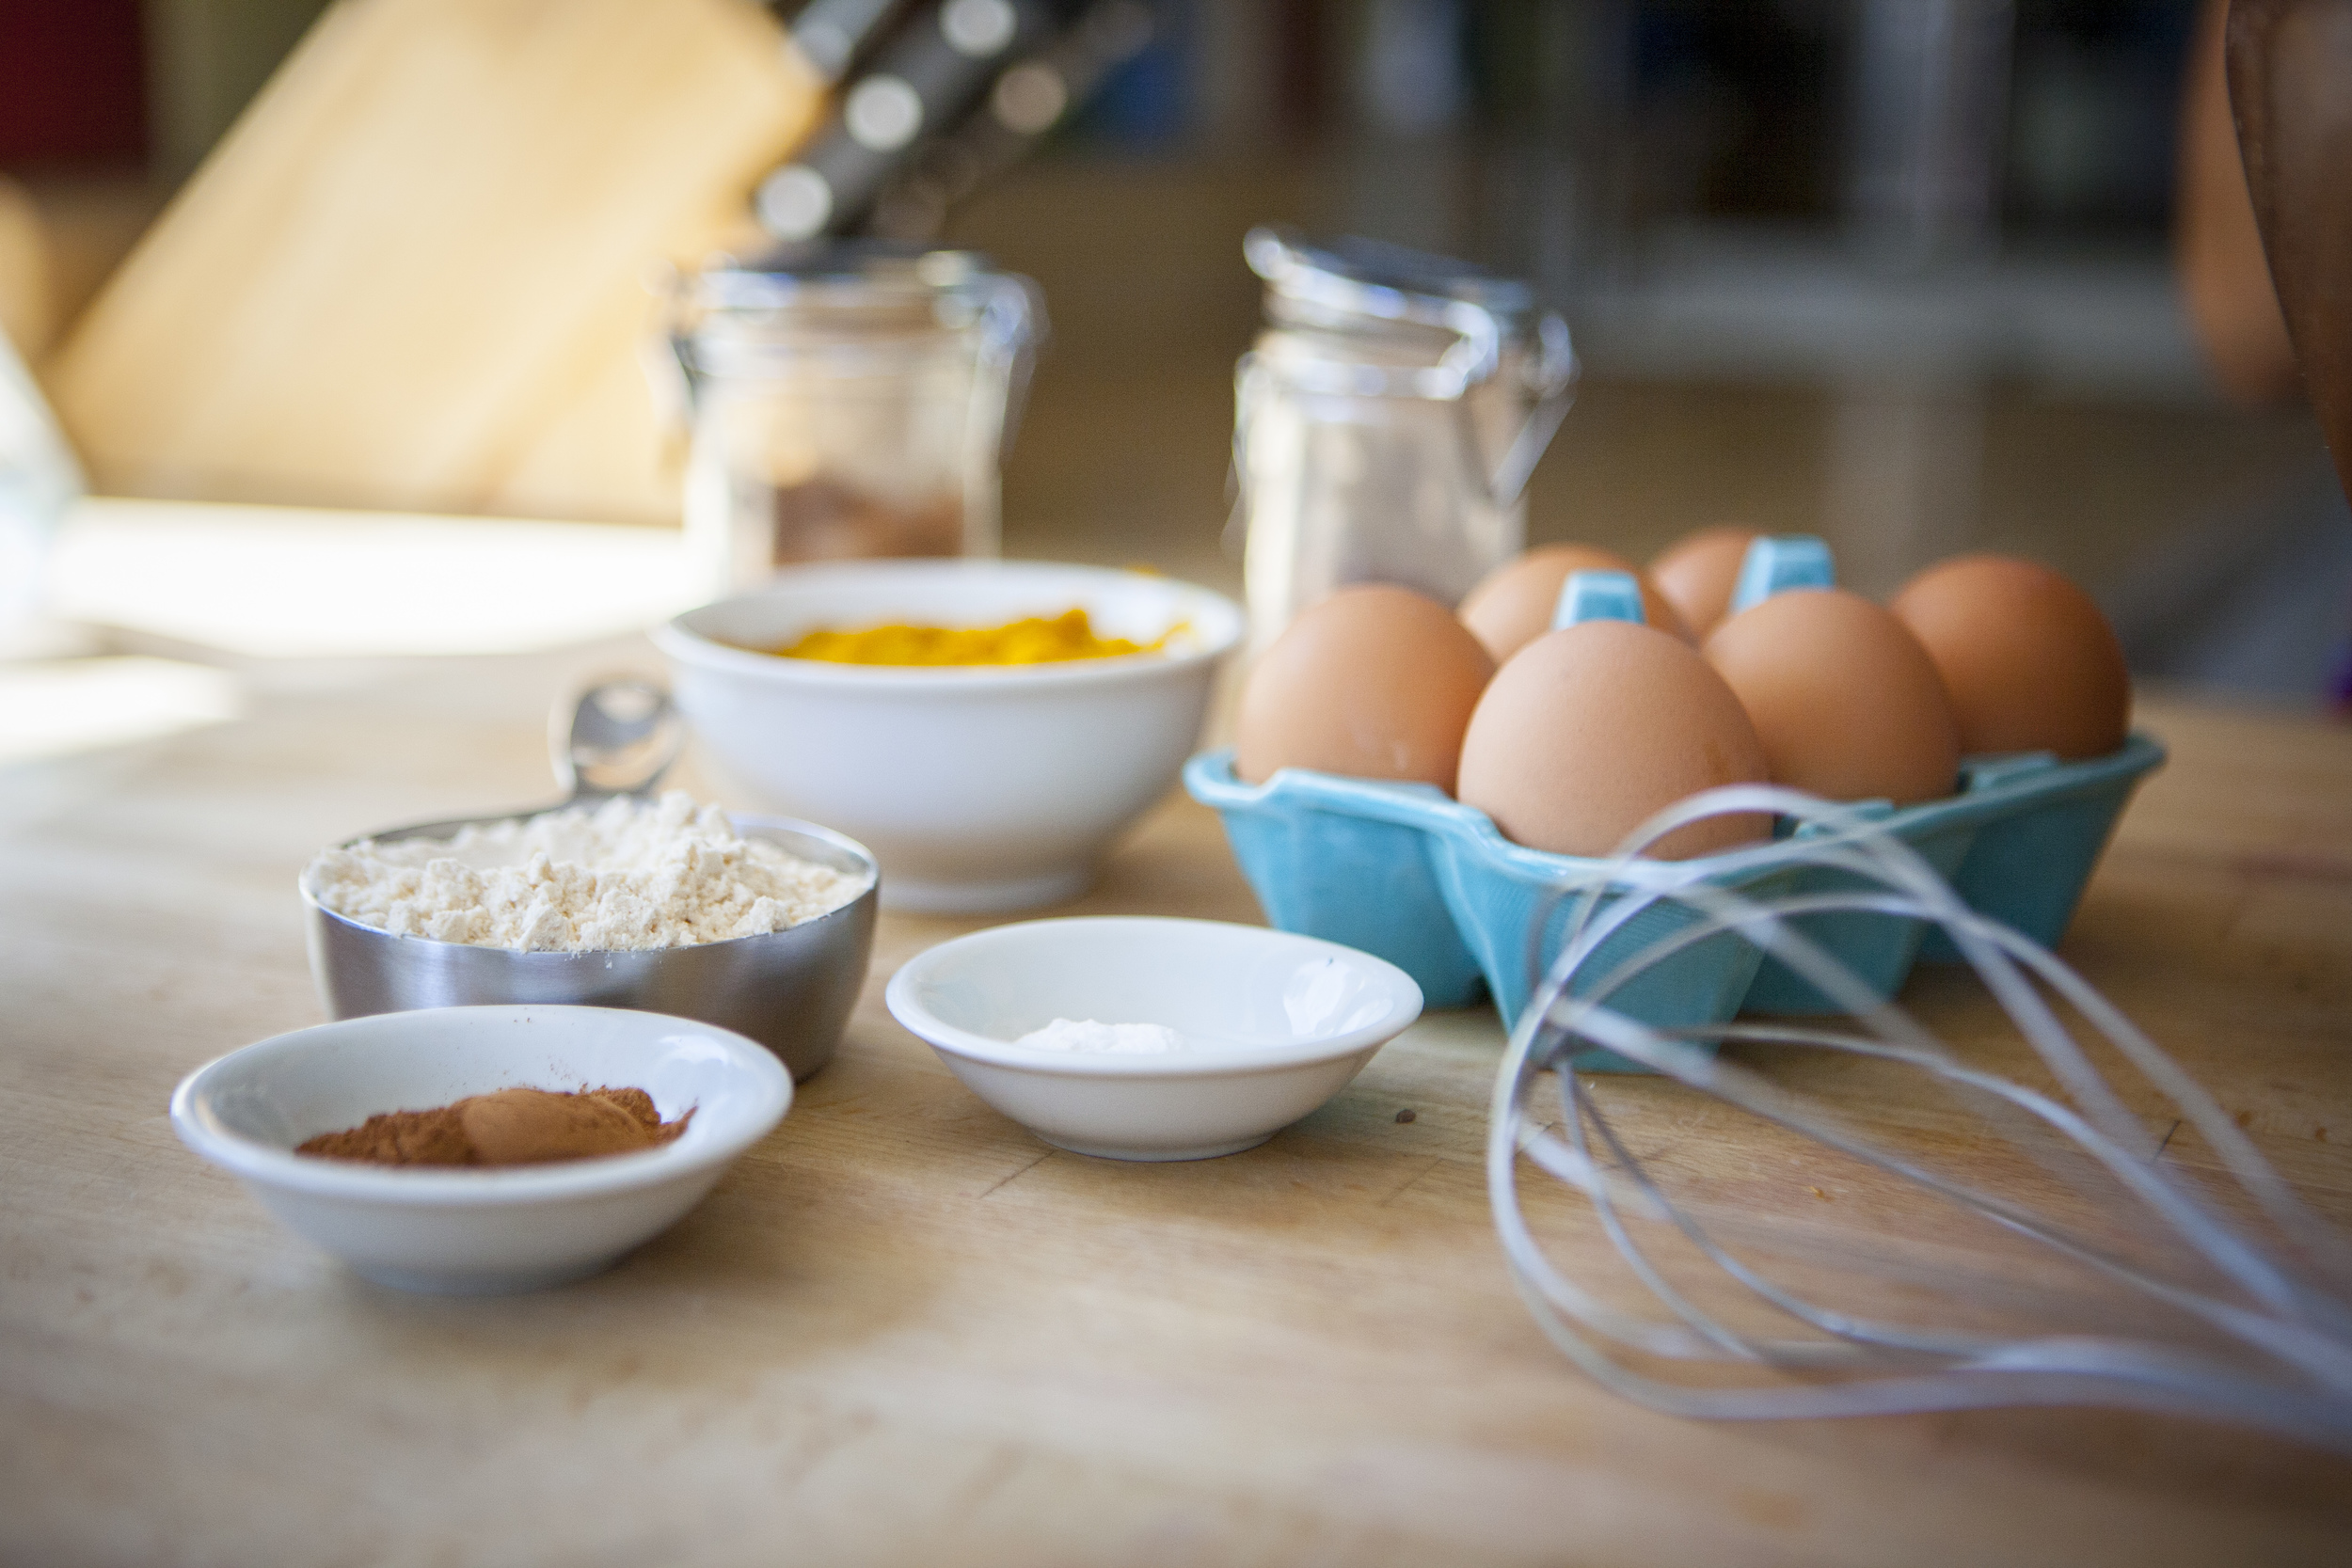

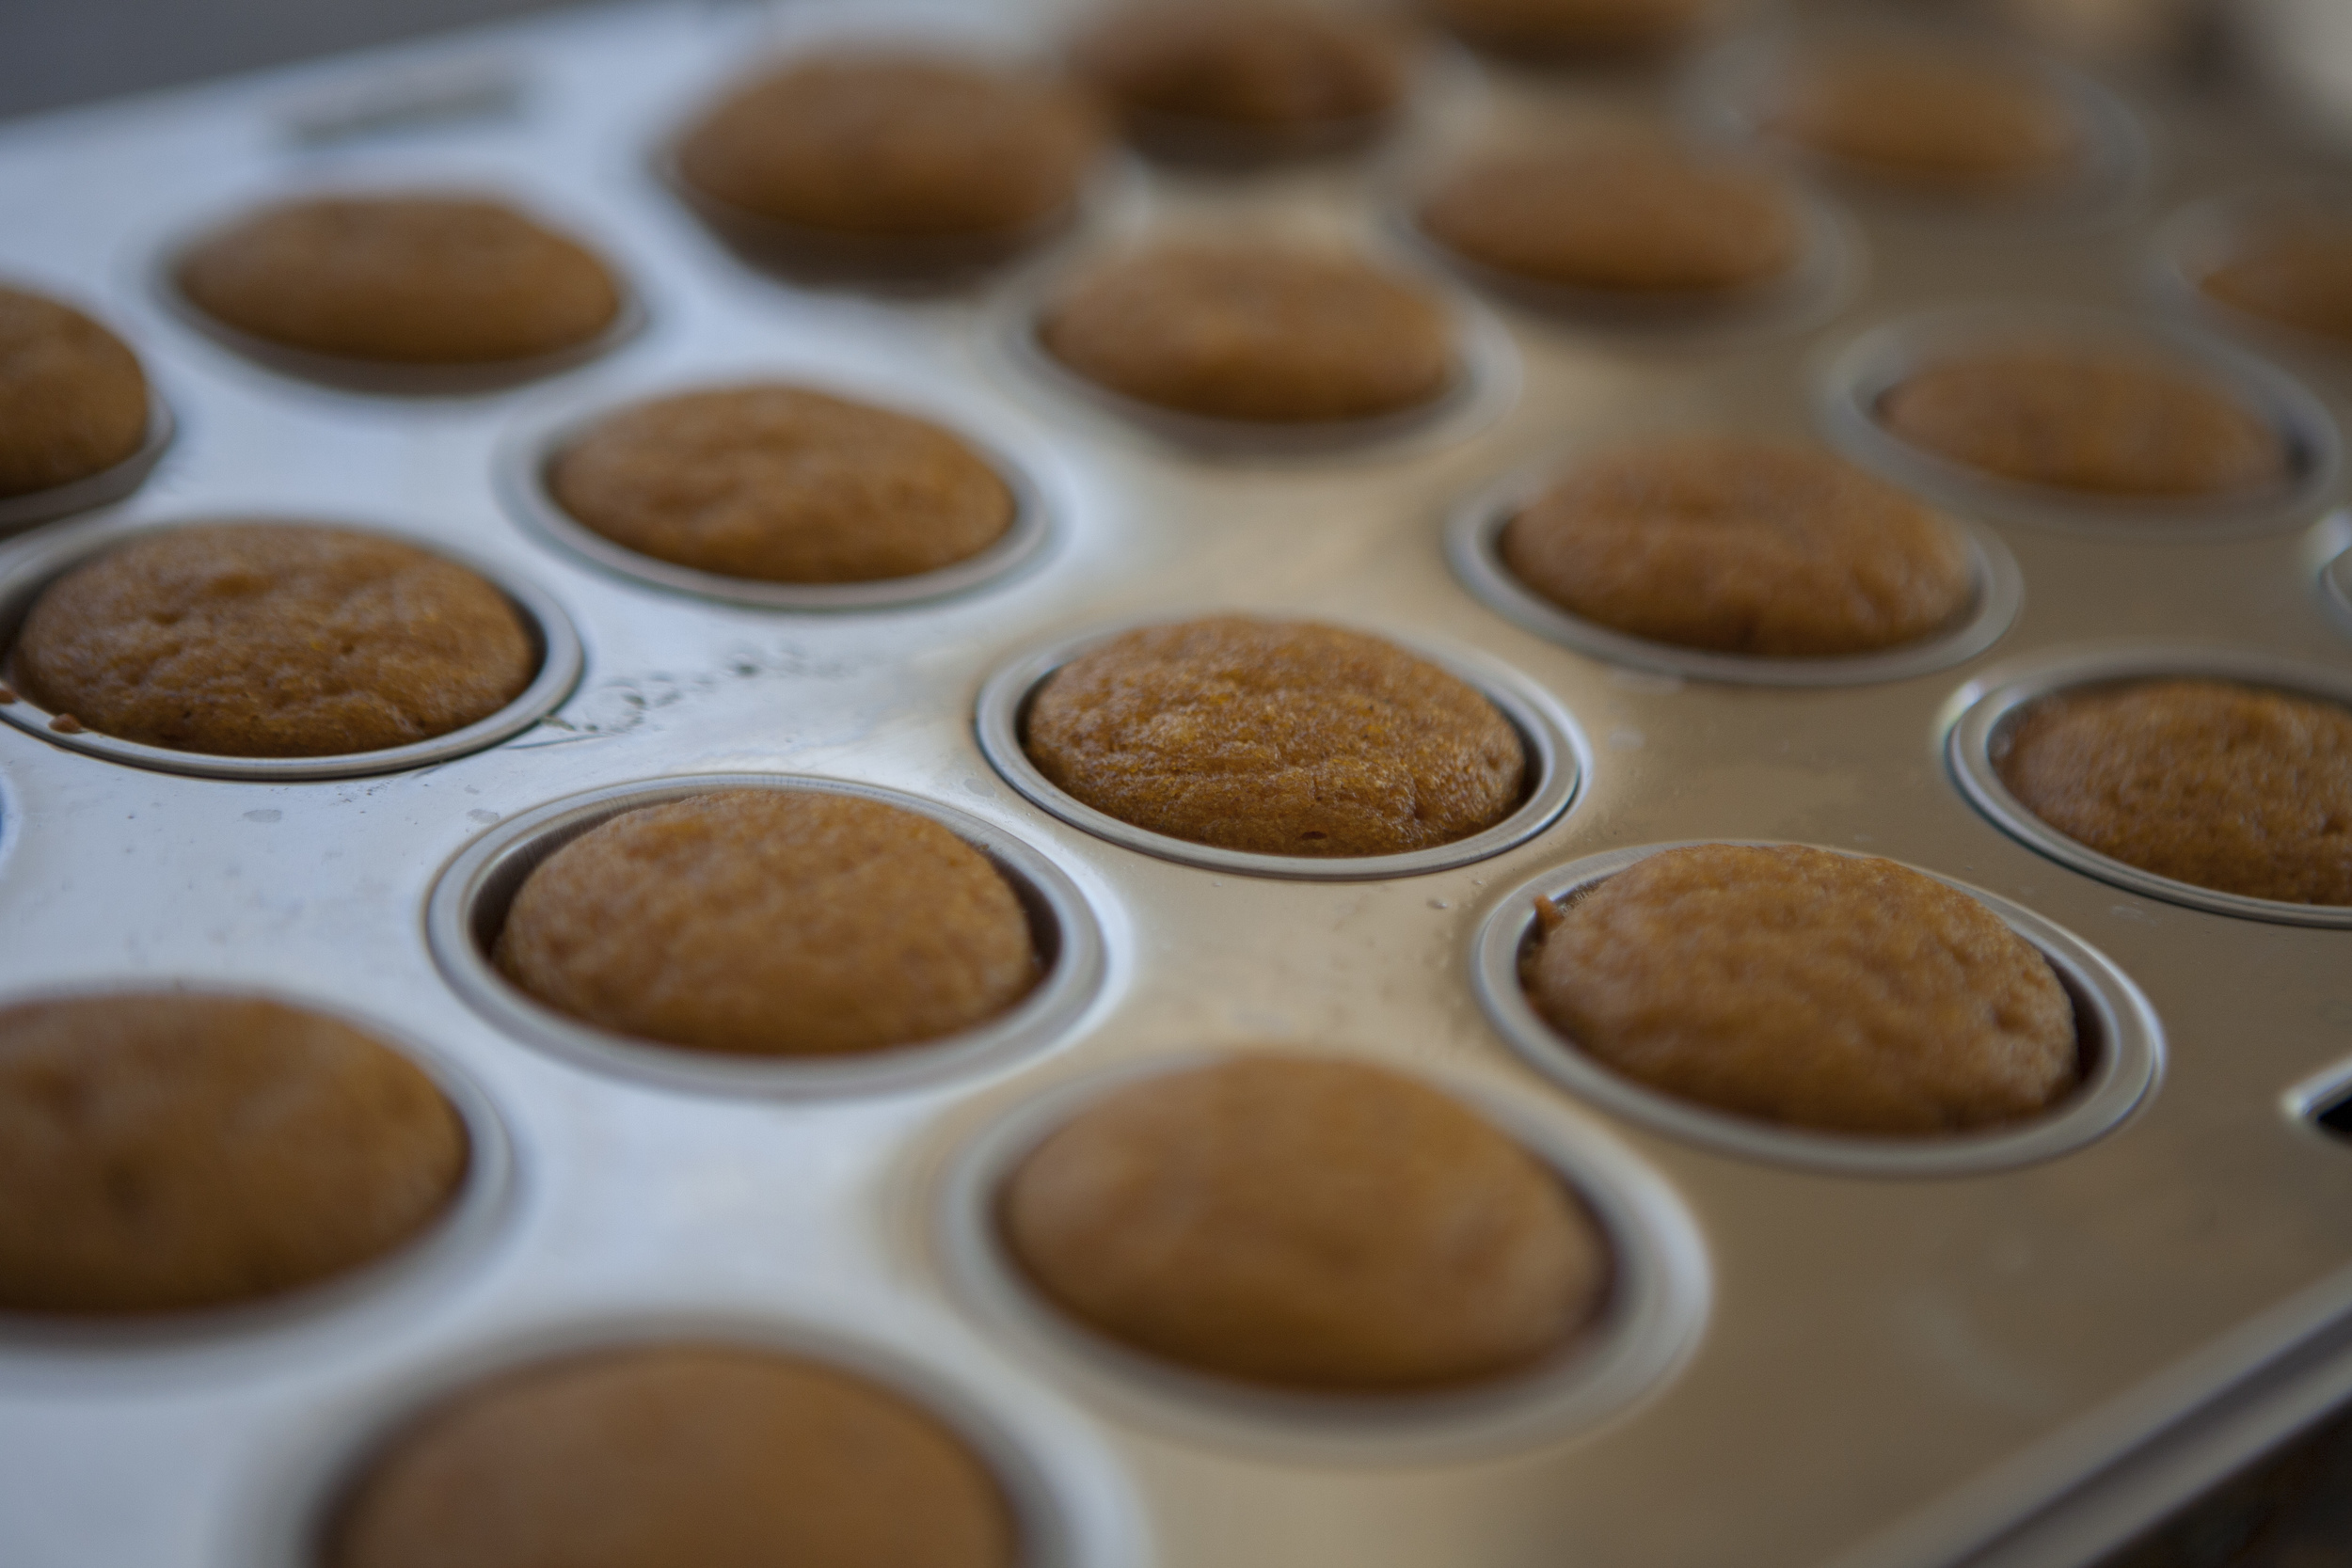
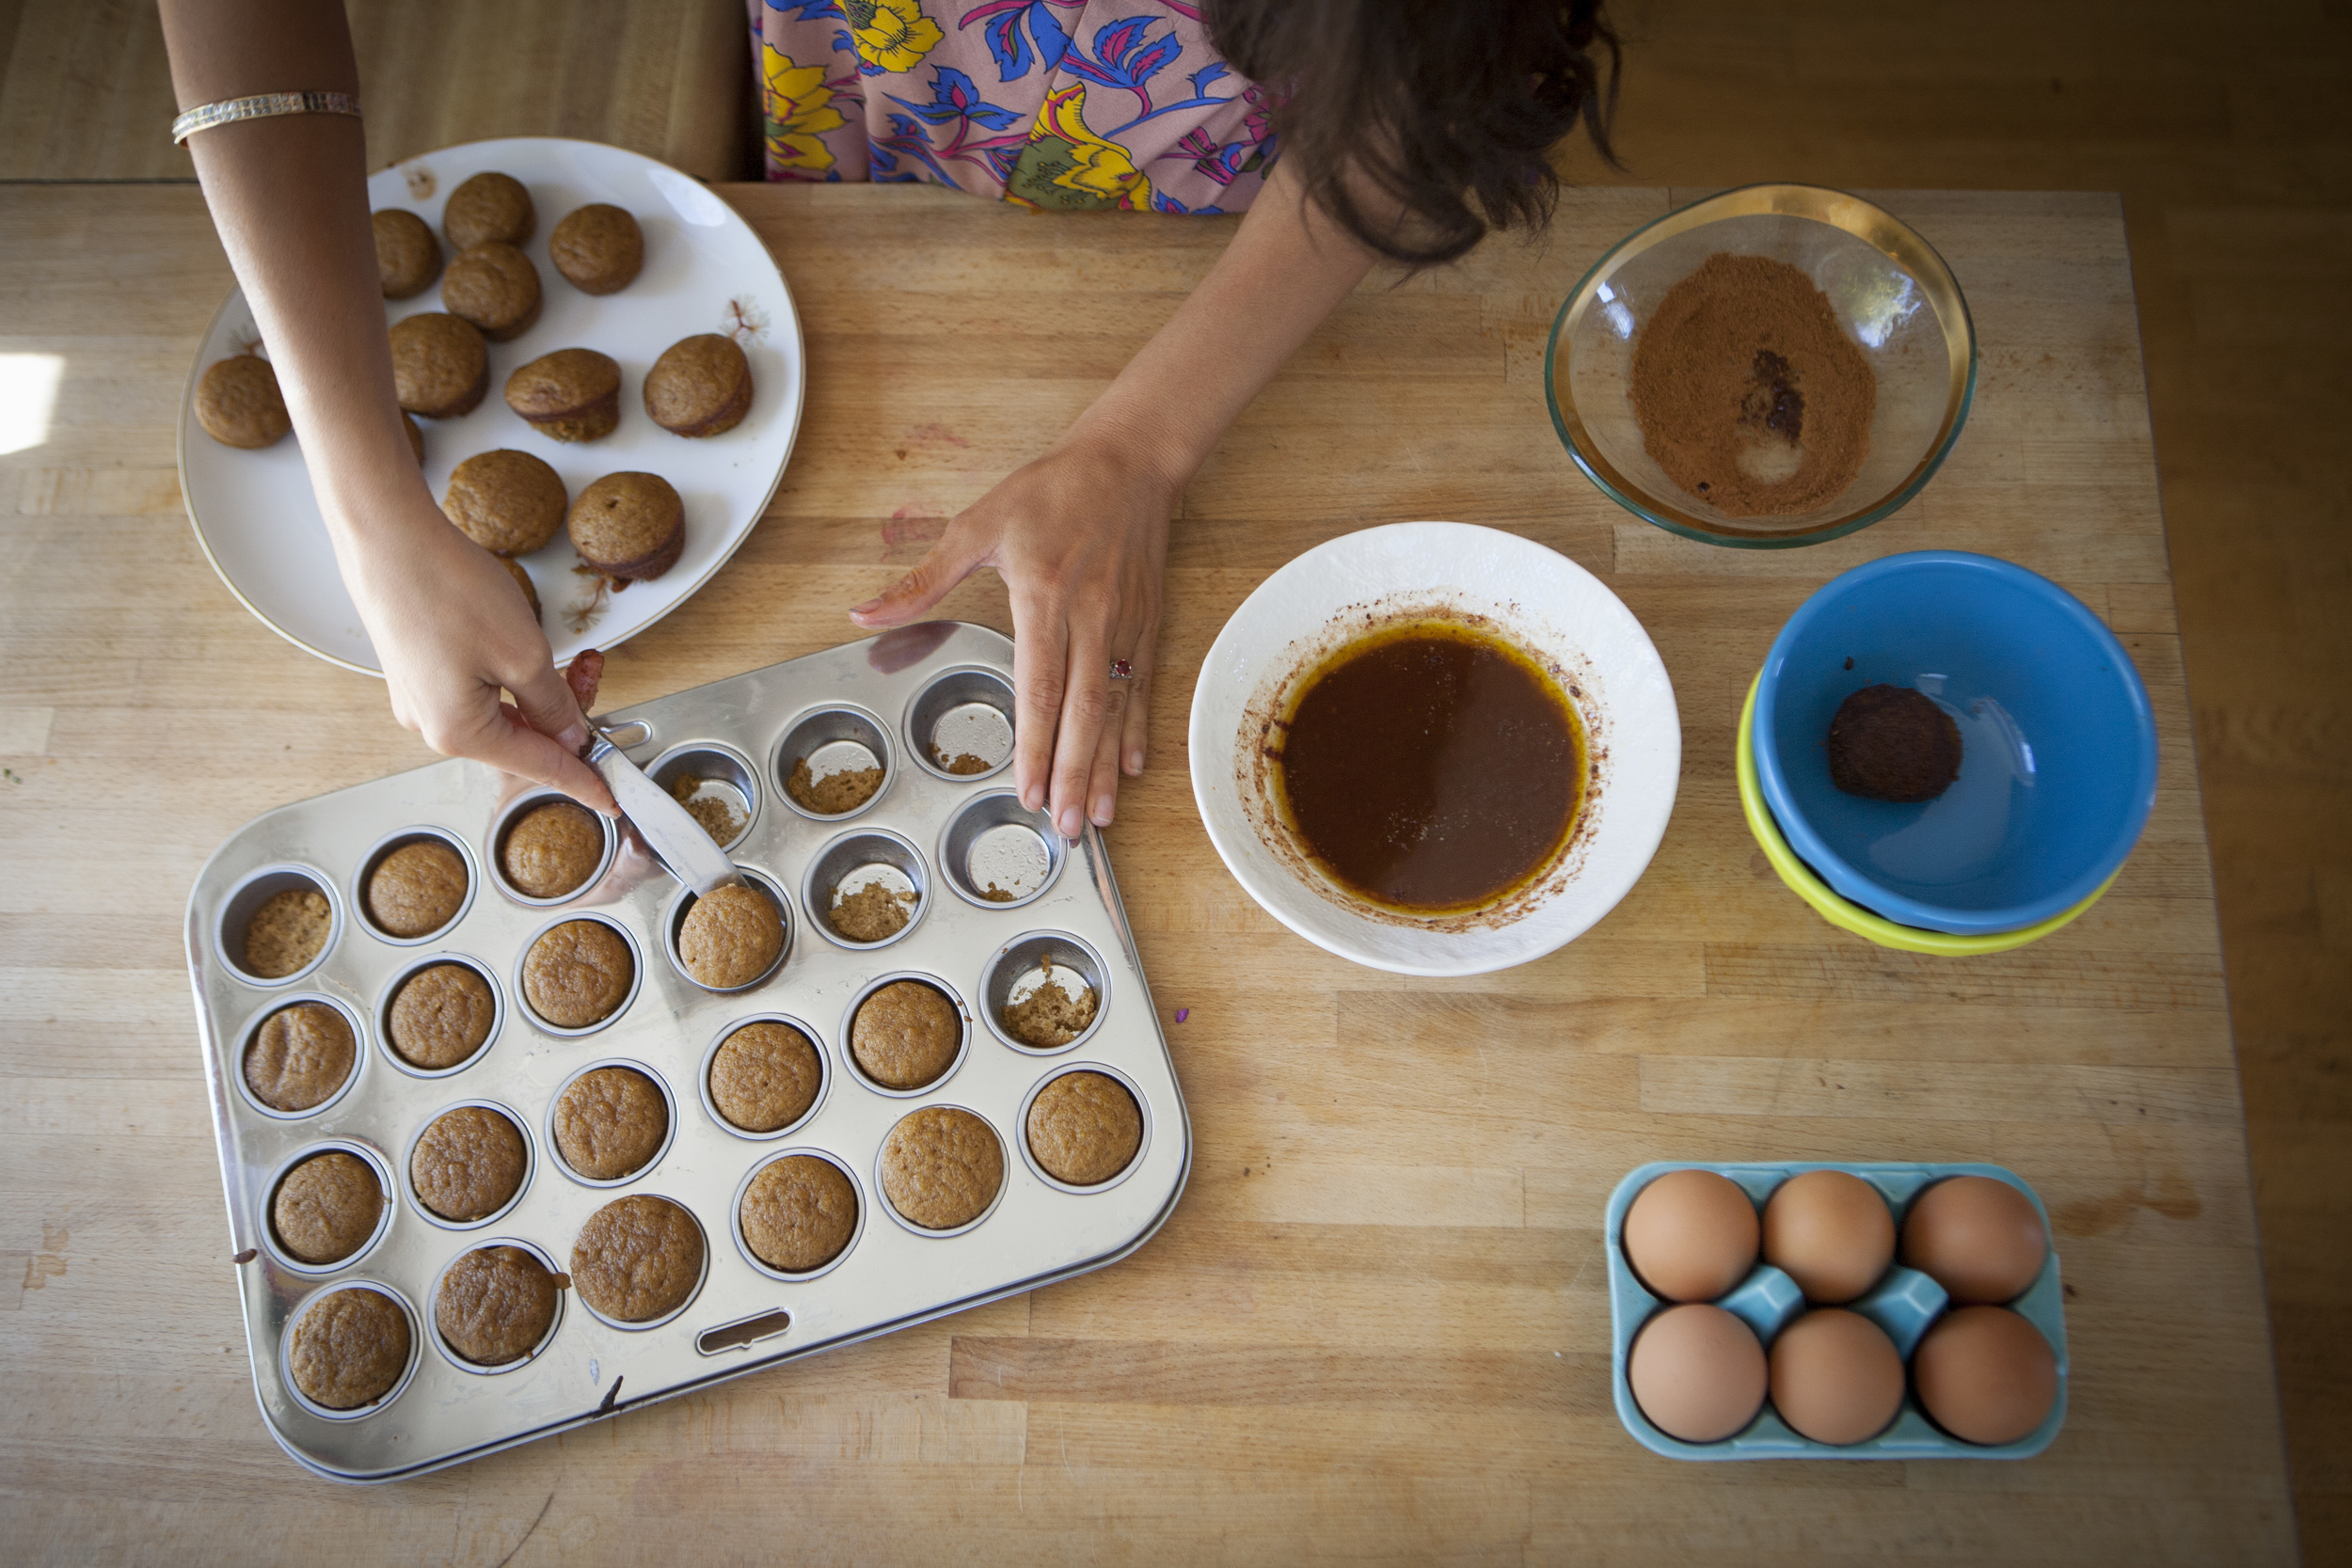
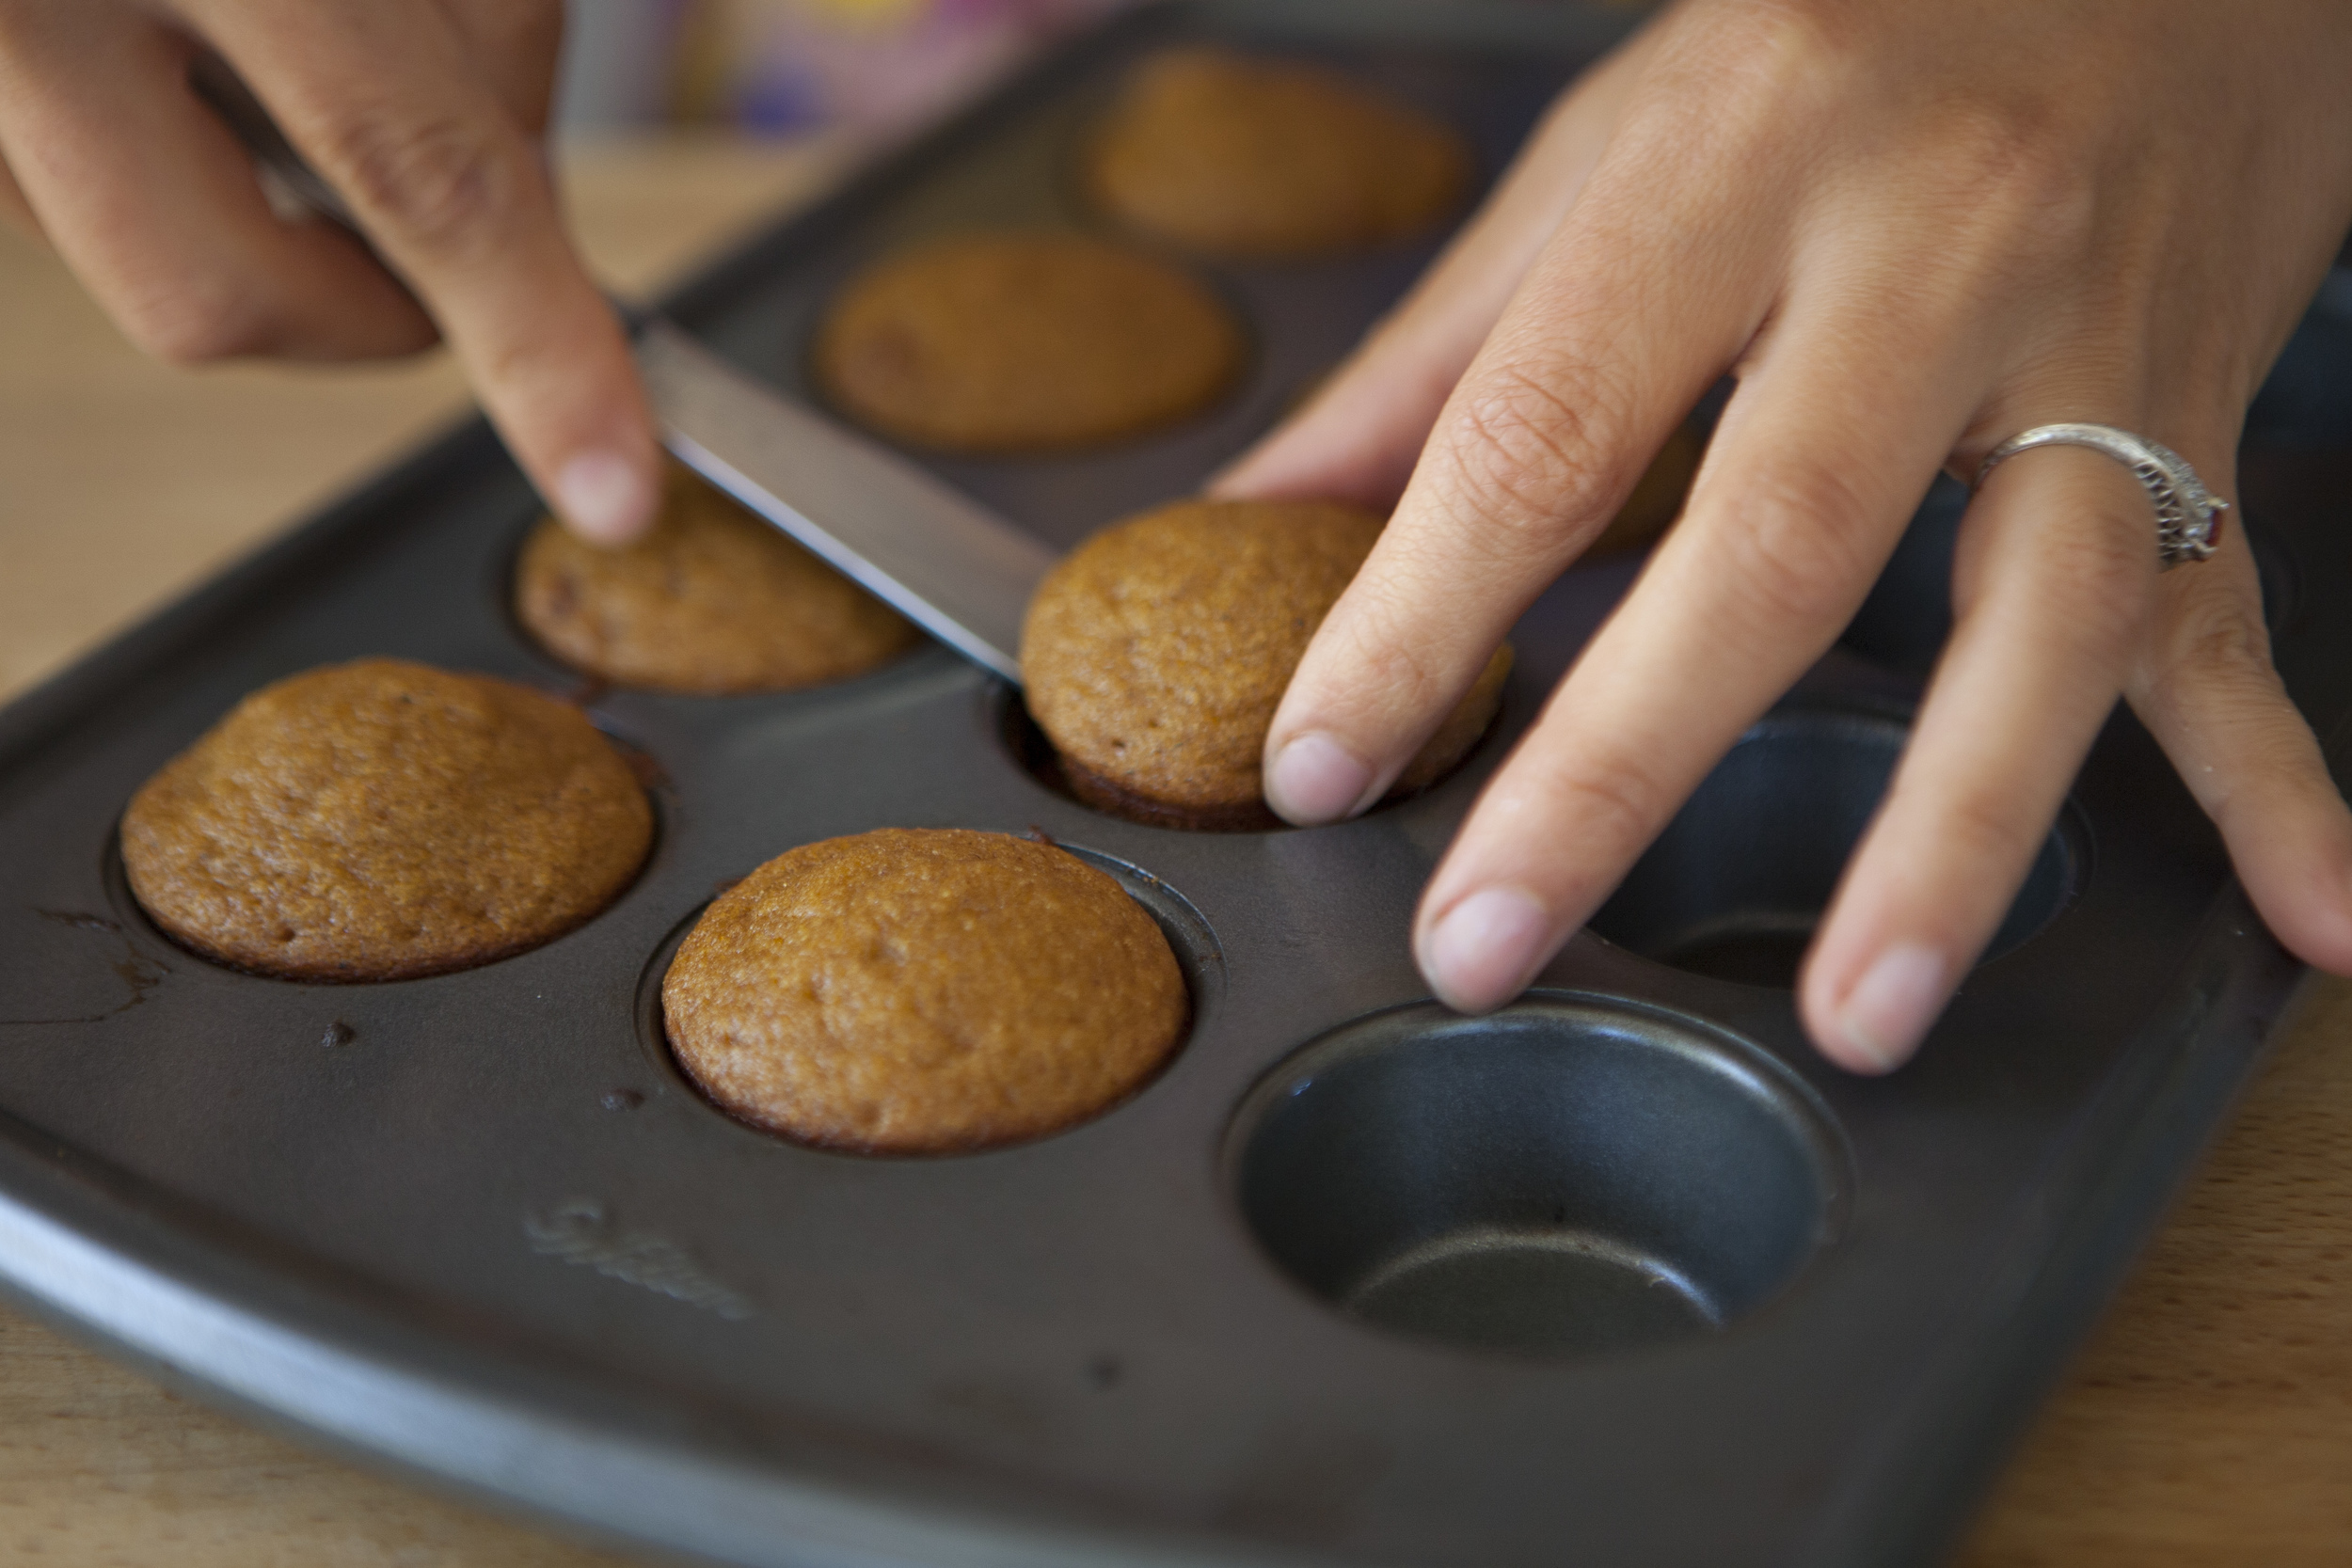
Paleo Pumpkin Muffins
Equipment
12 cup muffin pan
12 unbleached large baking cups
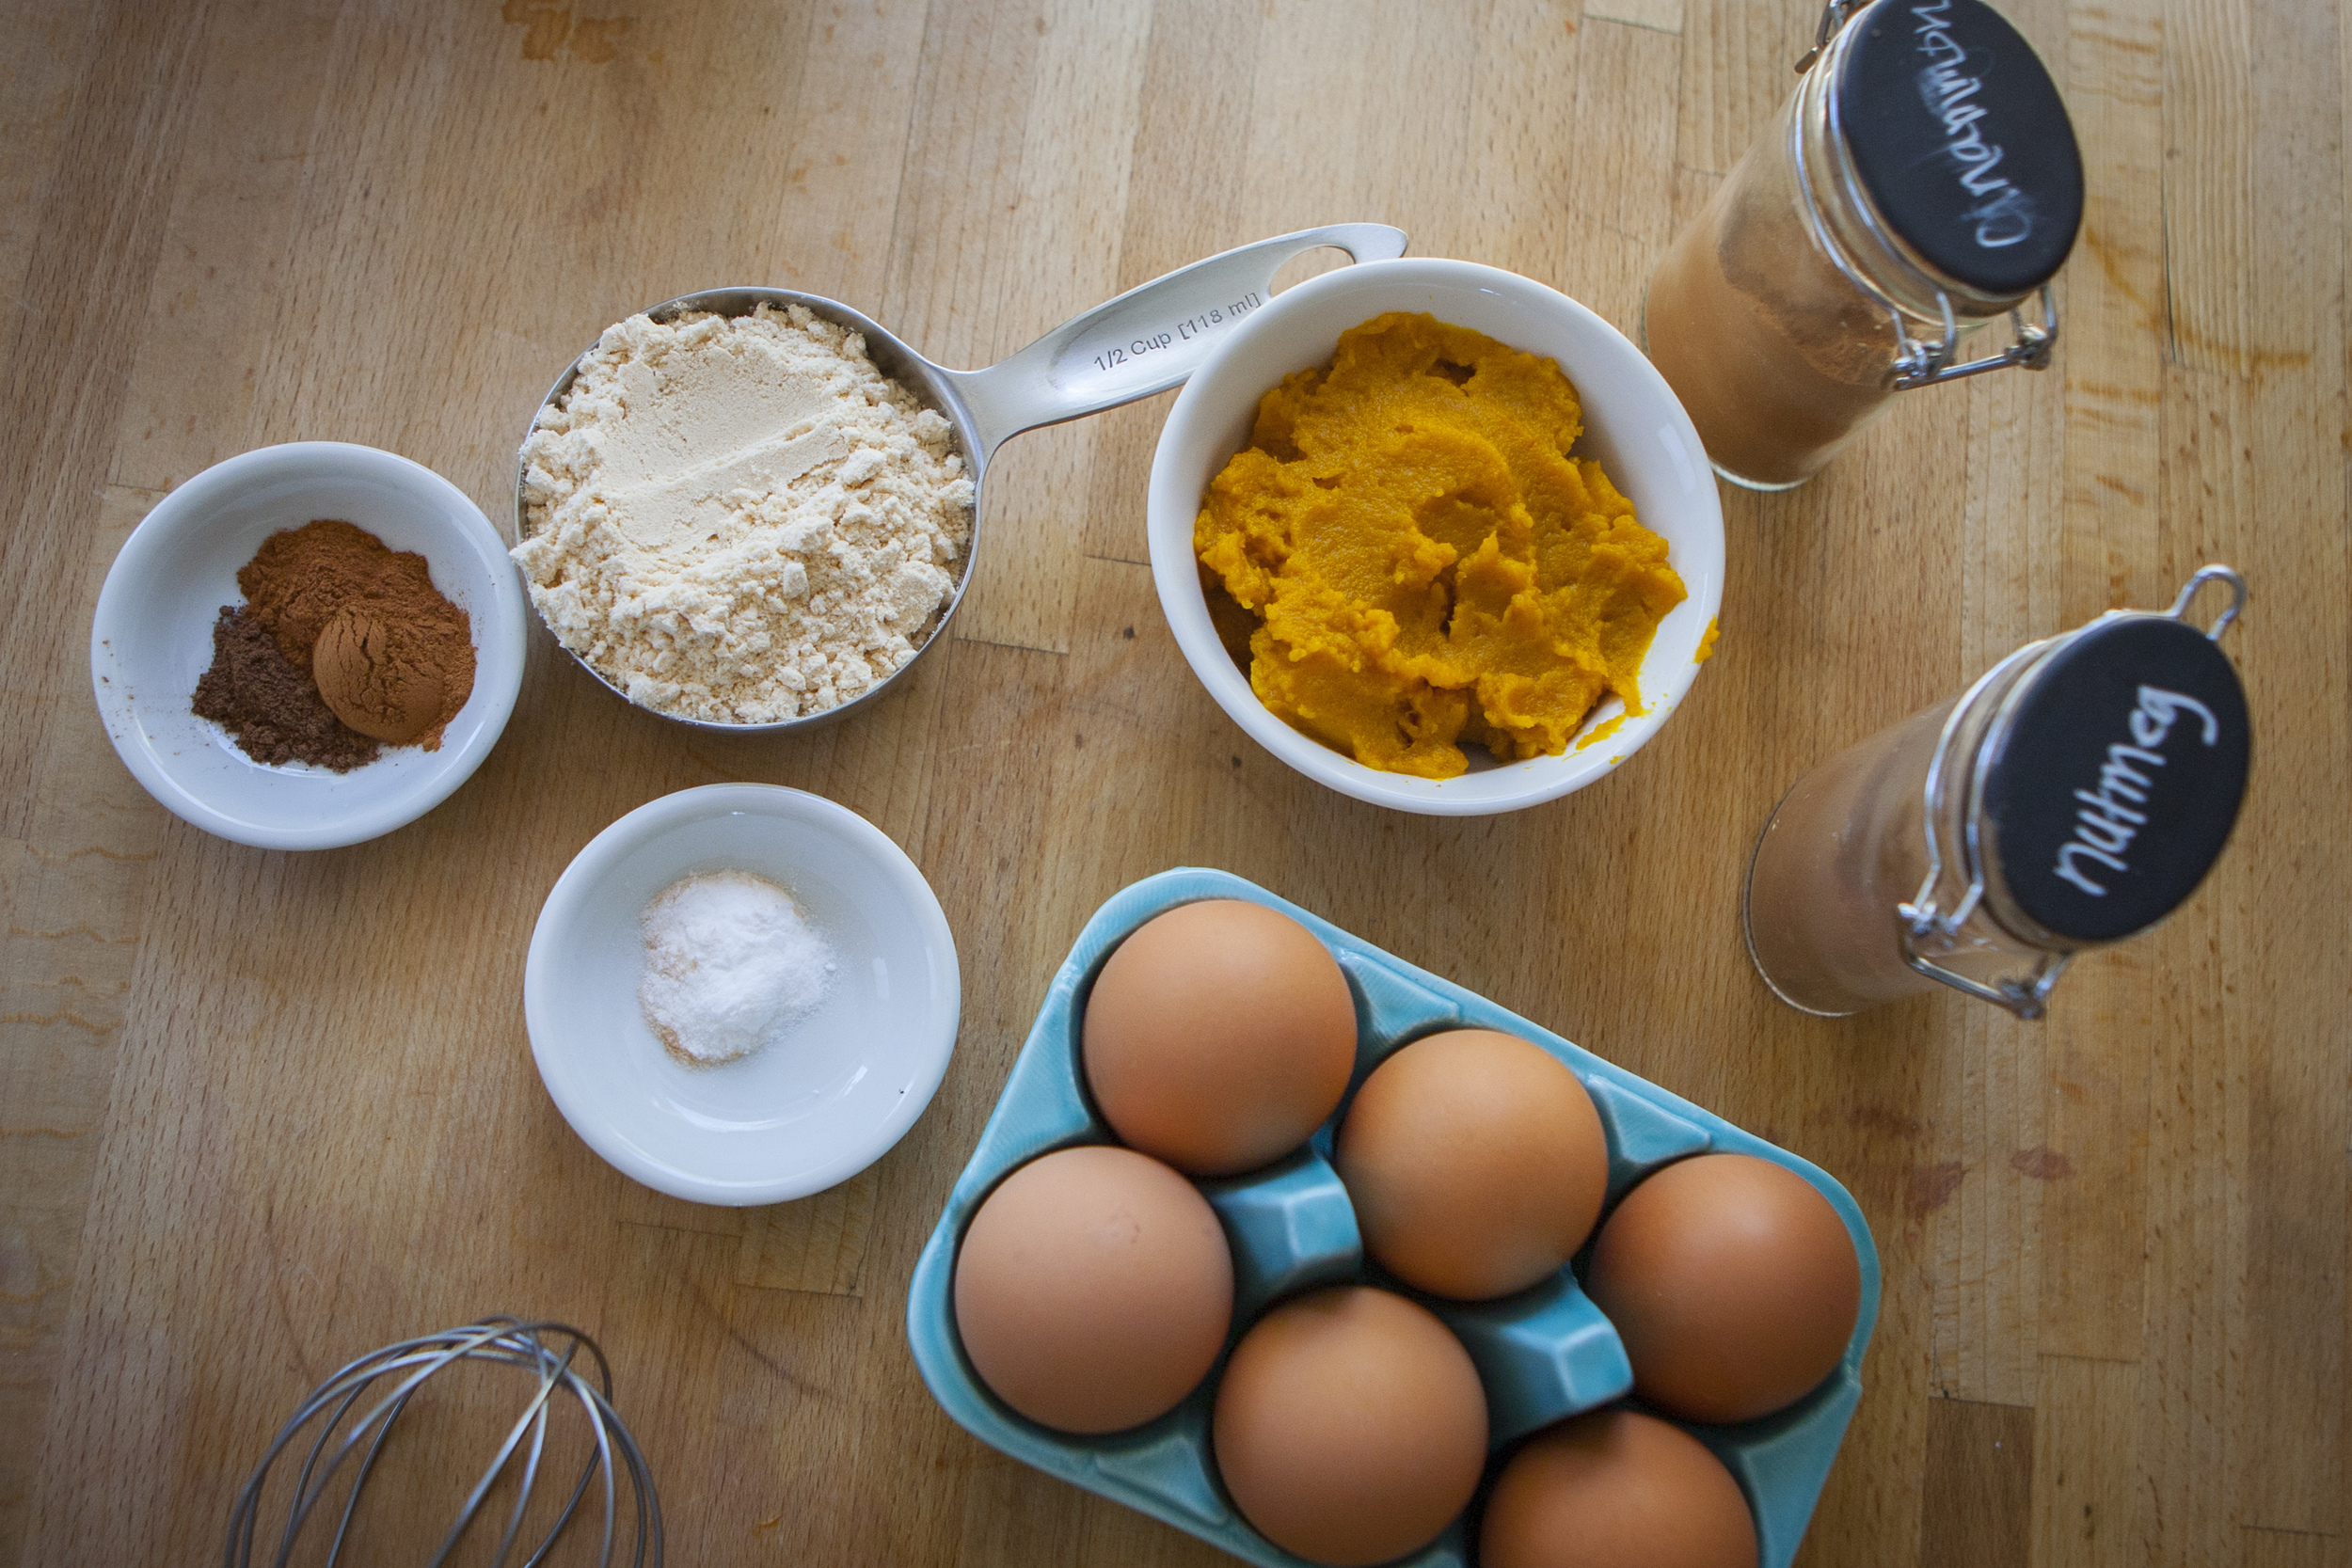
Ingredients
1/2 cup canned pumpkin puree (not pumpkin pie filling)
1/2 cup grass-fed butter or palm shortening (for a dairy free option)
5 eggs, beaten
1 teaspoon vanilla
1/3 cup honey
1/2 cup coconut flour
1/2 teaspoon cinnamon
1/2 teaspoon nutmeg
1/4 teaspoon all spice
1/8 teaspoon ground cloves
1/4 teaspoon sea salt
1/2 teaspoon baking soda
Topping
1 teaspoon coconut sugar
1 teaspoon cinnamon
Preheat oven to 350 F
Place liners in the muffin pan and set aside
In a bowl, combine, pumpkin, butter, eggs, vanilla and honey. Whisk until thoroughly mixed.
Sift together coconut flour, salt and spices. Add the dry ingredients to the wet ingredients. Whisk to combine.
Let sit for 5 minutes to allow the coconut flour to absorb the wet ingredients.
Add baking soda, stir until baking soda is mixed through.
Fill baking cups ¾ full with your batter.
Mix the coconut sugar and cinnamon together and sprinkle it on top of the muffins.
Bake for 15 minutes or until a toothpick inserted in the center comes out clean.
Allow muffins to cool for a few minutes by either removing them from the pan and setting them on a cooling rack or leaving them in the pan and tipping them on their sides.
Enjoy!


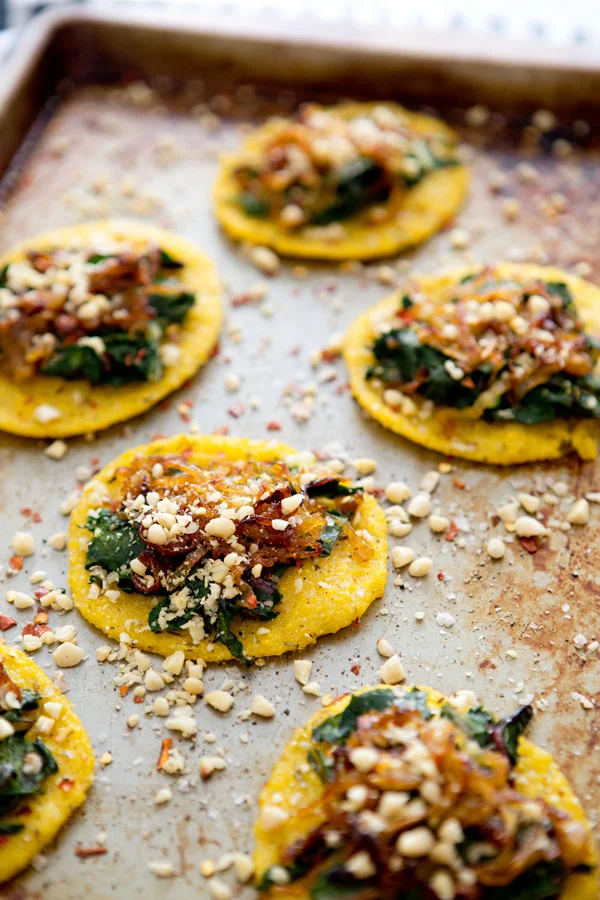
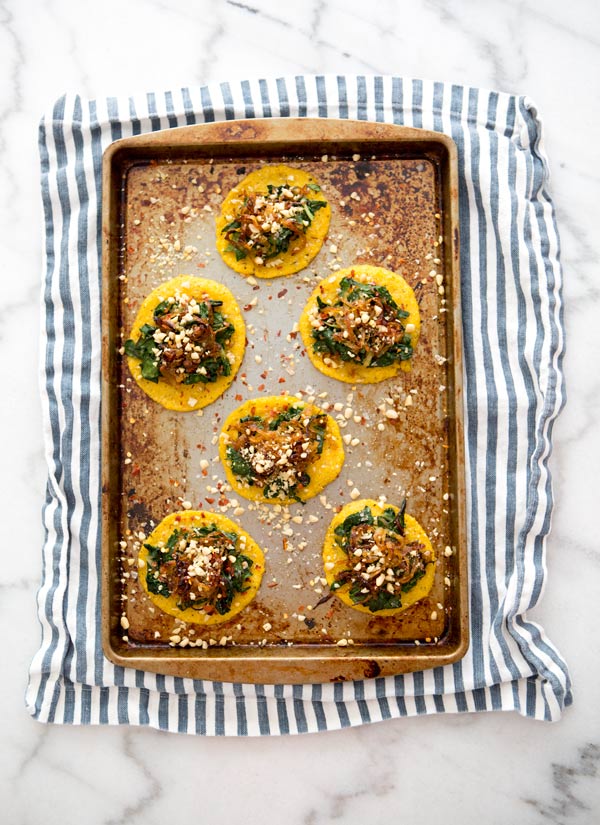
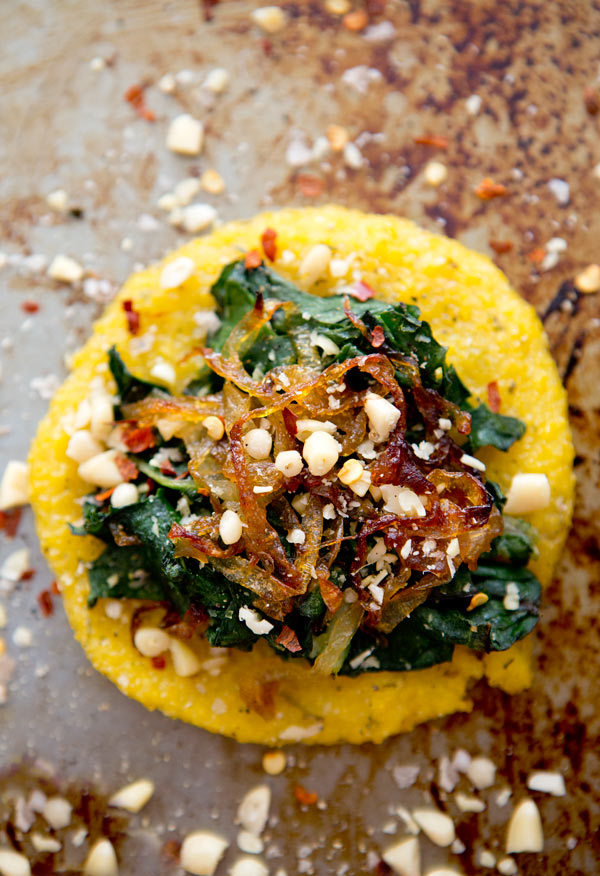
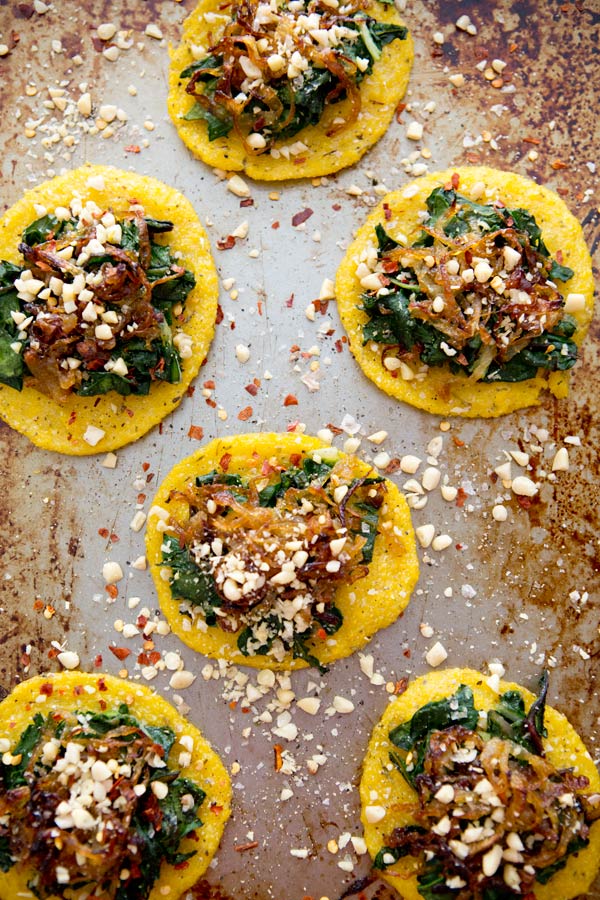
MINI POLENTA PIZZAS
We've had our eye on this mini polenta pizza recipe for quite some time and we can't be more excited to share it with you. This AMAZING recipe comes from House in the Hills - a fantastic blog that we just can't seem to get enough of. This caramelized onion and rainbow chard version is to die for.. but we want to see your variations! Show us by using #estcalifornia on your social devices!

We've had our eye on this mini polenta pizza recipe for quite some time and we can't be more excited to share it with you. This AMAZING recipe comes from House in the Hills - a fantastic blog that we just can't seem to get enough of. This caramelized onion and rainbow chard version is to die for.. but we want to see your variations! Show us by using #estcalifornia on your social devices!
MINI POLENTA PIZZAS (topped with rainbow chard and caramelized onion)
Serves 4- approximately 12 mini pizzas
Vegan + Gluten Free
Ingredients
1 cup polenta
3.5 cups vegetable broth
1 large yellow onion
1 large bunch of rainbow chard
1/4 teaspoon dried basil
1/4 teaspoon dried oregano
1/4 teaspoon dried thyme
1/4 teaspoon dried rosemary
1/2 teaspoon sea salt and more to taste
5 tablespoons of chopped pine nuts
4 tablespoons of olive oil
4 medium cloves crushed garlic
6 tablespoons pesto (recipe here)
crushed red pepper flakes
Method
Crust
- Preheat oven into 375 F.
- In a medium, heavy bottomed pot combine polenta, vegetable broth, 1 tablespoon olive oil, 1/2 teaspoon salt, thyme, oregano, rosemary and basil.
- Cook over medium low heat stirring continuously with a whisk for about 8-10 minutes or until polenta is very thick.
- Immediately spoon polenta onto (2) 10X15 baking sheets forming 2.5 inch round circles and lightly flattening with spoon.
- Let polenta sit for 20 minutes or place in refrigerator to firm up before baking.
- Bake for 20 minutes.
Toppings
- In a medium frying pan combine 3 tablespoons olive oil, 1 very large thinly sliced onion, and 2 good pinches of sea salt.
- Sauté over low heat stirring every 5-7 minutes until brown and caramelized (could take up to one hour). The trick to the most amazing caramelized onions is to cook them as slowly as possible and patience TOTALLY pays off!
- Prepare rainbow chard by separating the stems of the chard from the leaves. Discard stems. Thoroughly wash and dry leaves.
- Rough chops leaves until no large pieces remain.
- In a medium frying pan combine chard, crushed garlic and 1 tablespoon olive oil.
- Sprinkle with sea salt and cook over med-low heat stirring frequently.
Assembly
- Spoon 1/2 tablespoon pesto onto each pre-baked pizza crust, top with cooked chard and caramelized onions.
- Cook for an additional 10 minutes, or until crust is crunchy!
- Sprinkle with chopped pine nuts, fresh cracked pepper, finishing salt and red pepper flakes to your preference.
- Serve using a thin spatula to remove pizzas from baking sheet. Let sit cool for a minute or two before serving.
Notes
* If onions begin to stick add additional oil as needed.
* Be careful! Polenta splatters when cooking!
* Do not oil baking sheets, this will keep the crusts from crisping as much as you’d like.
* As polenta firms up it becomes harder to spread. If this happens when creating the crusts add a tiny bit more veggie broth to mixture and return to stove, heating for an additional minute before attempting again.


----------
All Photography and Recipe from A House in the Hills


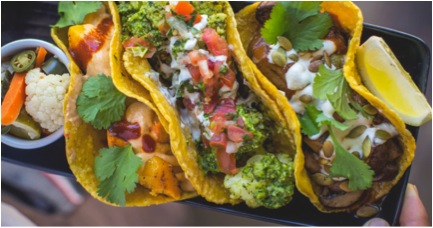
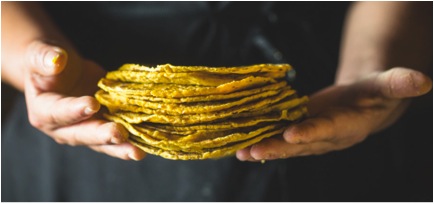
GRACIAS MADRE: A One-of-a-Kind Plant Based Mexican Restaurant
I was recently in West Hollywood and decided to check out Mexican Restaurant, Gracias Madre. I could literally eat Mexican food everyday, specifically here in Los Angeles, and am very intrigued with the idea of Mexican cuisine that does not incorporate meat. I didn’t really know what to expect.

Images via Gracias Madre
I was recently in West Hollywood and decided to check out Mexican Restaurant, Gracias Madre. I could literally eat Mexican food everyday, specifically here in Los Angeles, and am very intrigued with the idea of Mexican cuisine that does not incorporate meat. I didn’t really know what to expect.
Disclaimer: I am not vegan. Now that I got that off my chest, I want all meat lovers reading this to stick with me here since the food at Gracias Madre was so delicious. When I walked in, I was blown away by the décor. The indoor dining area and large patio were both very spacious and comfortable. The colors were bright and welcoming with beautiful tiles surrounding a bar showcasing extensive tequila options.
Gracias Madre exceeds expectations with its “organic, farm fresh, locally sourced, full of flavor and love” cuisine. Executive Chef Chandra Gilbert has an impressive repertoire, including Café Gratitude (esteemed vegan restaurant) as Director of Operations. Beverage Director Jason Eisner has made a menu that highlights small-batch mezcals and tequilas. Even the cocktails are made with local ingredients and house made syrups.
Now, let’s talk about the menu. I chose to start with the gordita appetizer that was a potato masa cake, with warm salsa verde, avocado, and cashew crema. Surprisingly, the crema tasted very similar to sour cream and it was really light. I was also drawn to the coconut ceviche tostada. That one blew my mind. They take coconut meat and slice it into little pieces,adding lime juice, guacamole, pico de gallo and lettuce. The texture felt exactly like what a fish ceviche would. It was delicious. Their menu had plenty of different options and the staff was very knowledgeable. Popular items include flash-fried cauliflower with cashew nacho cheese and lemon or the potato and chorizo made of tempeh quesadilla. Gracias Madre also offers Brunch on the weekends and an even more extensive dinner menu. Check it all out here.
The drink program there is also quite impressive. Options include a Boozy Popsicle with Mezcal, pineapple and jalapeno or snow cones like La Quinceanera featuring tequila blanco, muddled kiwi, mint, lemon, agave nectar, lime bitters, and shaved ice. My favorite hour is happy hour and theirs is from 3 p.m. to 6 p.m. Options include $5 margaritas and some food items at a discounted price.
I cannot wait to go back, and didn’t miss eating meat at all while at Gracias Madre. The menu is so different from typical Mexican and the flavors really shine, so I totally forgot it was even vegan. I would definitely recommend it and am excited for a fresh approach on Mexican, my favorite cuisine. Meatless Mondays is sounding better and better.
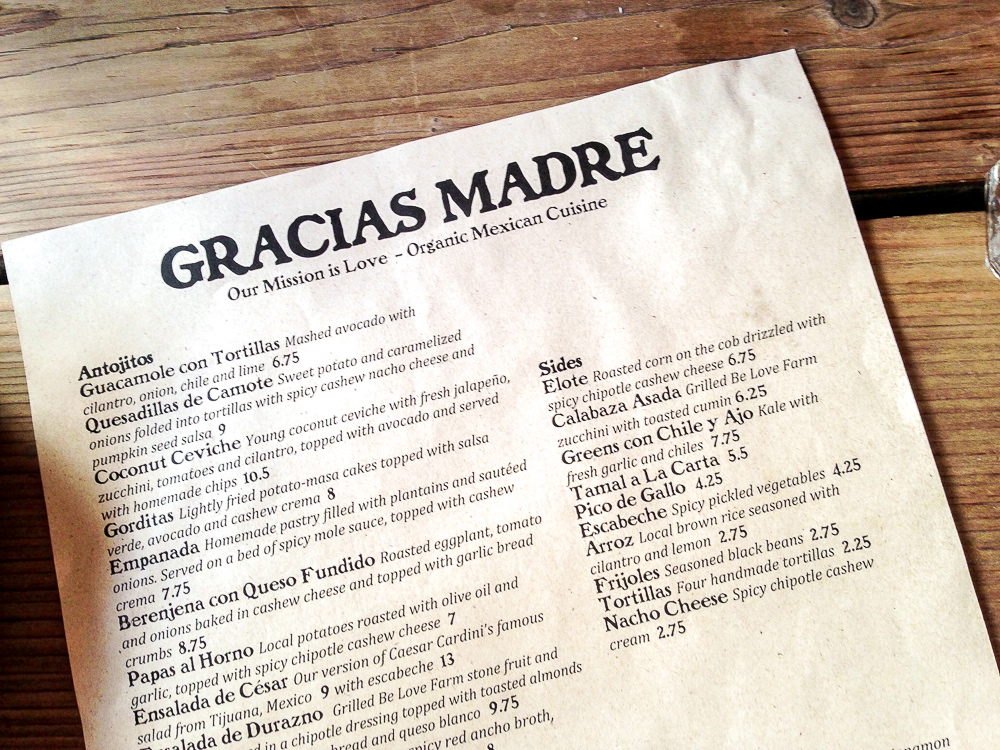

Gracias Madre
8905 Melrose Ave.
West Hollywood CA, 90060
ph: 323-978-2170
hours: 11am to 11pm

ABOUT THE AUTHOR

Keyla Vasconcellos is originally from Brazil and grew up in Virginia. When she moved to California, it immediately stole her heart. After attending Pepperdine University, she worked in restaurants where she grew to love all types of cuisines. She is aspiring to be a Gastronomist Extraordinaire by eating her way through Los Angeles and sharing her adventures with anyone who enjoys a delicious meal.


Kale Caesar Salad w/ Crispy Garbanzo "Croutons"
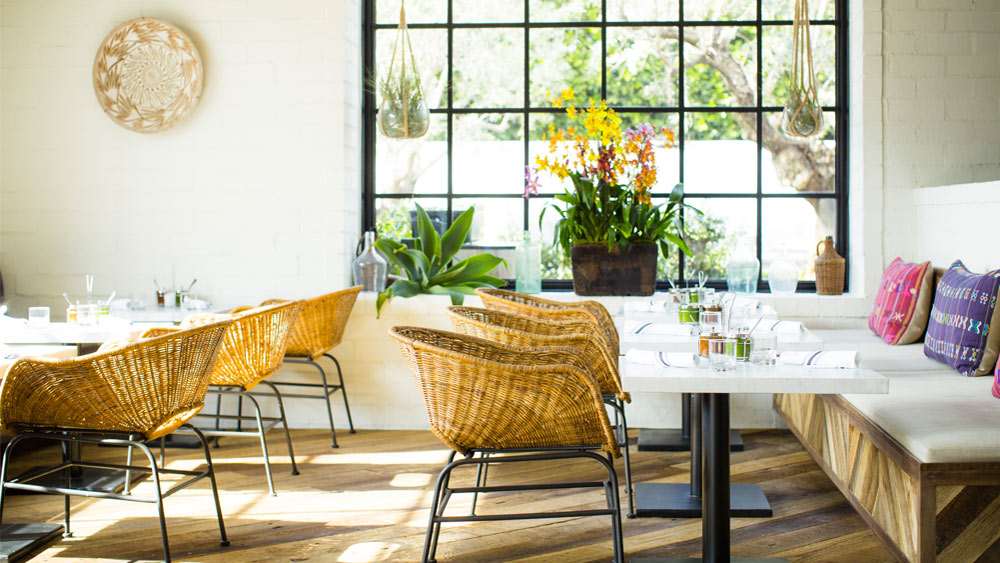
It’s no secret that California likes their salads. We have vegan restaurants, microbiotic cafes or gluten-free pizza joints almost everywhere you turn. We see words like “free-range” or “organic” in front of all our favorite ingredients and we don’t even blink an eye. We are all about putting healthy ingredients into our bodies.

Image via Mountain Mama Cooks
It’s no secret that California likes their salads. We have vegan restaurants, microbiotic cafes or gluten-free pizza joints almost everywhere you turn. We see words like “free-range” or “organic” in front of all our favorite ingredients and we don’t even blink an eye. We are all about putting healthy ingredients into our bodies.
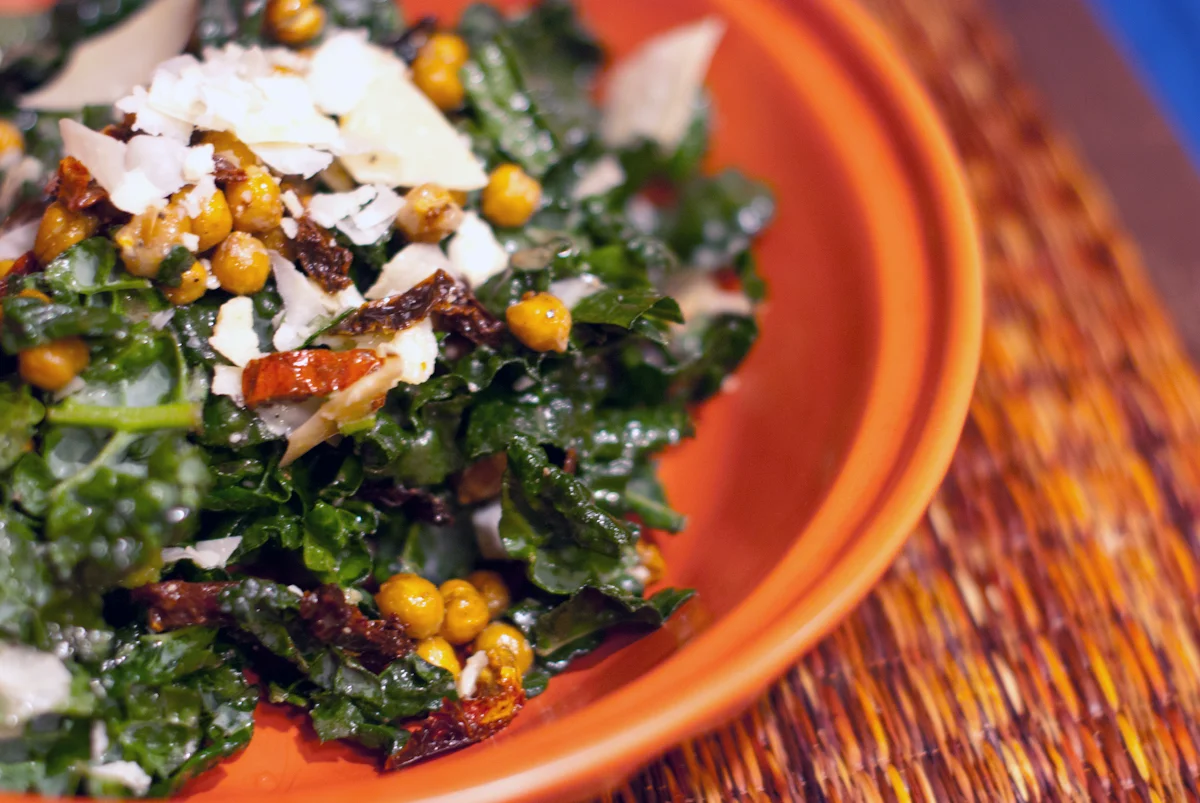
I’m not quite sure when Kale Caesar Salads started becoming popular but I keep seeing them pop up on menus all over Los Angeles. When I tried my first one, I quickly understood why. They are delightful! The Crunchy, bittery taste of the kale paired with salty parmesan and creamy Caesar Dressing – it’s a wonderful fusion of flavors.
This Kale Caesar Salad recipe has quickly become a favorite in my recipe box. Inspired by a recipe by Kelley Epstein over at Mountain Mama Cooks. I love the idea of replacing crunchy croutons with crispy garbanzo beans to give you that familiar crunch. However, this version is packed with fiber and protein which is a plus for vegetarians who are looking for protein alternatives. Although, you could easily add grilled chicken, shrimp or salmon to this dish and it would be equally tasty.
Kale Caesar Salad w/ Crispy Garbanzo "Croutons"
Prep Time: 10 minutes
Cook Time: 40 minutes
Ingredients
For the Dressing:
1 garlic clove
½ cup mayonnaise (or vegan mayonnaise)
1 tsp dijon mustard
3 tbsp lemon juice
1 tsp worcestershire sauce
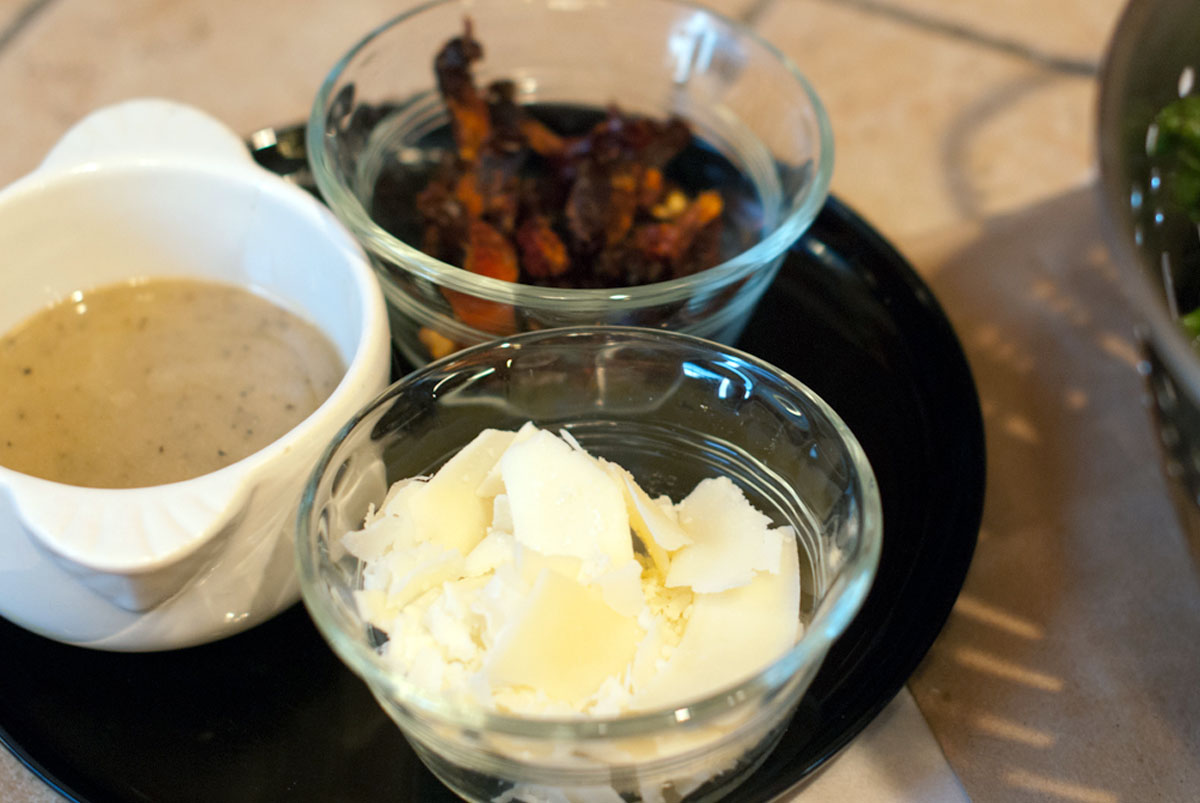
¼ cup freshly grated parmesan cheese
3-4 tbsp olive oil
1-2 tsp of water to thin if necessary
salt and pepper to taste
For Garbanzo Beans:
1 15oz can garbanzo beans
1 tbsp olive oil
salt and pepper to taste
For Salad:
1 head of kale (stems removed and chopped)
½ cup grated parmesan cheese
½ cup julienne sundried tomatoes
Caesar Dressing
Crispy Garbanzo Beans
Instructions
Preheat the oven to 375F degrees.
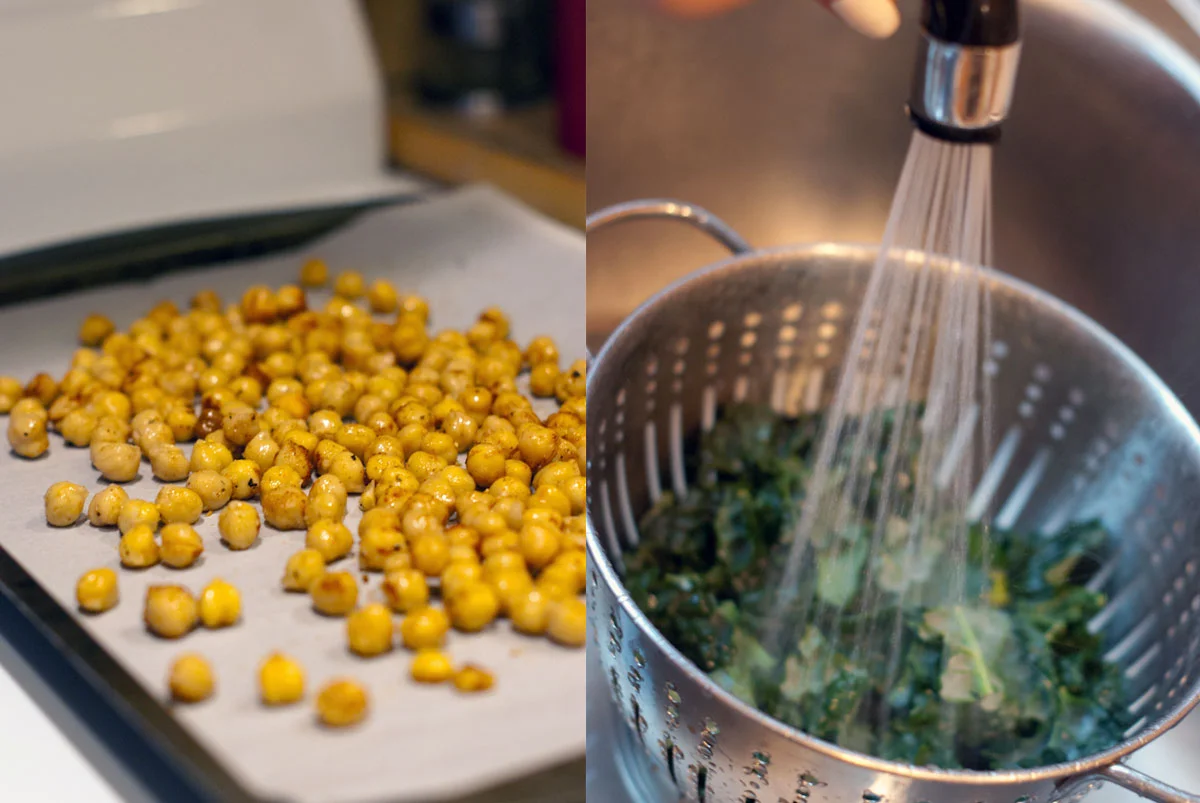
Rinse and drain the garbanzo beans. Then lay them on a double layer of paper towels and dry them as much as you can. Line the dried garbanzo beans on a baking sheet and toss with olive oil, salt and pepper.
Roast the garbanzo beans for 35-40 minutes until brown and crispy.
While the garbanzos are roasting, make the dressing:
Combine all ingredients except oil, salt and pepper in the base of a blender.
With the motor running, slowly add the oil in a thin stream into the blender.
When the dressing is thoroughly mixed, test for desired thickness. If you want it a little thinner, add the water a teaspoon at a time.
Season with salt and pepper.
To Assemble Salad:
Clean the kale and remove the leaves from the thick inner stalk.
Chop the kale and transfer to a large bowl.
Dress with desired amount of Caesar dressing and grated parmesan cheese.
Top with sun-dried tomatoes crispy garbanzo beans.

ABOUT THE AUTHOR

Lindsay Vacek has a passion for style, details and design. As a Fashion Editorial Photographer, she's worked in the Entertainment Industry for over 10 years and has a love for adventure and travel. She spends her spare time globe-trotting her way through foreign countries and loves new cultures, food, music, and arts.
Being a California Native, Lindsay loves meeting new people and sharing her version of life with others. With an infinite list of things-to-do, places to go and sights to see - she believe everyone can have a little more California in their own lives.
FOLLOW HER ON: INSTAGRAM / TWITTER / PINTEREST

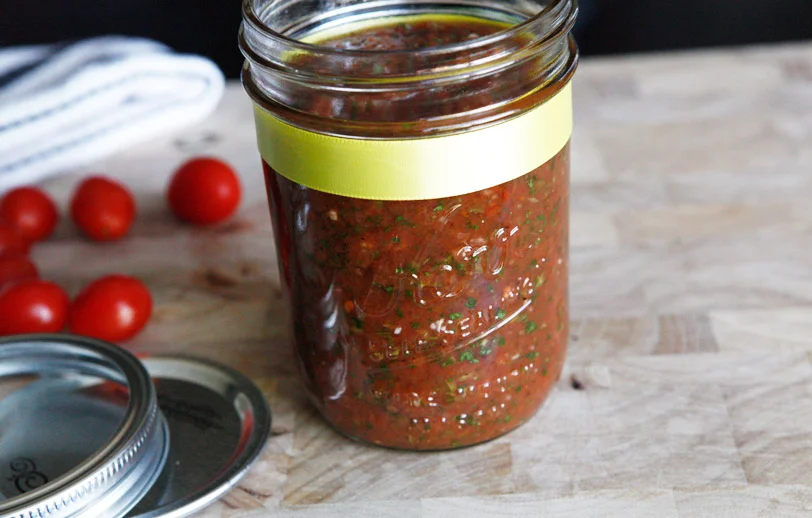
NICOLE'S HOMEMADE HABANERO PICO DE GALLO SALSA
I have always loved spicy food – but never really knew how much (or how committed I was to it) until I spent an extended period of time in Mexico. I stayed at Papaya Playa Project in Tulum, Mexico and Chef Umberto made the most amazing Habanero Salsa. I finally convinced him to tell me how he made it!

Image via Amazing Paleo
I have always loved spicy food – but never really knew how much (or how committed I was to it) until I spent an extended period of time in Mexico. I stayed at Papaya Playa Project in Tulum, Mexico and Chef Humberto made the most amazing Habanero Salsa. On my last day there I finally convinced him to tell me how he made it and he shyly said to me: “Bonita, it’s so facil. You roast some habaneros peppers, add some salt, vinegar and water – blended it all together and muy BUENO!”
I’m telling you – this salsa was SUPER SUPER make- you- sweat SPICY!! So, armed with Chef Humberto’s recipe, I decided to try making my own at home. As I went shopping I thought to myself that there was probably a better (different) way to make the salsa. Some way that you still got the flavor of the Habaneros but it wasn’t so spicy that you could barely breath (although a lot of us at Papaya Playa Project craved it that way – it was that good!)
Here is my version. So far I’ve gotten rave reviews. It’s a combo of Pico de Gallo and Habanero (remember: this is a design-by-taste recipe so taste often).
Disclaimer: It is worth mentioning that I rarely follow recipes and measurements. I believe you should taste as you go and alter according to your likes. I don’t use measuring cups other then the palm of my hand. For some reason, there is something really down-to-earth about that process. I dare you to try it….in my opinion it makes the experience, and the joy of cooking, that much better! I also find that I put way more effort into my cooking when I know that I am sharing with others. There’s something so gratifying by giving delicious food to people and hearing them rave about it (and come back for more). So without further ado, some of the best salsa I’ve had out there to date and I am proud to call it my own.
Nicole’s Homemade Habanero Pico De Gallo Salsa
Prep Time: 20 minutes
Cook Time: 45 minutes
Ingredients
9 habanero peppers
4 large hothouse tomatoes
3 plump limes
medium red onion
5 – 7 cloves of garlic
bush of cilantro
Himalayan salt (about 5 pinches, but season to taste)
1/2 cup water
1/4 cup vinegar
garlic powder (to taste)
Instructions
Place nine habaneros on a pan and roast in the oven at 350 degrees for 45 minutes. While roasting, prep the rest of the ingredients.
Chop the tomatoes to your desired size. Once the tomatoes are chopped squeeze in your limes (remember to roll them on the counter before slicing – it helps get the juices flowing) and add salt to start marinating. Remember, from this point, to mix well (and often) every step of the way. Also, don't be afraid of the tomato juices, it helps make the salsa salsa!
Finely chop up about half of a medium red onion plus half of the bushy part of a bunch of cilantro (or a tad more) along with the garlic cloves (about five). Mix altogether and let it sit while you wait for the Habaneros to be done. This is definitely a good place to taste with a tortilla chip and/or a taste tester to get the salt levels right. Remember, this is your base. So, when tasting, get it to a place where you would be happy eating this for the mild version all on it’s own.
Once the Habaneros are finished roasting, pluck them off the stems and throw the entire group of peppers into a food processor (seeds and all). I’m sure a blender would do here as well although the spice may stick to the machine so I wouldn’t use the same one you make your morning smoothies with.
Add a scoop of the Pico that you’ve made (juices included) and blend. Pulse and blend again. Pour in the water and vinegar. Then add a bit more salt and some garlic powder (to taste - if you don't need it, don't add it!). Keep adding a few more scoops of the Pico up until the liquid line in the food processor. This just helps blend and distribute the spices. Taste. If it’s too spicy then you can add a little more vinegar (but remember you will be mixing it with a lot of pico shortly so it will naturally dilute down the spice).
Combine the remaining Pico mixture and the food processor salsa into one big bowl. Mix well, taste, perhaps salt a little more and enjoy!!
Don’t forget to share with your co-workers, family and friends! They will appreciate the efforts and you’ll earn some points by being able to make something so tasty!
Please note: the quantities in this recipe makes about three 16oz size jars. Because of the citrus and vinegar, these should easily last a week. Next time, I will try freezing some and report back. Enjoy!


ABOUT THE AUTHOR

Nicole Woods is a California native who has worked in the entertainment industry for sixteen years. She is an internationally traveled entertainment executive by trade, yet a California woman at her core. California identifies who she is; down to earth, successful, beautiful (inside and out), positive and always looking for more.
With a passion for finding her own journey and a love for all categories this publication includes, now, no matter where she is in the world, she can always have a part of home with her and a community to share it with.

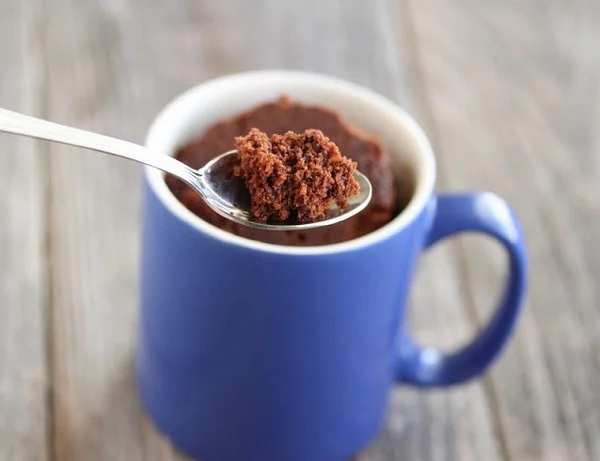
THE BEST FIVE-MINUTE CHOCOLATE MUG CAKE
Maybe you had a bad day or you’ve been eating healthy all week and just can’t curb that sweet tooth that has been pestering the last couple hours. I’m a big advocate for finding alternative ways to still curb those cravings while not breaking your calorie bank account.

Image via U Cake Decor Ideas
Maybe you had a bad day or you’ve been eating healthy all week and just can’t curb that sweet tooth that has been pestering the last couple hours. I’m a big advocate for finding alternative ways to still curb those cravings while not breaking your calorie bank account. So I am here to tell you that “Yes! You really can have your cake and eat it too!”
This 5-minute Chocolate Cake recipe is paleo-friendly, gluten-free and vegan. It’s loaded with ingredients that are natural and easy for your body to process so you don’t have to feel guilty about it. It’s super fast and single-serving in a mug so your cook time is fast and clean-up is easy! However, it’s a lot of chocolate goodness, so why not share with a friend? The more the merrier, right?
5 Minute Chocolate Mug Cake
Ingredients
¼ cup Almond Flour
¼ cup Coconut Flour
¼ cup coconut sugar
4 tbsp unsweetened cocoa powder
¾ cup unsweetened coconut milk
1 tbsp coconut oil, plus extra for greasing
2 tsp dark chocolate chips (sub. carob chips for Vegan)
1 pinch salt
Instructions
In a small glass container, warm the coconut milk and coconut oil just until it is melted.
Add sugar, cocoa powder, salt and mix with a whisk until smooth. Then add in Almond flour and coconut flour last (coconut flour is a very absorbant flour so it’s important it is added last). Mix until you have a smooth, even consistency. If it’s too thick, add a tbsp of coconut milk at a time until your batter is smooth.
Coat the inside of a glass or ceramic mug with a little bit of coconut oil. Then spoon in your cake mixture. Top with the chocolate chips and heat in the microwave until the middle bounches back when pressed (about 2 minutes). Allow to cool for 2-3 minutes, then enjoy!


ABOUT THE AUTHOR

Lindsay Vacek has a passion for style, details and design. As a Fashion Editorial Photographer, she's worked in the Entertainment Industry for over 10 years and has a love for adventure and travel. She spends her spare time globe-trotting her way through foreign countries and loves new cultures, food, music and the arts.
Being a California Native, Lindsay loves meeting new people and sharing her version of life with others. With an infinite list of things-to-do, places-to-go and sights-to-see - she believe everyone can have a little more California in their own lives.
FOLLOW HER ON: INSTAGRAM / TWITTER / PINTEREST
